Our view at Stack - Shopify has just about everything you need if you're looking to sell online. It excels with unlimited products, user-friendly setup, and 24/7 support. It offers 6,000+ app integrations, abandoned cart recovery, and shipping discounts up to 88%. Plus, it allows selling both online and in-person, scaling as your business grows.
Whether you’re starting a new business or moving an existing one online, launching an ecommerce site is an opportunity to benefit from rapidly growing sales channels. But to best position yourself, you need the right platform.
When Rod Johnson and Cesar Parnell, co-founders of the specialty beverage company BLK & Bold, were ready to create a website, they considered all their options.
“We started with a little bit of experimentation—maybe Wix, Squarespace, WordPress,” says Rod, chief values officer.
Ultimately, they launched their business with Shopify because of the platform’s comprehensive ecommerce features and user-friendly design.
“What compelled us to go with Shopify over the others was how intuitive it is,” Rod says. “Some of those other solutions are more segmented, but Shopify checked off significantly more boxes for us. Being the bootstrap entrepreneurs that we were at the time, it made more sense for us to reduce as much overhead as we possibly could.”
Rod recommends Shopify for entrepreneurs looking to reduce time to market.
“If you want as few barriers to entry as possible, I highly recommend leveraging Shopify, because it’s all in one place,” he says.
You can use Shopify to design and launch your online store in just a few steps. Here’s how to get started on your ecommerce journey.
How to set up a Shopify store
- Create a Shopify account
- Add products
- Choose your theme
- Customize your site
- Add a custom domain
- Configure shipping settings
- Set up payments
- Choose your plan
- Add pages
- Connect apps
- Create a test order
- Launch your store
Follow this beginner’s Shopify tutorial to get your online business up and running:
1. Create a Shopify account
Visit Shopify and complete account setup. A Shopify Basic plan starts with a three-day free trial. After your trial expires, your first month costs just $1. After that, it costs $39 per month.
From your account, you can explore your Shopify admin dashboard, the control center for your ecommerce business. Click through the vertical menu on the left-hand side to familiarize yourself with the dashboard’s key features. You’ll revisit the dashboard to design your online store, create marketing campaigns, organize customer information, manage inventory, and monitor performance.
2. Add products
Select “Products” in the left side of your browser window. Choose “Add product” to navigate to the products section of the admin dashboard.
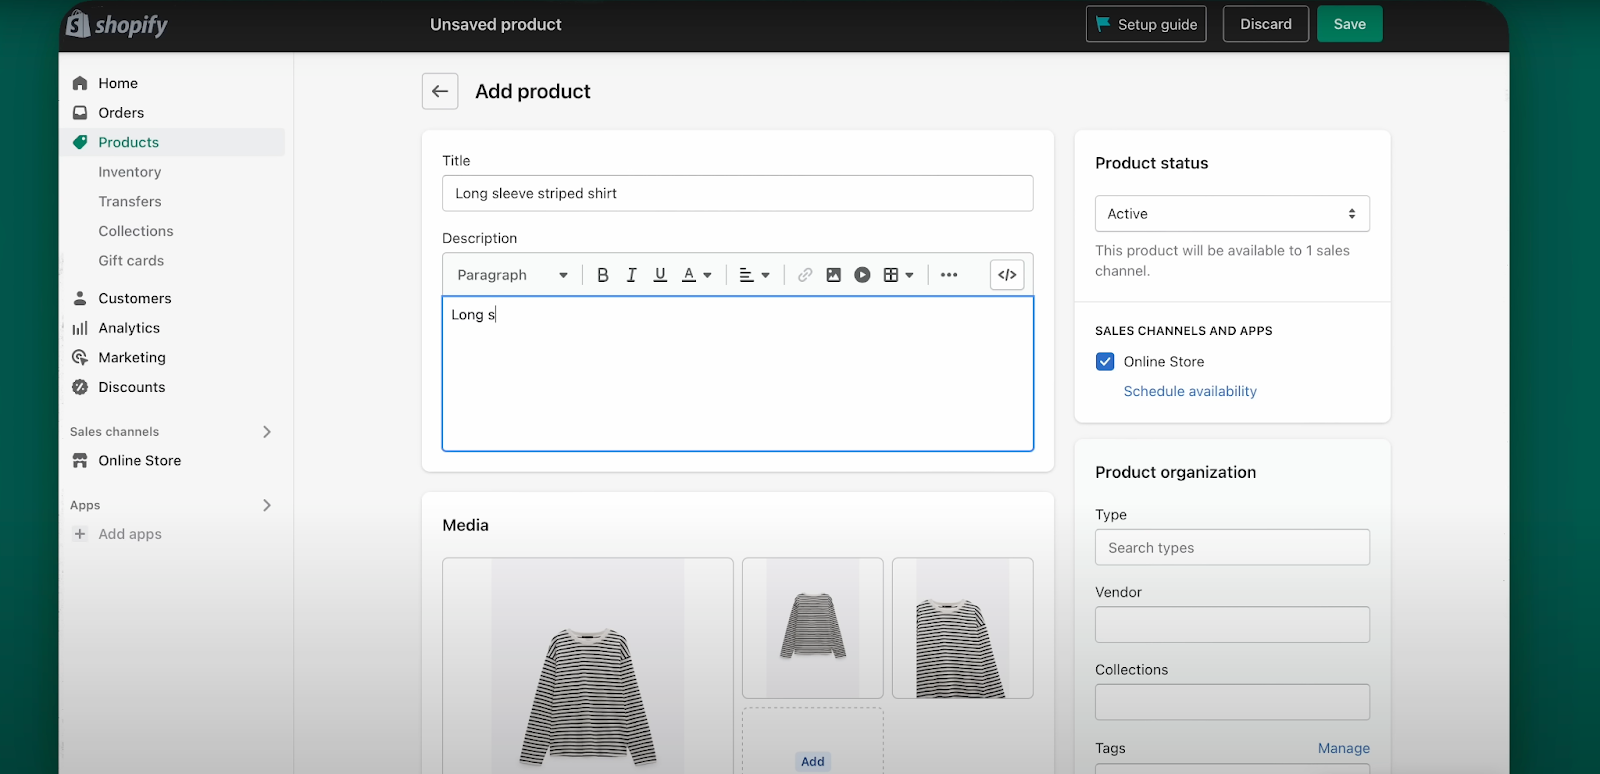
Input your first product title and description, upload images, and add pricing information. You can also add a product category, product variants like color or size, stock keeping unit (SKU) or barcode information. Next, select sales channels, configure tax and inventory tracking options, and edit the product’s search engine title and description.
When you finish adding your first product, click “Save.” You can add the rest of your products now or save this task for later, but consider adding a few items to start. This will make experimenting with product display options more productive when you choose your design theme.
3. Choose your theme
Shopify themes are pre-built templates that help you jumpstart your store design, organizational method, and store features.
Explore more than 100 free and paid themes on the Shopify Theme Store. Select the best fit for your site, and customize it to meet your specific brand and functionality requirements.
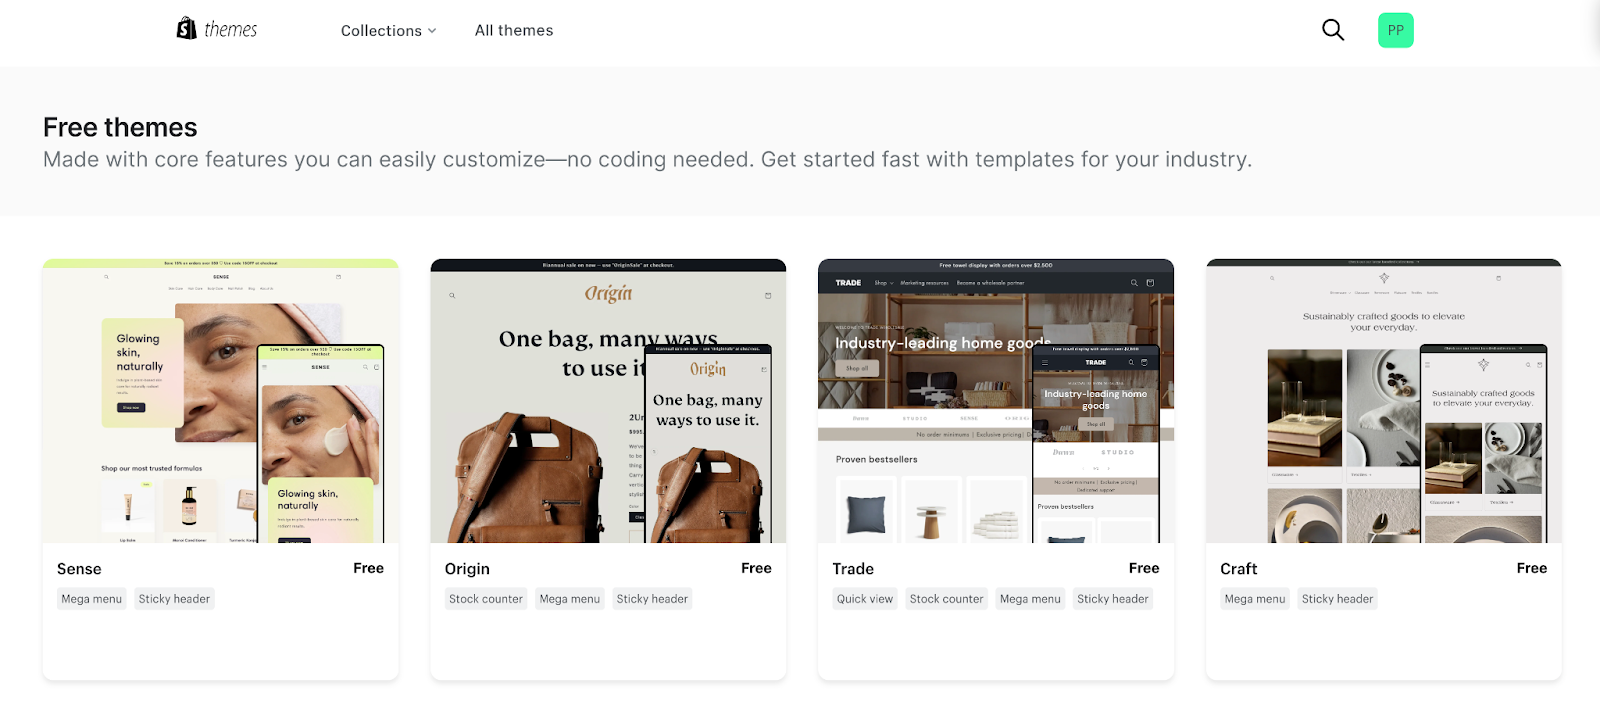
From the setup guide, select “Customize your online store” and “Customize theme.” The admin dashboard will display your current theme at the top of the section. Scroll down to “Theme library” and click “Add theme,” then “Visit theme store.” Browse the store, selecting “All themes” to view the entire library or “Collections” to filter results by style, feature, or price.
Find a theme you like and click “Try theme” to add it to your theme library. Return to your theme library, click the “Publish” button below your new theme name, and click “View your store” in the upper-right-hand corner of your browser window to preview your design.
Experiment with various themes until you find one that suits your organizational needs and brand guidelines.
4. Customize your site
Navigate to the themes section from the setup guide—or by selecting “Sales channels,” “Online store,” and “Themes” in the vertical menu on the left-hand side of your browser window. Scroll down to your current theme and click “Customize” to open your site editor.
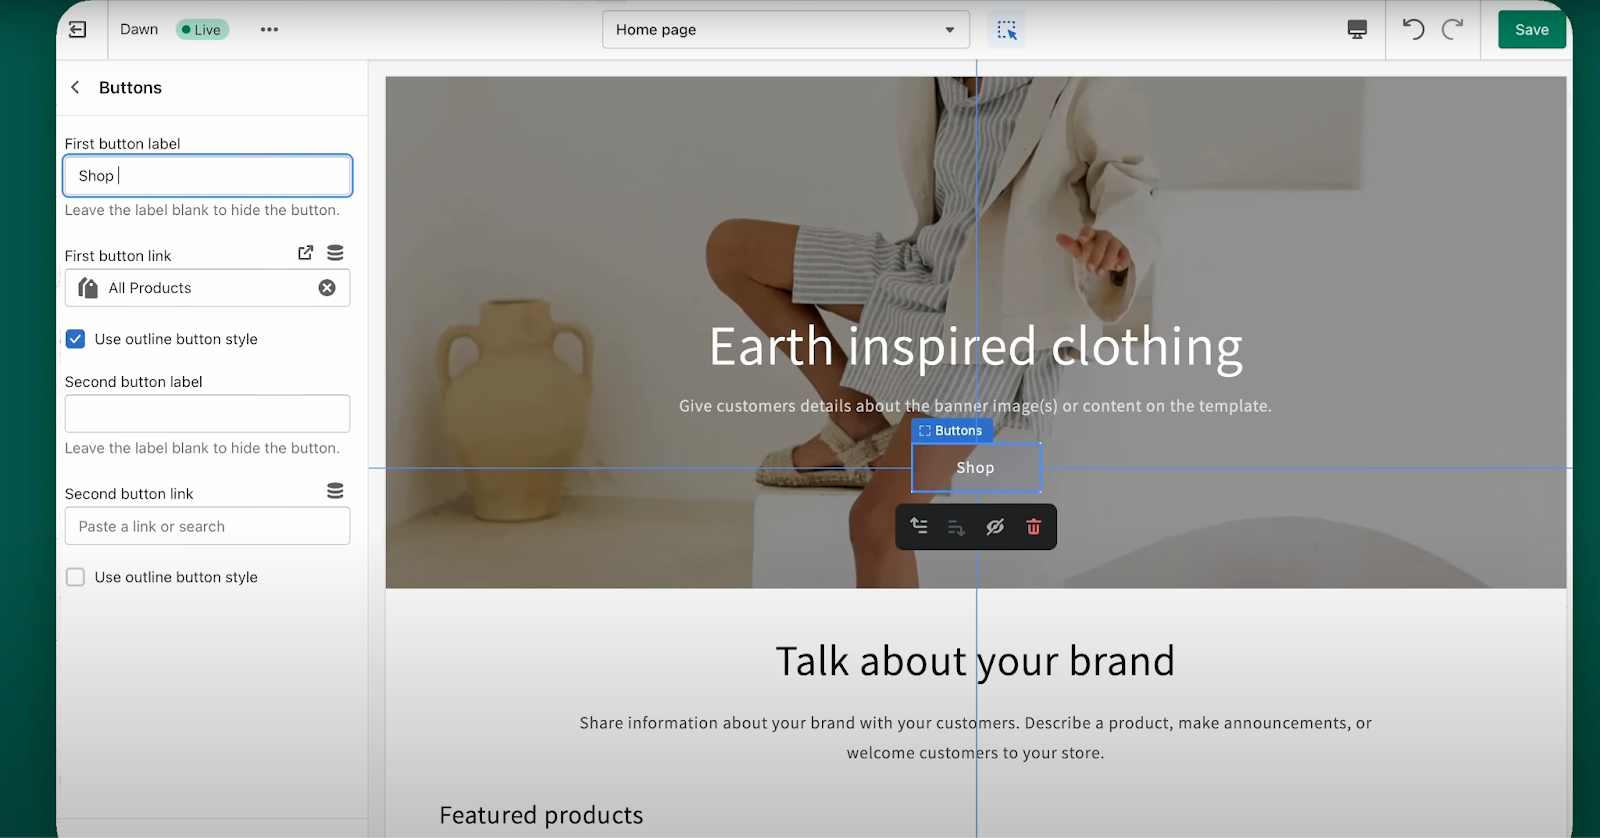
Use this tool to edit individual pages, add content, and customize your theme settings. To edit page content, locate the vertical menu on the left-hand side of your browser window and click the “Sections” icon. Then select a page from the dropdown list in the horizontal menu bar and update the displayed content using the live website editor.
To apply changes to your entire site, select the “Theme settings” icon from the vertical menu bar. The site builder will display a comprehensive list of settings including logo, colors, typography, layout, and media. Click on each one to view theme presets and apply changes. If you want to change your heading text font to align with your brand standards, for example, you’d select “Typography,” then “Headings,” then “Change.”
5. Add a custom domain
Your domain name is your online business’s URL. The default URL for Shopify stores is amyshopify.com domain. You can add onto this domain name for free, purchase a unique URL, or connect a custom domain you already purchased from a site like GoDaddy.
To navigate to domain settings, return to the setup guide and click “Sell products,” “Add a custom domain,” and “Add domain.” You can also navigate to this section by clicking “Settings” at the bottom left corner.
The dashboard will display your automatically assigned myshopify.com URL. If you already own a custom domain, click “Connect existing domain” and follow the prompts to connect it with your online store.
If you don’t yet own a domain, click “Buy domain” to purchase a custom domain from Shopify—often a version of your store name. You can also purchase a domain from a third-party domain name registrar and add it using the “Connect an existing domain” workflow.
6. Configure shipping settings
Return to the setup guide and select “Store settings,” then “Set your shipping rates” to visit the shipping and delivery section of the admin dashboard.
Shopify automatically adds domestic and international shipping zones, which determine shipping rates and can help you collect taxes. You can visit the Shopify Help Center to learn more about Shopify tax collection or consult a tax professional for support.
Use the admin dashboard to add and remove zones and adjust rates to match your shipping policy. If you’re planning on offering free shipping, for example, you might set domestic delivery fees to $0 and roll shipping expenses into product prices. You can also configure delivery methods, outsource your order fulfillment process to the Shopify Fulfillment Network, or use Shopify Shipping to calculate actual shipping costs for USPS, UPS, and DHL Express, order shipping supplies, and purchase discounted shipping labels.
7. Set up payments
From the setup menu, navigate to “Settings” and select “Payments.” Here you can activate Shopify Payments. Merchants who use Shopify Payments don’t pay transaction fees for payments processed through Shopify Payments, Shop Pay, or PayPal Express—or on cash payments or bank transfers.
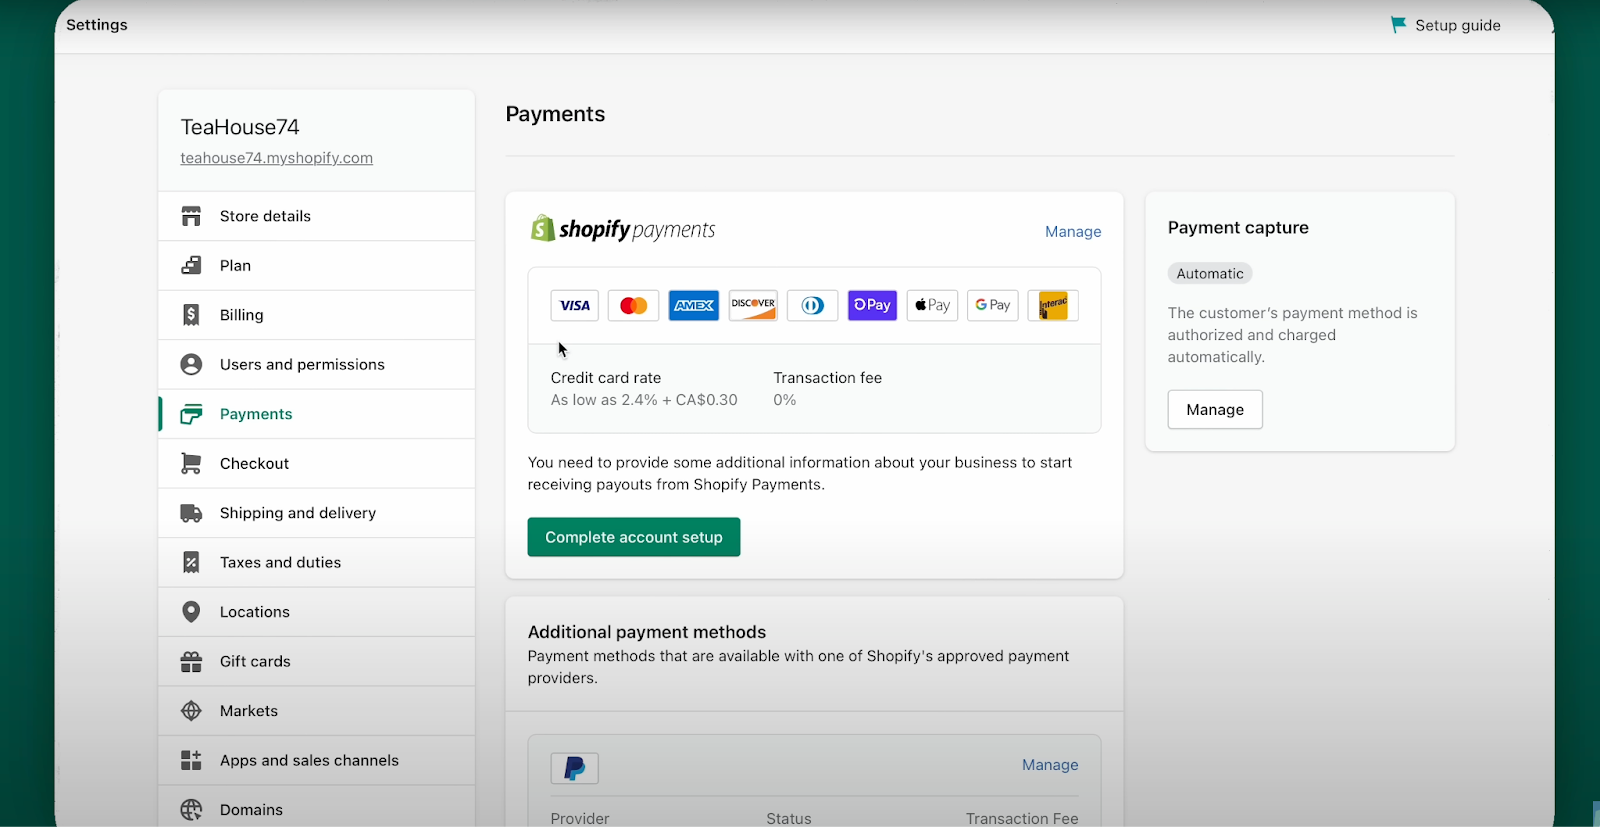
You can also use the dashboard to connect one of Shopify’s approved payment gateways or other payment providers and set up manual payment options, like bank deposits, money orders, or cash on delivery.
8. Choose your plan
From the setup guide, click “Store settings,” then “Pick a plan.” Shopify offers four plans: Basic, Shopify, Advanced, and Plus. The solo entrepreneur plan, Shopify Basic, includes one user account, 10 inventory locations, a point-of-sale system, and 24/7 chat support. Monthly fees are $39, billed monthly, or $29 per month, billed annually.
Compare all plans and view monthly subscription fees on the Shopify site. Choose your plan, select your billing model (monthly or yearly), and enter your credit card details—you can always change your plan later.
9. Add pages
Your Shopify store comes with a pre-built homepage, contact page, and checkout page, and Shopify creates and populates product pages as you add items to your store. You can edit page content in the site builder and configure your checkout page and customer account settings by clicking “Settings,” and then “Checkout” at the bottom of the left-hand vertical menu.
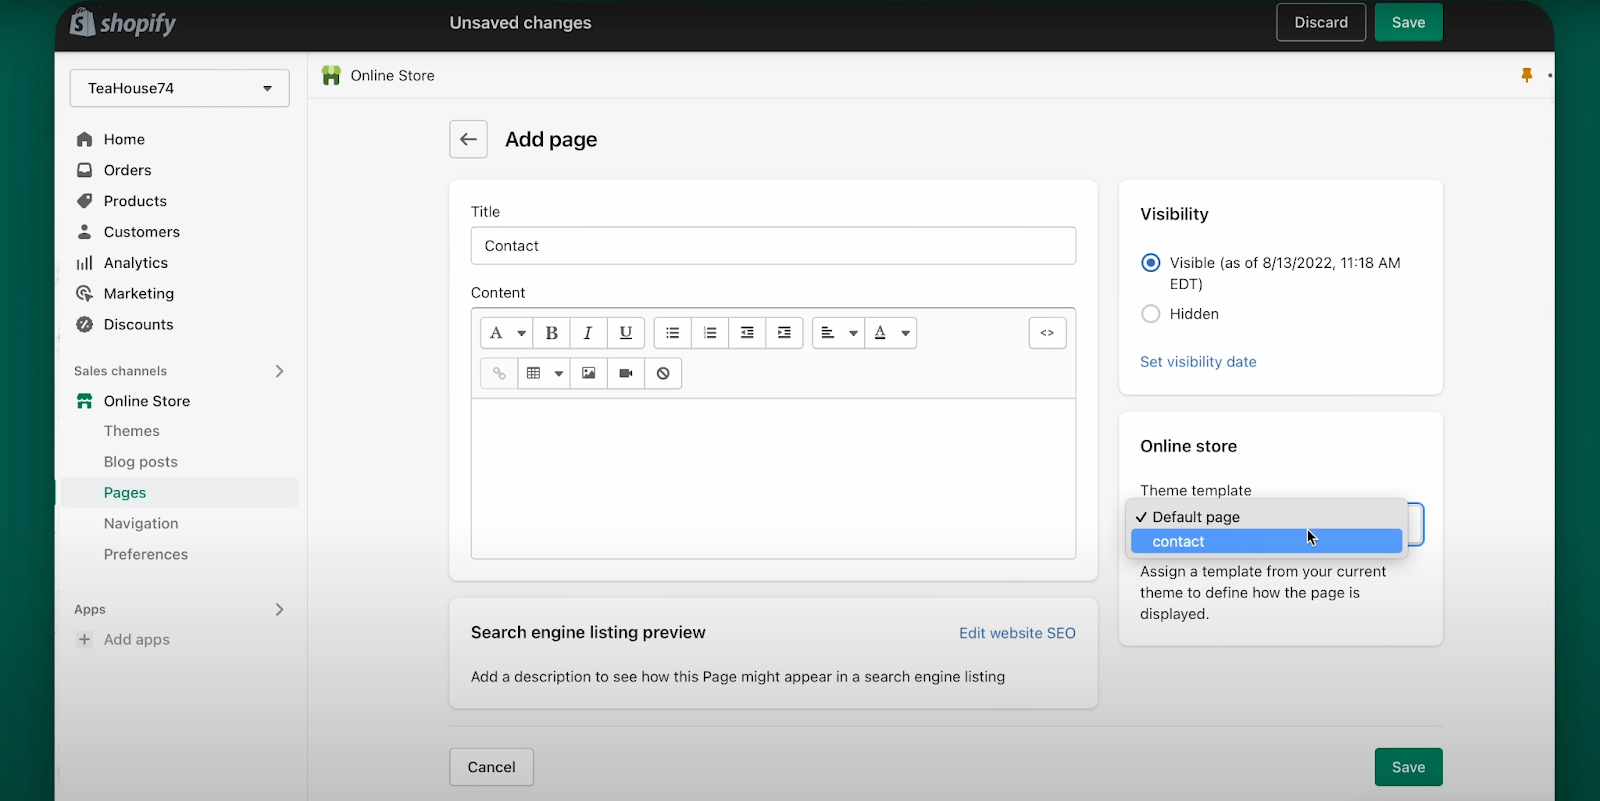
You can also add other page types, such as an About page showcasing your brand story or an employment page advertising career opportunities. To add a page, select “Online store,” then “Pages” from the vertical menu on the left-hand side of your dashboard. Then click “Add page” and input new page information.
10. Connect apps
Apps can extend the functionality of your online store. The Shopify App Store includes nearly 10,000 native and third-party apps to help you manage your store and other sales channels, fulfill orders, and drive traffic to your store.
To connect apps, select “Settings,” then “Apps and sales channels.” Click “Shopify App Store” to visit the App Store, then browse apps or use the search bar to locate apps by name or functionality.
For example, you might use search engine optimization apps to improve your performance in search engine results. Or select the “Marketing and conversion” section from the dropdown menu to view a collection of apps that help businesses generate organic traffic, boost conversion rates, and increase average order value.
11. Create a test order
Test orders ensure your checkout process is working and that your order processing, inventory, and shipping settings are correct before you launch your store.
Return to the setup guide and navigate to the final section, “Launch your online store.” Click “Place a test order” to view Shopify’s test order instructions. If you’re using Shopify Payments, you can place an order in test mode. You can also use Shopify’s Bogus Gateway or place and cancel an order from a third-party payment provider. In each case, you’ll visit your checkout page and place an order the same way your customers will.
Consider testing various payment methods and placing multiple orders using different devices. You can also test discount codes and input multiple shipment addresses to confirm that your site is calculating taxes accurately. Consult Shopify’s test order checklist for a guide to best practices.
12. Launch your store
Shopify automatically password-protects your store during the development process. Once you’re ready to launch, return to the setup guide and click on “Launch your site,” then “Remove password.”
Enter a homepage title and a meta description (the text that appears on a search engine listing section). Then add your social sharing image and connect Google Analytics or add a Meta pixel if applicable. Finally, scroll down to the password protection section and remove your password to launch your store to the public and start selling products online.
Shopify tutorial FAQ
Is Shopify easy to use for beginners?
Yes, Shopify’s intuitive platforms include everything a new ecommerce store owner needs to set up and operate a successful business. Visit Shopify to sign up for a free three-day trial and $1 for your first 30 days.
Can I learn Shopify for free?
Yes, Shopify helps new online store owners quickly and easily launch a beautiful, functional ecommerce site. You can sign up for free and start building online stores today.
How much money do I need to start with Shopify?
Shopify offers a three-day free trial, and you can pay just $1 for your first 30 days. After your first month, you can subscribe to the Shopify Basic plan for $39 a month.
If Shopify is of interest and you'd like more information, please do make contact or take a look in more detail here.
Credit: Original article published here.
