Our view at Stack - Shopify has just about everything you need if you're looking to sell online. It excels with unlimited products, user-friendly setup, and 24/7 support. It offers 6,000+ app integrations, abandoned cart recovery, and shipping discounts up to 88%. Plus, it allows selling both online and in-person, scaling as your business grows.
Running an online business is a juggling act. Between managing your store, wrangling supply chains, and keeping customers happy, finding time to post on Instagram when your audience is actually scrolling can feel impossible.
But here’s the thing: You don’t have to choose between running your business and nailing your Instagram strategy. With post scheduling, you can create content when it suits you and share it when it will make the biggest splash. Let’s dive into how to use this feature to boost your reach, engagement, and sales.
Why schedule your Instagram posts?
Scheduling your Instagram posts isn’t just a time saver—it’s a game changer for your social media strategy. Here’s why:
Save time, stay focused
Instead of dropping everything to post, batch your content creation. You’ll streamline your process, avoid constant interruptions, and keep your focus where it matters most—growing your business.
Keep your feed consistent
Your followers crave consistency. With a regular posting schedule, you’ll keep your audience engaged and coming back for more. It’s a simple way to build brand loyalty without breaking a sweat.
Reach more eyes
Use Instagram Insights to uncover when your followers are most active, then schedule your posts to hit those peak times. The result? More impressions, wider reach, and better engagement.
Plan like a pro
Rushing to post can lead to sloppy captions and missed opportunities. By scheduling, you can craft your messages carefully, plan for upcoming events or promotions, and ensure your content always puts its best foot forward.
How to schedule Instagram posts natively
- Set up a professional Instagram account
- Create and edit your content
- Schedule your post
Scheduling Instagram posts is straightforward, even if you’re new to social media. Here’s how to get started:
1. Set up a professional Instagram account
Convert your personal Instagram account to a business profile:
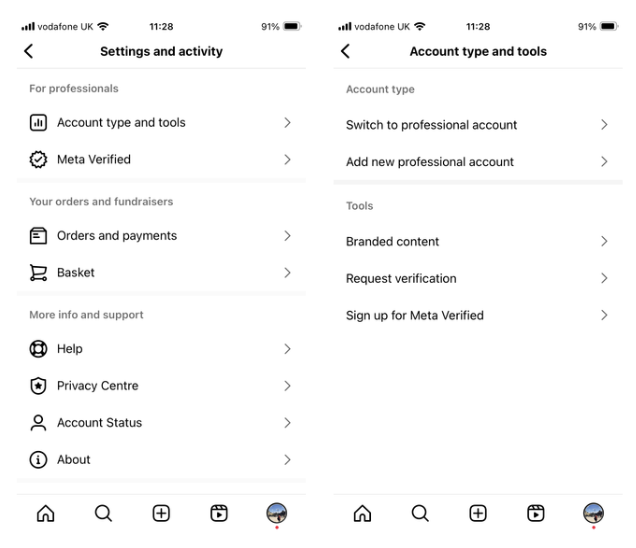
- Open the Instagram app and tap the menu button in the top right corner.
- Tap “Settings,” then “Account types and tools.”
- Select “Switch to a professional account.”
- Follow the prompts to choose your industry and add contact information.
2. Create and edit your content
- In the Instagram app, tap the + button, then choose Post or Reel.
- Record new content or upload existing media from your phone.
- Add captions, effects, filters, music, text overlays, or AR elements.
3. Schedule your post
- Tap the arrow (Android) or Next button (iPhone).
- Select “Advanced settings” then “Schedule this post.”
- Choose a date and time (up to 75 days in advance)
- Tap Done, then back, and finally, Schedule.
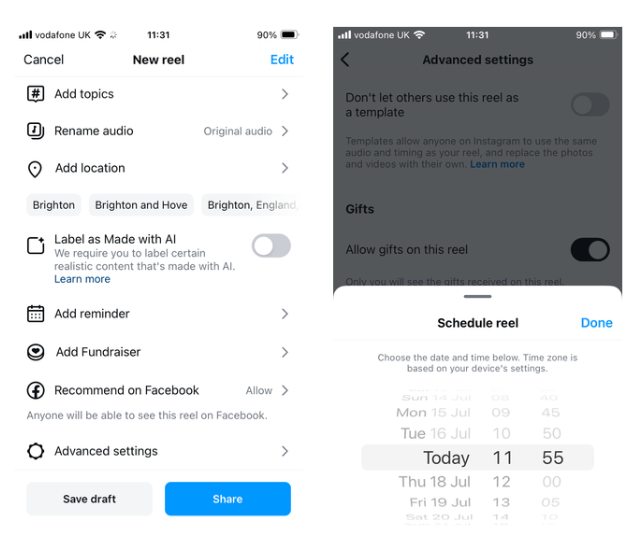
By following these steps, you can efficiently plan and schedule your Instagram content, allowing you to focus on other aspects of your business while maintaining a consistent social media presence.
How to schedule Instagram posts with Meta Business Suite
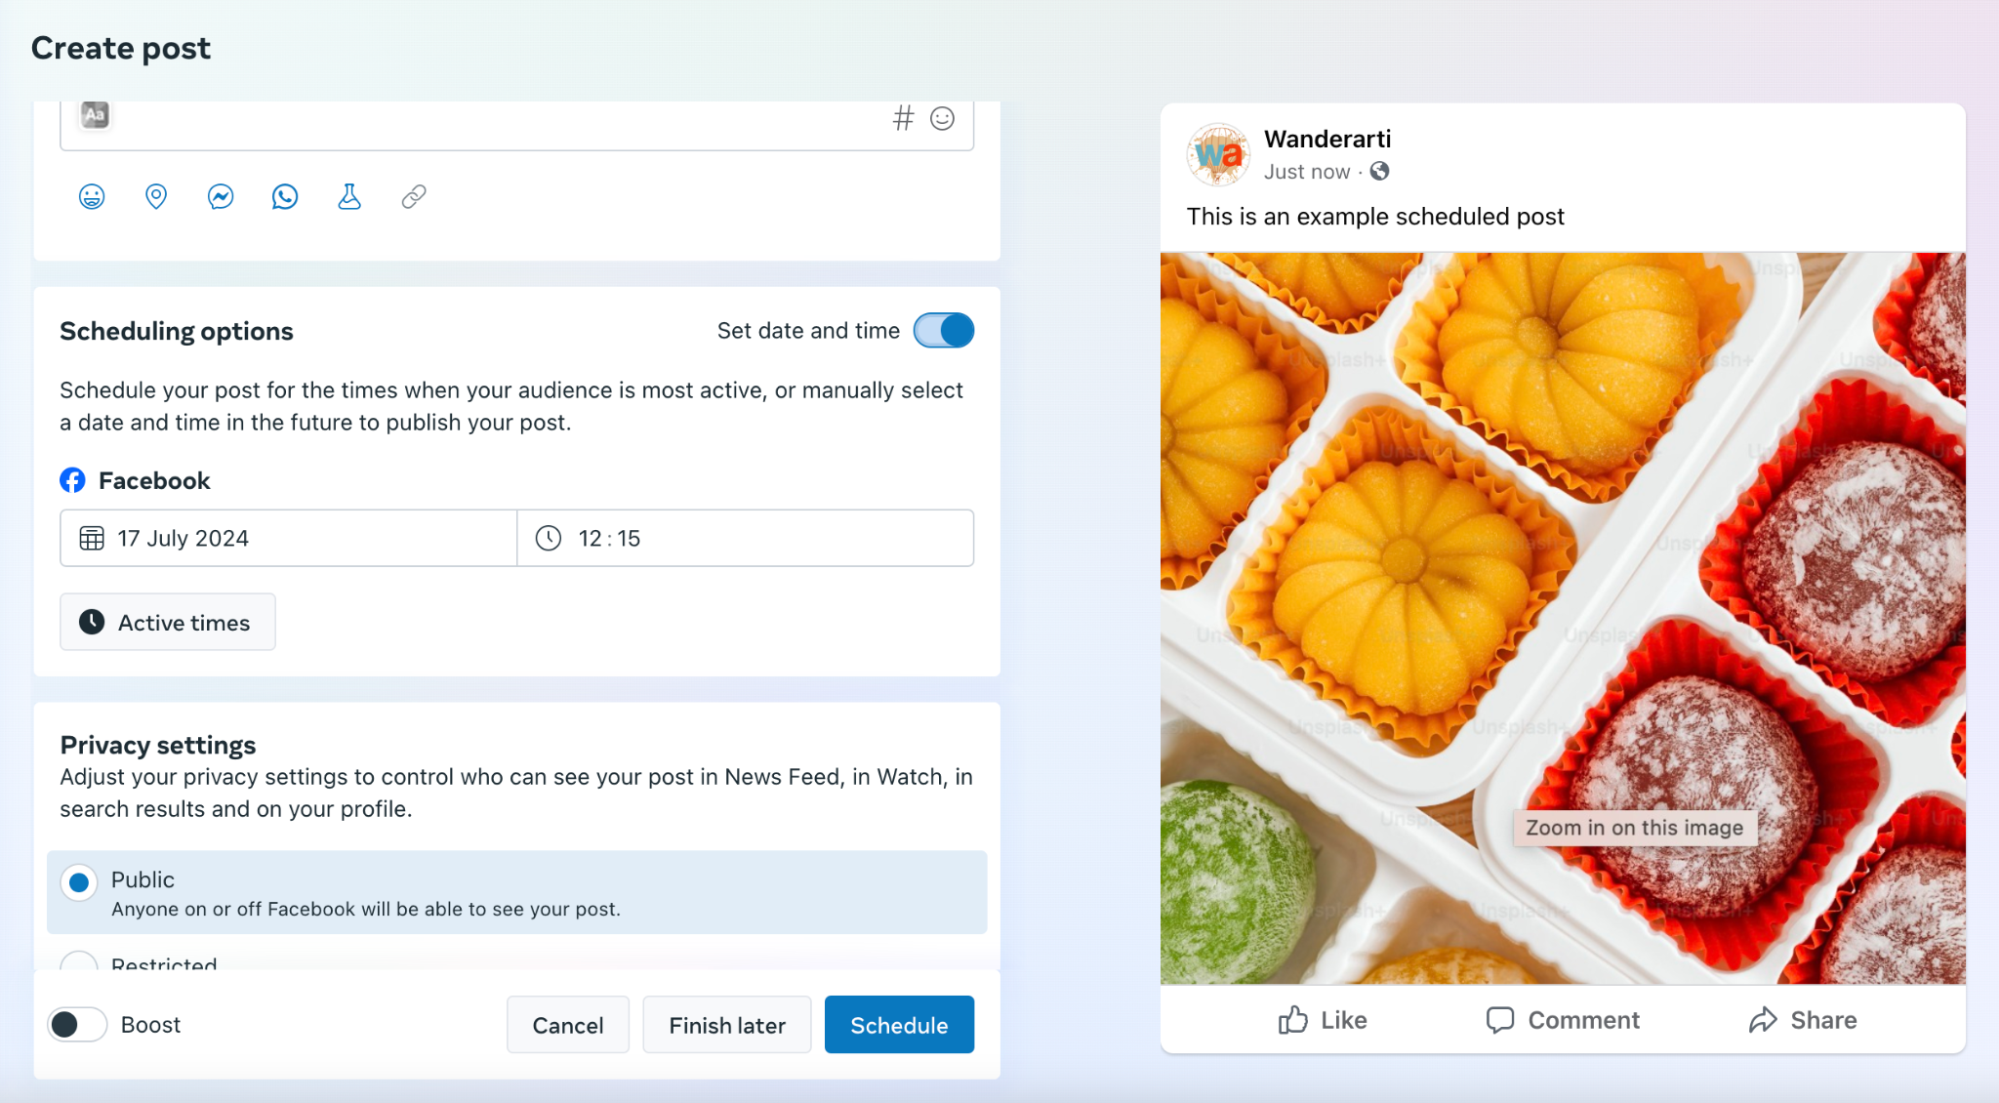
Meta Business Suite allows you to schedule both Instagram and Facebook posts in one place. You can view all your scheduled content in a visual social media calendar and create new posts directly within it.
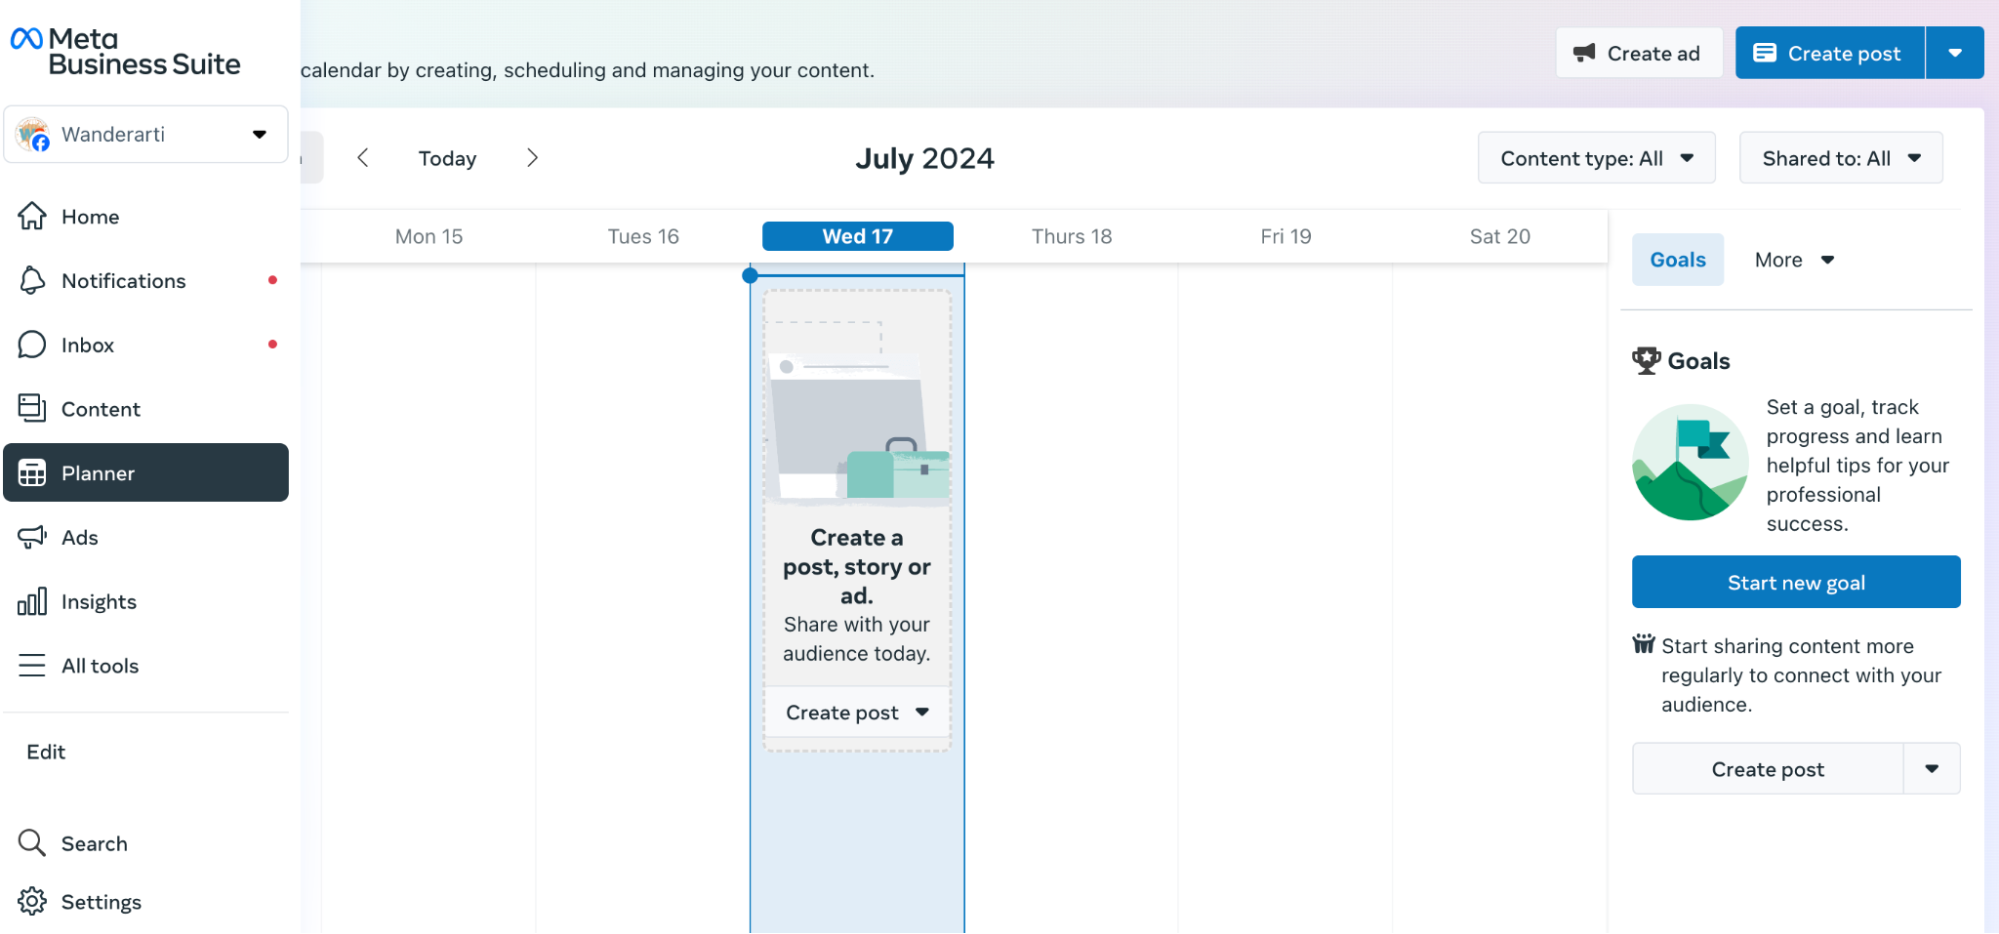
Here’s how:
- Log into your Facebook business account at business.facebook.com.
- Connect your Instagram account to Meta Business Suite, if you haven’t already.
- Navigate to the “Planner” or “Content” section.
- Click “Create post.”
- Choose where to post the content.
- Add your text, photos, videos, and links.
- In scheduling options, turn on “Set date and time.”
- Choose your publish date and time.
- Click “Schedule” to finalize.
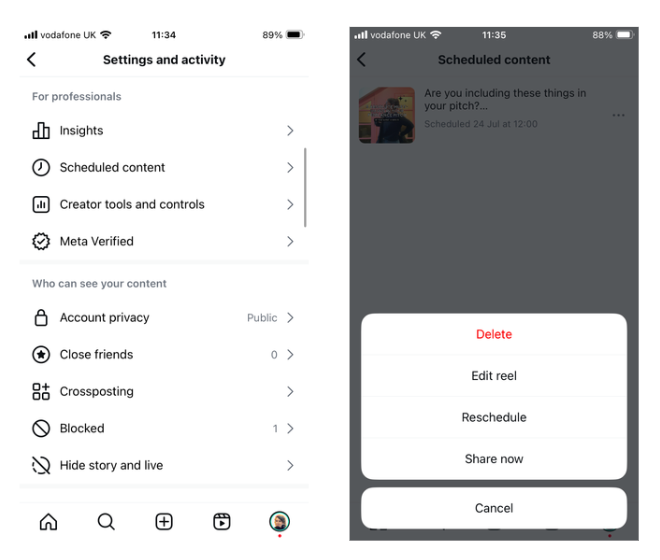
Managing scheduled Instagram posts
Need to edit a scheduled post? Here are two ways to do it.
From your Instagram profile:
- Go to your profile in the app.
- Tap the menu button in the top right corner.
- Tap “Scheduled content.”
- Tap the three dots beside the post you want to edit.
- Choose to “Reschedule,” “Share now,” or “Delete.”
From the Create menu:
- Tap the + button in the app.
- Tap Post or Reel, then Scheduled.
- Tap the content you want to change.
- Choose to Reschedule, Share now, or Delete.
These methods give you flexibility to adjust your content strategy as needed.
5 best Instagram scheduling tools
While Instagram’s built-in scheduler is a good start, it lacks some advanced features. Here are five popular social media management tools that offer more robust scheduling options:
- Buffer. Offers a browser extension for quick sharing, customizable posting schedules, and built-in analytics.
- Hootsuite. Allows auto-posting and bulk scheduling. Provides custom recommendations for optimal posting times based on your audience analytics.
- Later. Schedules feed posts, Reels, and Stories. Offers hashtag suggestions and a drag-and-drop content calendar.
- Sprout Social. Schedules various post types, including Stories and Reels. Features ViralPost technology for finding the best time to post on Instagram, and a unified content calendar.
- SocialPilot. Enables bulk scheduling of up to 500 posts at once. Includes a content library and AI-powered assistant for generating captions, hashtags, and post ideas.
These tools sync with multiple social platforms, making it easier to manage your content across channels.
Best practices for scheduling Instagram posts
Scheduling shouldn’t drastically change your social media marketing strategy. Keep these best practices in mind:
Engage with your followers
Set aside time to respond to comments and questions when your posts go live. This engagement builds your brand voice and encourages followers to return.
Sync across social channels
Coordinate your content across platforms using a social media management tool. This ensures consistent messaging and demonstrates professionalism.
Develop quality content
Use the extra lead time to plan and create high-quality posts. Consider testing content internally before sharing with your target audience.
Avoid overposting
More isn’t always better. Posting too frequently can lead to follower fatigue. Aim for three to five posts per week to maintain engagement without overwhelming your audience.
Scheduling Instagram posts FAQ
Why isn’t the schedule option showing on Instagram?
Make sure you have an Instagram professional account (business or creator). If you do, try updating your app to the latest version. If this doesn’t work, it might be a temporary glitch.
Is scheduling Instagram posts free?
Yes, it’s free. You just need a professional account (creator or business), which is also free to set up.
Are there drawbacks to scheduling Instagram posts?
Scheduling too far in advance can make it harder to react to immediate changes or trends. Your posts might not reflect current customer preferences or inventory changes if scheduled too early.
How do you pick the best time to schedule Instagram posts?
Use Instagram Insights to see when your followers are most active and likely to engage. This data can help you schedule your posts for maximum impact and engagement.
If Shopify is of interest and you'd like more information, please do make contact or take a look in more detail here.
Credit: Original article published here.
