Our view at Stack - Simplify growth with an all-in-one platform. Powerful marketing, sales, and support automation. Integrated CMS. Scalable software. Crafted for customer experience.
You’re out with friends, laughing, having a grand old time — when someone asks the group a total brainteaser: “Why don’t ‘B’ batteries exist?”
You’re stumped. Your friends are stumped. You whip out your smartphone and type the question into the Google machine. And boom: Up pops a battery company’s blog post on the nationally uniform specifications for the size of battery cells. It’s exactly what you were looking for, you nerd.
But here’s the thing: The content on the website is loading as if you’re looking at the site on the desktop. In other words, the font and pictures are really tiny, and you’re finding you have to zoom in and scroll back and forth to read and interact with the content. Now that’s an annoying user experience.
This is an example of a viewport issue.

What’s a Viewport?
A website’s viewport controls the width of a webpage for the device a user is viewing it on.
If you don’t configure your website’s viewport properly, you’re dooming your mobile visitors to several, frustrating minutes of pinching and zooming. (That is, if they even choose to stay on your site.) And trust me, that’s probably a lot of your website visitors, seeing as mobile search queries have already begun to surpass desktop.
If your website’s built on Content Hub, you don’t need to worry about configuring a viewport. Your site will automatically adjust to any device’s viewport. But if it’s not, even if you’re using responsive design, you’ll need to configure your viewport in order to offer a good experience to your mobile visitors.
In this post, I’ll show you how to do just that. But first, let’s get a little better of an understanding of how viewports work and what they look like.
What Your Site Looks Like With a Viewport vs. Without
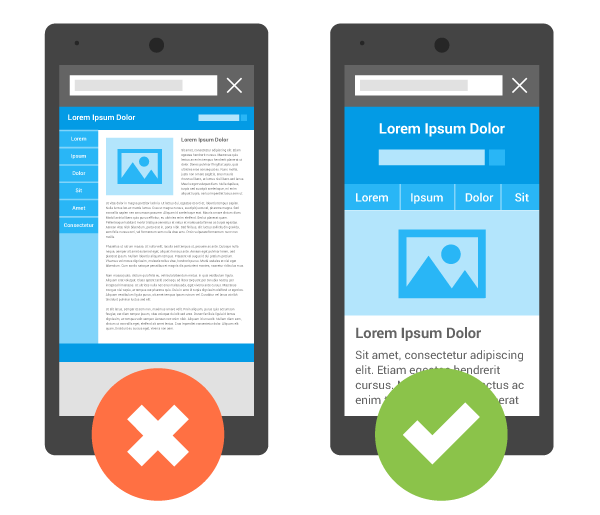
When you don’t set a viewport for mobile devices, those devices will render a webpage at the width of a typical desktop screen and then scale to fit the screen so that the text and graphics are super small. This is called the “fallback width,” and it ranges from 800–1024 pixels.
When you do set a viewport for mobile devices, the webpage’s width will scale automatically to a user’s mobile device, giving them a much better experience.
What does that look like? Below, the screen on the left doesn’t have a viewport configured, so the mobile browser assumes desktop width. The screen on the right does have a viewport configured, so the mobile browser knows to match the device width and scale the page so the content’s easily readable.

Image Credit: Google Developers
First, Check to See If You Have A Viewport Configured Already
To check, go to the Google Mobile Ready Check website. Paste your URL into the empty field and hit “Submit” at the bottom. The tool will run your website through Google’s mobile-friendly test, and if your viewport is not configured, it will tell you.
If your viewport isn’t set up, keep reading.
How to Configure Your Website’s Viewport
To configure a mobile viewport, all you have to do is add a meta viewport tag to any and all webpages you would like to be mobile-friendly.
To do this, simply copy the HTML snippet below and paste it in the header of your site.
<meta name=viewport content="width=device-width, initial-scale=1″>
In many cases, placing this viewport tag in the header file will have the viewport carry across the whole site, making your entire website more mobile-friendly. But be aware you may have to add the viewport tag to each and every webpage individually, especially if you use different software for your website versus your landing pages. If you’re not using an integrated solution like HubSpot Landing Pages or Content Hub, you’ll have to manually check to make sure your landing pages, site pages, and blog have this viewport tag so they’re mobile-friendly.
Note: Adding this tag won’t make your website responsive to mobile devices — that’s an entirely different process, described here — but it will make it so mobile users don’t have to zoom in and out and scroll back and forth to read and interact with the content on your website.
What’s with the red text?
If you leave the red text (“device-width”) the way it is, that just means you don’t want to set a specific width at which to display your content — and your webpage will pick up the size of your user’s device automatically. Most of you will want to do this.
If you do want to display a specific piece of content for a specific device for one reason or another, then you’ll want to replace that red text with the pixel width of the desired device. By setting a width within the tag (which, again, is not required), then any device will render at that specific width. (This is generally not recommended unless you have designed a page/site for a specific screen size. Also, you can’t set more than one viewport tag — you’ll have to pick one device size and stick to it.)
But let’s say you do want to set a specific width. For example, the width of iPhones vary, but say you want your site to display specifically for an iPhone 6 when a person’s holding it in landscape. iPhone 6’s have a landscape width of 667px, so you’d put this tag on your site:
<meta name=viewport content="width=667, initial-scale=1″>
All iPads have a landscape width of 1024px, so you’d put this tag on your site:
<meta name=viewport content="width=1024, initial-scale=1″>
Make sense? Here’s a complete list of viewport sizes for your reference.
Keep in mind that by stating that the width of your layout is equal to the device width, you’ll run into problems when users rotate their mobile devices. To get around this, you *could* use JavaScript to conditionally choose which meta tag attributes to go with, as Ian Yates points out in this blog post … but the simplest solution seems to be to ignore the width altogether and simply keep it at “device-width.”
The “initial scale” part of the HTML tag can stay at one no matter what. It just ensures that when someone opens your content, the layout will be displayed properly at a 1:1 scale. This helps your webpage take advantage of the full landscape width no matter the mobile device’s orientation (portrait versus landscape).
That’s it! Have questions? Ask them in the comments section.
For more tips on how to improve the performance of your website, check out our recently revamped Website Grader. This free online tool generates personalized reports based on your site’s performance, mobile readiness, SEO, security, and more.

![]()
If Hubspot is of interest and you'd like more information, please do make contact or take a look in more detail here.
Credit: Original article published here.
