• Skip to primary navigation
  • Skip to main content
software stack logo

Software Stack

Get your Software Stack together

  • Knowledgebase
    • All Categories
    • Accounting Software
    • Automation & Workflow Software
    • Customer Relationship Management
    • E-Commerce Shopfronts & Payments
    • Marketing Automation
    • Online Courses & Membership
    • Project Management
    • Surveys & Forms
    • Web Hosting
  • Home
  • About Us
  • Contact Us
  • Show Search
Hide Search

Webflow

How to create an event website: Tips for attracting attendees

Software Stack Editor · April 11, 2024 ·

Draw crowds with an event website that stands out.

No matter the type or size of the occasion, an event’s website is an essential launchpad where potential attendees engage and learn key information. It’s instrumental in attracting guests and influencing their decision to show up. After all, the best event sites also act as promotional material to drive ticket sales.

Below, we’ll unpack how to create an event website that balances aesthetics, function, and valuable content to deliver a seamless online experience and convince visitors to attend.

Do you need an event website?

If your organization hosts an event of any kind, you’ll benefit from an event website — even if you already have a dedicated business or organization site.

While you could choose to create an event page on your main site, designating a separate site lets you provide all event-related details in one accessible space. Particularly for complex or multi-day functions, an event site lets you use multiple pages to convey all logistics and information and prevents cluttering your main website. Presenting logistics and overviews in an organized format like this improves your visitors’ user experience (UX) and therefore drives conversions.

An event website, also known as an event-specific web platform, is a dedicated online location tailored for a specific occasion — like a hackathon, a product launch, or a virtual event for your company. It functions as a central hub of information. Here, event organizers offer logistical details like schedules, location, or ticketing information. It also provides a space for attendees to RSVP or buy reservations. Most importantly, an event site engages attendees before, during, and after an event.

This platform builds buzz before an upcoming occasion, especially when linked to promotional material or social channels. While an event is live, attendees may refer to the website to find information on schedules, speakers, and updates in real time.

And finally, the site serves as an archive of speaker bios, overviews, or recordings of panels and presentations for attendees to revisit later. This fosters a connection between the audience and your organization and maintains interest long after the event is over, which translates into customer conversions and continued user engagement.

Tips for crafting an effective event website

Creating an event site requires a slightly different strategy than building your main company website. While your primary website serves as a comprehensive source of information about your business, an event platform is hyperfocused on a single occasion.

Consider these practical tips to get started.

Understand your target audience

Before designing your event site, you need a deep understanding of your ideal audience. This target may be more specific than your main site’s, perhaps a particular segment of your customer base or a new audience you’re trying to attract.

To accurately pinpoint and cater to your event’s target audience, consider using a combination of market research methods. Surveys and user questionnaires reveal specific interests and preferences. A/B testing — where you present two versions of a page or feature to different user groups — lets you track and compare the number of sign-ups on both sites to highlight which design or content delivers the most conversions.

Knowing your audience lets you incorporate their preferences into your site so you can create content and features that entice them to attend an event. For example, if you’re organizing a design conference, participants might be drawn to exclusive hands-on workshops. Conversely, a book launch might attract fans eager for signed first editions.

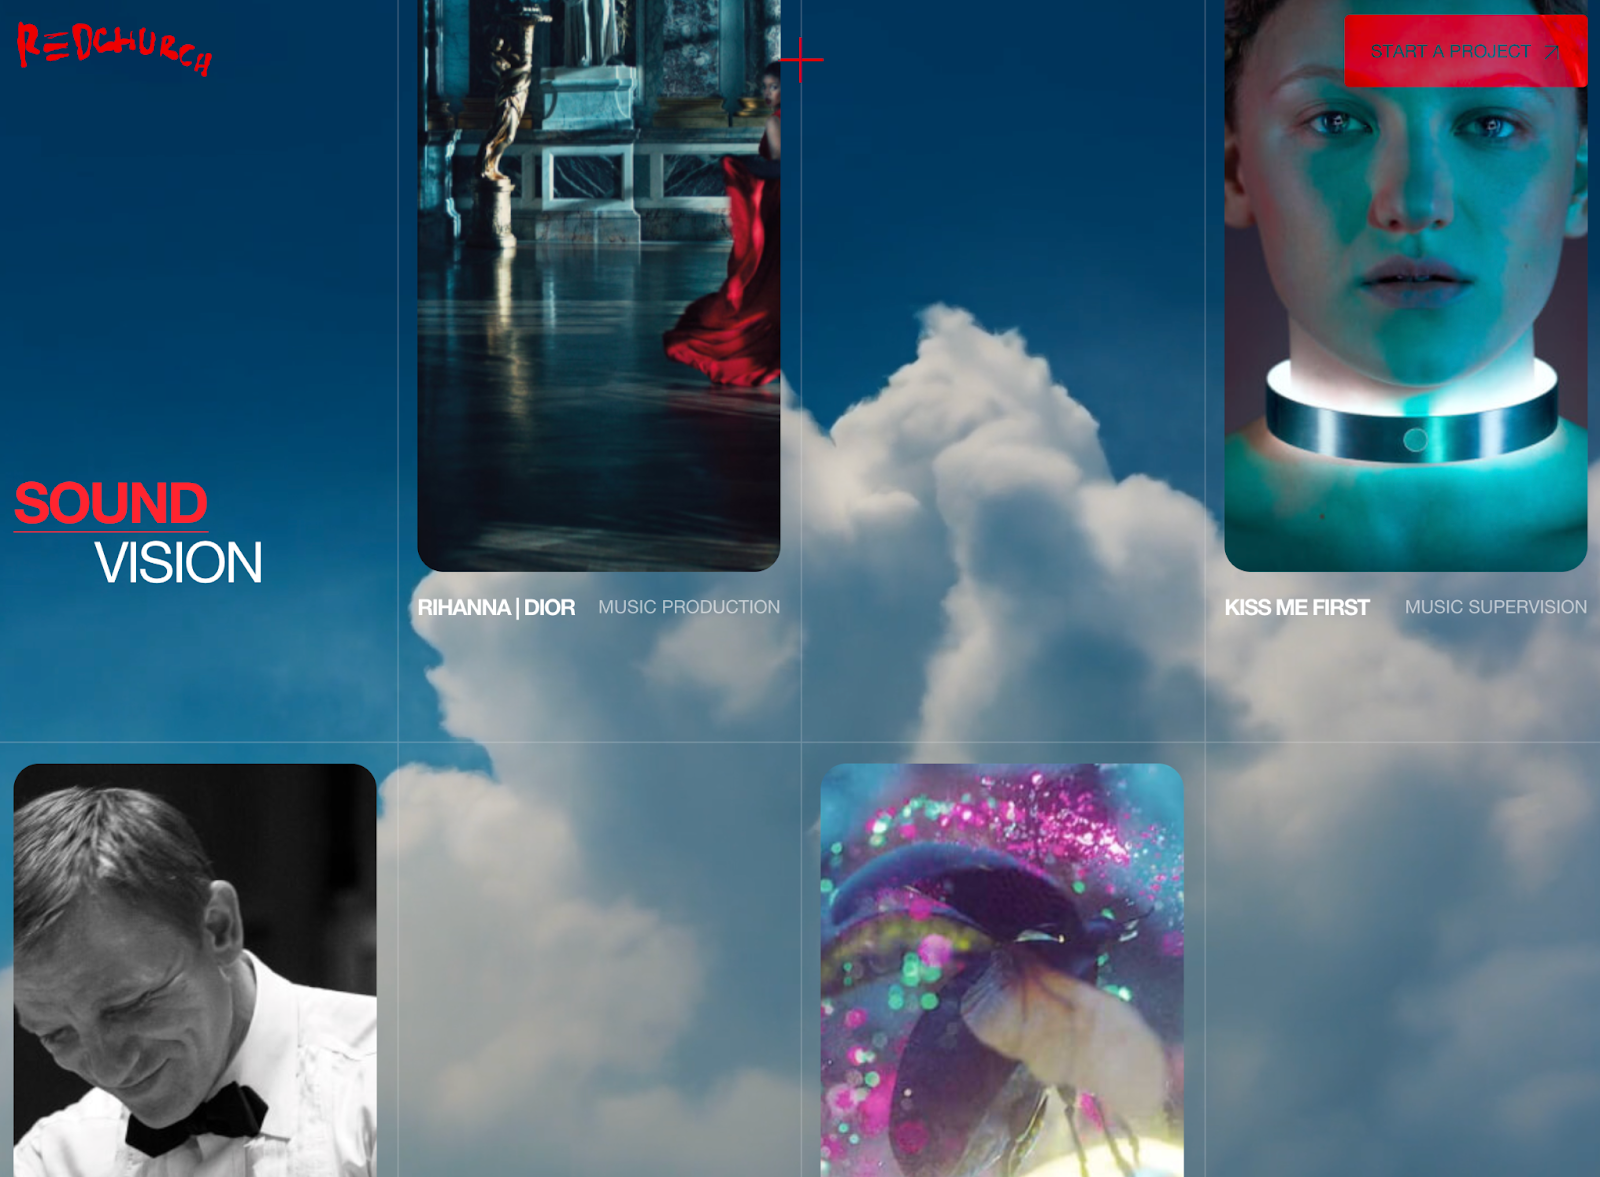
For example, Webflow Conf 2023’s event site was built to target our community of web developers, designers, marketers, and visual artists. Each menu and CTA button is interactive and changes color as you hover over it, showing design expertise through dynamic elements. Plus, ample white space ensures readers can sift through information without feeling overwhelmed.

As you scroll, you’ll see various locations and times with a brief overview of the conference, simplifying access to important information. Then, the site streamlines navigation to learn more — the menu at the top of the screen provides quick access to each location, with options to engage with workshops or view community events.

The site also highlights CTAs to additional resources, like other Webflow events and a keynote recap in video or blog form. Those who prefer recordings can watch the event back through the colorful “recordings” button in the menu, while those who favor text-based content can opt for articles.

Webflow Conf 2023’s homepage.
Source: Webflow

Understanding your target audience’s unique desires lets you customize your event site’s content and website design to resonate with potential attendees, enhancing engagement and boosting attendance rates to ultimately contribute to your bottom line.

Create a positive user experience

To encourage visitors to engage with your site, it’s essential to reduce user friction and provide a positive online experience. One way to enhance UX is with thoughtful design, like building a well-structured, user-friendly site. By making navigation intuitive, you empower visitors to quickly locate the information they need to decide whether or not they’ll attend your event.

For instance, consider creating a single-page site to quickly grasp and retain your users’ attention. For more complicated events with lots of logistics, such as multi-day summits with several concurrent sub-events and various speakers or panels, create specific pages for details like day-to-day schedules or speaker bios so you don’t clutter your main page.

Optimize for accessibility

You can also improve UX by boosting your site performance and accessibility. This requires fast page load speeds and data caching. Peak mobile responsiveness should extend to all devices to deliver an optimal experience, whether users are sitting at their laptops or browsing from their phones.

Including alt text for all visual components is essential to website accessibility, so be sure to provide concise but comprehensive written descriptions alongside images. This helps site visitors make sense of images they can’t view, which is especially key for including users who are blind or have visual disabilities. Alt text also displays in place of an image if the file hasn’t loaded or when a user has chosen not to view images.

Screen readers also enhance accessibility, particularly for readers with visual disabilities or limited sight. This assistive technology works alongside devices to convert text, images, and other visual screen elements into audio or Braille outputs. Screen readers function best with websites designed with their needs in mind, so research best practices for optimizing your site to pair well with this technology.

8 essentials to include on your event site

A website’s look and functionality aren’t enough to convince attendees that your event is worth their time and money — they need to care about your cause or be curious about the event’s topic.

So, aside from the practical aspects of building your site, you must create compelling copy about the event’s purpose to stir up interest. Your content should also establish trust and stave off logistical confusion by setting clear expectations for the event.

We’ve compiled a list of eight key elements to include on your event site.

1. Event details

Prominently feature key event information, including the event’s date, time, and location. You should also include an event calendar for a multi-day event with a detailed agenda. This not only attracts your attendees, but it also helps them plan and sets clear event expectations.

2. Registration and ticketing

Create a user-friendly and secure registration process so users will feel confident about their privacy when providing contact or payment information. This builds trust with your attendees and also encourages ticket purchases — if purchasing or registering protocols seem at all insecure, it’ll deter visitors from offering their personal information to sign up. Consider integrating with a third-party event platform to streamline the registration and ticket purchase process.

3. Speaker and presenter profiles

Highlighting your event’s talent is essential. Consider displaying speaker and presenter profiles with photographs, brief biographies, and the topics they’ll address. This not only lends credibility but also entices potential attendees with industry knowledge they stand to gain.

4. Interactive features

Engage your audience with dynamic elements — such as chats, polls, or virtual networking rooms — to help attendees form connections with each other (and your brand) before the event starts. For example, a Q&A feature where attendees submit questions to speakers in advance provides an interactive touchpoint and prepares the speakers for topics of high interest. This proactive engagement elevates the attendees’ experience and optimizes the event’s content by ensuring relevant and resonant discussions.

5. Visual content

Compelling visual content doesn’t just look nice on your site — it sets the tone for your event before it begins by lending a glimpse into the atmosphere and environment guests should expect. Use high-quality images, videos, and infographics to capture your attendees’ interest.

6. Social sharing

Integrate your event site with social media platforms to extend reach and boost visibility. You can promote the function on your organization’s main social channels, create separate channels for the event itself, and encourage speakers and promoters to share teasers and registration information on their own platforms to encourage their established followers to attend. This will help create buzz in advance of the event and continue the conversation afterward.

7. Contact information

Providing access to event organizers helps build trust and offers support to both potential and registered attendees. Rather than sharing your email — which could expose you to site crawlers that will lift and spam your address — consider using a contact form. Human interaction, even when virtual, encourages connection to your cause. Be sure to respond to any requests or inquiries so attendees feel personally cared for and confident in your organization’s attentiveness.

8. A prominent CTA

Calls to action, or CTAs, act as signposts that guide users toward desired actions, like registering for your event, purchasing tickets, or joining a community. Strategically design visually compelling CTAs and place them throughout your event site to improve engagement. Make these straightforward to act upon, not demanding too much effort from users — effort that might discourage them from moving forward.

For instance, the website for Zip Forward, Zip’s 2023 user conference, places clear “Watch now” CTAs below prominent event sections featuring company founders and team leaders. The demarcation ensures each speaker gets their own spotlight on the page and helps viewers quickly find guests and topics.

The green “Watch now” buttons contrast well against the black background and change color as you hover over them. Plus, the site includes images and videos to add visual references and a glimpse into the event. These subtle yet engaging designs prompt visitors to take action, inviting them to watch recordings and register for the company’s next event.

‍

A section of Zip’s 2023 user conference website showing links to video snippets from the event.
Source: Zip

How to promote your event online

Once you’ve built your event site, you’ll need to promote it to attract attendees and sell tickets. Check out these practical event promotion strategies to ensure a successful turnout.

Leverage social media marketing

Harness the power of social media marketing to create anticipation around your event. For instance, targeted advertising on platforms like Facebook and Instagram helps reach a wider audience. Also consider collaborating with influencers in your industry to expand your reach — advertisements on channels beyond your own will broaden your audience and showcase your event’s popularity.

Optimize for search engines

Pay attention to the importance of SEO for your event site to enhance its online visibility. Following SEO best practices, such as incorporating relevant keywords into your content and optimizing your metadata. These actions improve your site’s visibility in search engine results pages (SERPs), increasing your chances of reaching a larger audience.

Promote it through email marketing

Use email marketing campaigns to complement your event promotion efforts. These emails give you extra space to share event information, highlight key speakers, and offer exclusive early-bird discounts to incentivize ticket purchases. Craft your email content to be mobile-friendly and visually appealing to drive attendee engagement.

A place to create unforgettable experiences

An event website is more than just a digital brochure for your event — it’s the starting point for creating an unforgettable event from the moment attendees first land on your site. Strong event websites set the stage for pre-event promotion by building anticipation through compelling content, interactive features, and easy social sharing. This results in a smooth, engaging attendee experience.

If you’re ready to elevate your event website and create unforgettable experiences, explore the possibilities with Webflow Enterprise, a powerful visual website builder. Build a visually stunning event site to catch and keep your attendees’ attention before, during, and after your event.

How to optimize micro-moments in marketing to boost your business’s customer engagement

Software Stack Editor · April 10, 2024 ·

Transform queries into customers with micro-moment marketing.

Smartphone technology means you carry the internet in your pocket, with Google ready to answer any question in seconds, whether you’re searching for the nearest coffee shop or deal-hunting for vacation tickets.

These spur-of-the-moment situations are called micro-moments. They may seem insignificant, but they provide minute marketing opportunities where the right messaging or advertisement could turn users’ curiosity into conversions.

Learn about the different types of micro-moments and how to capitalize on them to improve your business’s bottom line.

What’s a micro-moment?

A micro-moment is a Google-coined term that describes the brief, intent-driven moments when users turn to a device — typically a smartphone — to fulfill a need, like answering a question, gaining knowledge, or making a decision.

Users have high expectations for relevant and immediate information, and those expectations are critical to a micro-moment’s makeup. And with queries coming in at such high volumes, there are ample opportunities to engage with your audience at numerous points in the customer journey.

The 4 primary micro-moments

Before developing your marketing strategy, you must understand these four micro-moments for delivering timely and relevant content.

1. I-want-to-know

I-want-to-know moments occur when a user wants information on a product or service without necessarily intending to make a purchase. The research includes product reviews, how-to guides, and topic-specific Google searches.

Say someone is curious about a cloud storage platform and wants to explore a potential purchase. An SaaS company selling cloud solutions can write a comprehensive review comparing their offering to other options and effectively capture the user’s attention by leveraging their interest to know more about the product.

2. I-want-to-go

I-want-to-go micro-moments are instances when users look for information about a specific brand or consider purchasing in a physical store.

For example, you may be searching for the nearest smart home device showroom. The company selling products can capitalize on this by optimizing their online presence for local search results. The company can use tools like Google Business Profile and provide an accurate address and aesthetic photos, enticing people to visit and buy their devices.

3. I-want-to-buy

In these instances, users are ready to buy a product or service and need assistance. They actively look for the best places to buy and research product information — including reading reviews or comparing prices — to make the best possible decision.

Consider a founder looking to buy project management software for their employees. They explore reviews, watch YouTube videos to compare brands, and search for the best deals online.

Businesses can leverage I-want-to-buy micro-moments by providing clear and concise product and service information, showcasing customer reviews to reinforce potential buyers positively, and offering a seamless purchasing process across their online and offline channels.

4. I-want-to-do

I-want-to-do micro-moments occur when a user needs help completing a task or learning a new skill. These intent-driven searches could be anything, like a company’s marketing head researching how to localize website content.

For instance, Webflow offers step-by-step guides, video tutorials, and articles on creating a localization strategy for those seeking practical knowledge.

A real-world example of micro-moment marketing

Starbucks embraces micro-moment marketing by strategically incorporating digital features into their customer experience.

Recognizing the I-want-to-buy micro-moment, the coffee and beverage giant introduced an order ahead feature that allows customers to place and pay for orders through the company’s mobile app. This caters to people in a hurry who want to skip the line in a physical store.

The company also sends personalized offers and promotions to customers based on location, encouraging them to visit the nearest Starbucks store. The strategy effectively targets I-want-to-go micro-moments and drives foot traffic to Starbucks locations.

Finally, Starbucks addresses I-want-to-know instances by providing informative content through their app and social media platforms that offer quick insights into new releases, recipes, and products.

The future of marketing is now

Thought leaders from Silversmith, Accel and Webflow discuss the current and future impact of artificial intelligence on the marketing landscape

Watch now

↗

The future of marketing is now

Thought leaders from Silversmith, Accel and Webflow discuss the current and future impact of artificial intelligence on the marketing landscape

Watch now

↗

Watch now

The importance of micro-moment marketing

Starbucks understands micro-marketing’s impact. They integrate digital strategies to improve customer engagement by providing value during various micro-moments throughout the day. Here are a few reasons this strategy is critical for a company’s success.

Prime users for engagement

Micro-moments represent precise opportunities for customer interaction. By understanding and responding to these moments, you can capture a user’s attention when it matters the most and when they’re likeliest to take action. And a targeted approach ensures the content you deliver is relevant and aligns with a potential customer’s immediate needs and intentions.

When competing with thousands of other businesses for a place on Google’s search engine results pages (SERPs), you can significantly improve your conversion rates by intercepting and engaging people during these micro-moments. It creates a positive user experience and imprints your brand’s name in users’ minds.

Build relationships with customers irrespective of scale

Any company — big or small — can use micro-moment marketing to increase brand awareness. Whether you’re a multinational corporation or a local startup, these moments offer equal opportunities to introduce your company, showcase your products and services, and win over consumers through targeted marketing and high-quality customer service.

Over time, crafting content that resonates with users during the four micro-moments allows you to establish yourself as a valuable resource within your niche.

Gain a competitive edge

Jumping on the micro-moment bandwagon gives you a head start in a saturated market. You can continually tweak your marketing strategy, make mistakes, and refine your approach to suit customers before rivals adopt similar methods.

And consistently identifying and capitalizing on emerging micro-moments differentiates your company from the rest because you’re more responsive to customer needs. With a proactive stance, you can position yourself as an industry leader with a positive reputation and establish a solid foundation for long-term success.

4 steps for implementing micro-moment marketing

Micro-moment marketing is about creating meaningful interactions that lead to conversions. Following these four steps, you can guide users through the sales funnel and improve your bottom line.

1. Understand your audience’s micro-moments

First, conduct thorough research to identify the specific micro-moments relevant to your target audience. You can use data visualization tools to gain insights into popular searches and analytics software to analyze consumer moments that signal intent.

Consider a fitness app. During I-want-to-do moments, users look for quick workout routines and nutritional tips. Considering this, the company might tailor content to address these moments so they can capture interest and provide instant value.

2. Optimize the mobile experience

Because micro-moments often occur on smartphones, you must optimize your website and digital platforms for mobile responsiveness, including quick page loading times, effective homepage designs, intuitive navigation, and secure payment gateways.

For example, a retail company streamlines the purchasing process for users in the I-want-to-buy moments by providing precise product information for quick decision-making and implementing a one-click checkout option for conversions.

3. Create bite-sized content

After understanding your audience and incorporating responsive design, develop content that fits micro-moments’ urgency, like bullet-listed answers or short how-to videos for common queries.

Say a travel company creates short video guides highlighting local attractions for I-want-to-go micro-moments. These videos are short, concise, and accessible across multiple platforms, ensuring people can quickly absorb the information to make decisions.

4. Focus on location-based moments

Incorporate location-based marketing, such as geotargeting. This helps address I-want-to-go micro-moments by spreading ads in a specific area and reaching users near your physical business locations.

Imagine you operate a franchise with hundreds of physical stores across the country. You can send personalized offers and discounts to users near your store to capitalize on their intent to explore and encourage impromptu visits and purchases.

Develop engaging micro-marketing strategies with Webflow

Incorporating micro-moments in your marketing strategy is seamless with a visual-first website-building platform like Webflow, where you can create high-performing, responsive webpages to attract visitors.

Plus, large organizations can use Webflow Enterprise to host data-heavy websites supported by robust security measures and scalable infrastructure. Boost engagement, future-proof your digital ecosystem, and grow your business with Webflow.

Webflow for Enterprise

Loved by designers. Trusted by enterprises. Bring Webflow in-house at your company with advanced security, custom traffic scaling, guaranteed uptime, and much more.

Learn more

↗

Webflow for Enterprise

Loved by designers. Trusted by enterprises. Bring Webflow in-house at your company with advanced security, custom traffic scaling, guaranteed uptime, and much more.

Learn more

↗

Learn more

Last Updated

April 10, 2024

Theming with design tokens at Webflow

Software Stack Editor · April 9, 2024 ·

Last October, we launched our new UI redesign during Webflow Conf.

In January, we followed that up with the successful launch of new appearance settings in the Designer that allow users to choose between a default, darker, or brighter theme.

You might be asking; how did we facilitate such large-scale design updates and manage to keep the UI visually consistent? The answer: by using design tokens and CSS variables.

In this blog, we’ll explore the ins and outs of the behind-the-scenes magic that makes these large UI changes possible.

How we utilize design tokens and CSS variables

Like many companies, Webflow uses Figma to create mockups of new features. Our designers leverage design tokens – key-value pairs that use Figma’s Variables API – within their mockups.

At Webflow, we have over one hundred design tokens in Figma that cover nearly every aspect of CSS styling: colors, backgrounds, font sizes, borders, border radii, sizing, spacing, and more. We’ve carefully curated this robust collection of tokens over time through close collaboration between our Design System team and the rest of the design organization.

For example, we might have a design token for our default text color that looks like this: Text/Default: #C4C4C4. We might also have a design token that can be used as a margin or padding value that looks like this: Space/space-1: 4px. We even have some tokens that point to other tokens as their value.

We use these design tokens to create CSS variables in our code. For instance, the design token for our default text color that we saw earlier becomes var(–colors-text-default), which we can then use as the value for the CSS color property for some HTML element like this:

color: var(--colors-text-default)

That variable references an underlying color token:

–colors-text-default: var(–core-colors-gray-400);

And these color variables are then tied to our base hex values:

–core-colors-gray-400: #C4C4C4;

Usage in our code

Given that Webflow is a mature codebase that has seen several iterations of both JS-based and CSS-based styling solutions over its lifetime, implementing design tokens was not a trivial task. To further complicate matters, the codebase had numerous occurrences of hard-coded style values, which led to inconsistent styles and bespoke component designs.

We first took the time to unify our systems so that they could all use the same set of CSS variables. Then we replaced any hard-coded values to instead use those variables. The unification process took a couple months to complete. This initial work was well worth the effort though, as we now have a single source of truth for our design tokens and styles.

Our CSS-based style system using .less files defines all of our design tokens as Less variables that can be used in other .less files. Our JS-based style system defines all of our design tokens inside what essentially boils down to an object of key-value pairs.

This allows us to style our elements using CSS/LESS like this:

.button {
  color: @d2–textDefault;
}

Or to style our elements using our internal JS-based style system like this:

const HelpText = emotionStyled(‘div’)({
  color: tokens.colors.textDefault,
});

The important thing to note here is that everything is using these tokens and variables. We don’t have any instances of hard-coded base style values anywhere anymore.

We even have tooling in place to proactively catch instances where developers have tried to add hard-coded style values in pull requests in GitHub! This tooling traverses the abstract syntax tree (AST) of the code and reports any style values it encounters that don’t use our design tokens. This way we can keep our codebase clean and prevent future regressions of non-ideal style usage.

Making style updates

Having this setup in place enables us to make large-scale UI changes fairly easily.

If we want to update our default text color to be something else, we update the design token value in one place in Figma and in one place in our code. Then, the rest just works. Because all of our frontend code is using these tokens, when a token’s color value is changed, the color gets updated everywhere all throughout our app.

That’s the dream, right? To update once and see the effects everywhere. No more hunting down hundreds or thousands of instances where a color was used and replacing them, hoping you caught them all.

This system also makes theming much easier. We mentioned earlier that the Designer allows you to choose between a default, darker, or brighter theme. To support these three themes, we have three theme config files that contain all of the design token values for each theme. The variable names are the same for each theme (and enforced by TypeScript!), but the values are different. And since our components reference the variable names in their styles, switching between each theme just works for every component. All we have to do is swap out the set of tokens and values used in our app based on the currently selected theme, and the styles get applied everywhere.

const lightThemeColors: ThemeTokens = {
  textDefault: coreColorTokens.gray[800],
  /* more tokens here */
};

const darkThemeColors: ThemeTokens = {
  textDefault: coreColorTokens.gray[400],
  /* more tokens here */
};

[embedded content]

Moving forward

With our current system in place, we can respond to customer feedback and deliver value to the business much more quickly. We’ve enabled ourselves to wrangle a complex, sprawling codebase and make UI style updates with ease.

So, what’s next? We’re now in a place where we can continue to refine the look and feel of our app without requiring a significant time investment. Could that mean light mode in Designer? Dark mode in Dashboard? Even further theme customization? No promises, but the possibilities are endless!

8 bug-tracking tools for developers in 2024

Software Stack Editor · April 9, 2024 ·

image

It’s preparation — not perfection — that makes for a bug-free product.

Bugs happen. Even the smartest web development teams can’t avoid them entirely. That’s because bugs can occur for various reasons — operating system changes, browser incompatibilities, and small errors, to name a few. 

The best way to prepare for these different issues is to implement a comprehensive bug-tracking system for capturing, tracking, and resolving them as you detect them.

Thankfully, bug reporting software is a well-established industry with many options on the market. Products called bug-tracking tools or defect trackers help your team develop a robust system to keep your operation running smoothly when pesky bugs skitter into your workflow.

Why do you need a bug-tracking system?

Any development team can encounter the many forms of website bugs, such as dead links, missing pages, and broken navigation. As you discover such glitches, it’s essential to have a system for intake, execution, and tracking. Without a methodical troubleshooting approach, your team will lose vital time and effort addressing repetitive issues. A proper bug-tracking system addresses the complex, time-sensitive nature of identifying problems and diagnosing causes before implementing an action plan. 

Here are the primary benefits you’ll gain from a robust bug-tracking plan.

Reduced disruption

Bugs are not easy to anticipate, and managing them disrupts your team’s workflow by adding extra labor and taking time away from normal operations. Even with a tracking system in place, malfunctions will still cause disturbance, but their overall impact lessens when you have a plan to combine and prioritize issues as they arise. 

Improved product results

To promote overall site performance, your development team must view bugs on the whole, rather than as isolated incidents. A bug-tracking system provides product managers and developers with a high-level view, identifying connections between issues, such as shared CSS classes or similarly-broken interactions. Spotting these connections may reveal solutions that address multiple problems at once.

Increased customer satisfaction

Customers tend to forgive even the most egregious malfunction when they feel the developers are working to fix it. A properly updated bug-tracking system gives community managers the information they need to share progress updates with your user base via announcements and newsletters. This transparency creates a culture of camaraderie and trust, discouraging users from fleeing en masse when your product faces a glitch.

4 elements of bug and issue tracking

Bugs can easily slip through the cracks without critical tracking components working together as a well-oiled machine. As you develop your bug-tracking project plan, map out these steps so your tool is ready to usher bugs through each resolution stage.

1. Detect

The most crucial part of a sound bug-tracking system is finding and capturing the bug. Reports come from many sources, such as support calls and user reviews. You might also detect problems when you measure your site’s performance regularly. Your team must be capable of detecting issues as soon as they appear so they can act on them swiftly.

After detecting a bug, determine its urgency. Typically, the more the bug negatively impacts the user experience, the more immediately you should treat it. This information determines which priority to assign the problem, informing how and when to solve it in your development cycle.

2. Track

Some bugs can resolve during a single development cycle, while others require more effort to identify and get rid of. Either way, your bug-tracking system must maintain a steady cadence of checking progress toward resolution. This information is vital for your community managers, who need to report progress to their audience regularly. 

3. Resolve

Your tracking approach should use a system of assignees, standard operating procedures (SOPs), and messages so developers and managers can resolve issues according to an optimized plan. This formal process makes it clear who’s doing the work and when. 

Here’s an example of how a team may approach a website bug:

  • A user leaves a review pointing out slow load times.
  • Your community manager notices this review and files a ticket in your bug-tracking software. They fill out a template that prompts them to provide relevant information about the issue.
  • Your product manager assigns the ticket to a developer and adds a message to suggest a timeline for fixing it.
  • The developer implements performance optimizations that improve loading times and assigns the bug back to the product manager for validation.
  • The product manager validates that the fix worked and then closes the bug.

4. Monitor

Even after you’ve resolved a bug, it’s best practice to keep monitoring the problem. The resolution might only work temporarily, which you’ll never know if you immediately stop assessing your fix. If you need help, there are monitoring tools like Pingdom and Site24x7 that can surface issues or keep an eye on problem areas. 

How to choose the right bug-tracking tool

To select the right system for your team, consider the essential elements that make an optimal bug-tracking solution. Some features may be more or less critical to your team, so weigh them carefully when selecting a tool.

Functionality

Some tracking tools are comprehensive task-monitoring apps with a wide variety of features. Others are specialized, offering a select suite of functions to serve a particular need. Consider which capabilities your team needs before selecting a bug-tracking tool.

Here are some standard features you might want from a tracking resource: 

  • Kanban board
  • Assignees
  • Customizable workflows
  • Issue templates
  • Access control

Interface

With all those features vying for importance, it’s easy for a bug-tracking tool’s interface to get messy. The best solutions use a combination of color coding, intuitive design, and careful simplification, resulting in a straightforward product. It’s best practice to try demos for many different products before selecting one to use long-term.

Integrations

Many bug-tracking tools have APIs enabling other software to share information. This feature allows for convenient functions like generating reports from email or advancing the troubleshooting workflow from within a collaborative tool like Slack or Microsoft Teams. These features might seem small, but the time they save adds up quickly.

8 excellent bug-tracking tools in 2024

Now that you know what goes into a smart bug-tracking tool, it’s time to explore the leading solutions in 2024. The following products earn high marks for their interfaces, functionality, and integration support.

1. ClickUp

ClickUp is relatively new to the scene, but they’ve quickly garnered widespread respect for developing a comprehensive yet easy-to-use task-tracking app. Enjoy the features you need to track glitches, like a Kanban board, assignees, and customizable workflows — all with an intuitive interface. It also supports integrations with Slack, Teams, and Google Drive.

2. Trello

Trello is a powerful task management tool that tracks issues visually via intuitive cards and boards. The board layouts are infinitely customizable, and the access control, time tracking, and assignee features are as robust as they come. 

Trello’s free version offers plenty of basic features, but you’ll need to upgrade to its premium plan ($10/month/user) if you need complete admin control and access to key features like calendars and dashboards.

3. Bugzilla

Bugzilla has been around since 1998, offering its service for free and updating regularly. It doesn’t provide as many features as its competitors, like Kanban boards or assignees, but it does offer an intelligent time-tracking tool and duplicate bug detection. For the price tag, Bugzilla delivers a valuable experience that can serve your team’s basic needs.

4. Zoho

Zoho has a massive library of products, many of which integrate well with one another. Zoho’s Bug Tracker is a comprehensive, feature-complete tool that supports assignees, custom workflows, and Kanban boards. It’s relatively easy to use with its intuitive design. But if you need to track many issues, you’ll want the premium subscription ($7/month/user) for up to 120GB of storage.

5. Asana

Asana is a streamlined task management tool that offers assignees, custom fields, and a Kanban board. Its custom workflow builder is impressively powerful and easy to use. It even tracks the time your teams take to move through each stage and delivers a report regularly.

6. Redmine

Redmine is a free, open-source bug-tracking tool with a pared-down but useful feature set. It includes access control, a shareable calendar, and custom workflows. But it relies on its few supported integrations to offer other features. For example, integrating with Orangutan enables time-tracking features, and implementing a webhook in Zabbix allows for automatic ticket generation.

7. Jira

Jira is an industry leader in project management and defect-tracking software. It offers all the features of its competitors, like custom workflows, templates, and access control. That said, Jira has a steep learning curve. Its search function requires a proprietary query language (JQL), access control is complex, and UI is less intuitive. It’s an incredible tool, but you’ll need to invest significant time into learning and introducing it.

8. Bird Eats Bug

Bird Eats Bug offers a revolutionary way to catch and report bugs. While it’s less effective than its competitors in tracking bugs, it stands out with its ability to harness them. This tool offers an intuitive browser extension that enables QA testers to capture bugs and report detailed logs with minimal button clicks. These reports can then transfer to tracking tools like Jira and Trello to automate task creation. With Bird Eats Bug, you can record your session and play it back to detect bugs without opening the developer console.

Move beyond the glitch with Webflow

Bug tracking relies on accurate, timely information. With Webflow, you can see a comprehensive log of site changes, helping you diagnose and resolve website issues as soon as they arise. If you encounter a particularly challenging bug, check out Webflow University for troubleshooting tips from our team of qualified experts.

The costs of ineffective collaboration — and how to avoid them

Software Stack Editor · April 8, 2024 ·

image

We often hear that managers should encourage independence, creativity, psychological safety—and collaboration with other teams. Collaboration can make your work better, but it’s still a delicate practice that takes work to get it right. 

In fact, most of us can think of a time (or several) when collaboration has gone poorly. A lot can go wrong when your work depends on other people: coworkers might show up to meetings unprepared, teams’ goals may be misaligned, or you end up  spending hours re-doing work because someone didn’t clearly communicate their vision. 

The consequences of failing to properly invest in processes that enable strong, effective collaboration can be debilitating on both your teams and your businesses. Below, let’s explore the hidden costs of mismanaged collaboration — and what teams can avoid them and set themselves up for success. 

The power of true collaboration

English scholar John Donne once wrote, “No man is an island, entire of itself” — a reflection of how humans are often reliant on one another and stronger as a unit. This sentiment, one where the whole is greater than the sum of its parts, is the core of why collaboration is so powerful. 

When teams within organizations are able to successfully come together to build and create, it can unlock innovative work that wouldn’t otherwise be possible. Marketing teams in particular must collaborate with other teams to put their ideas into action. For example, marketers often work with developers to build custom elements for a website and with designers to polish visuals for a feature announcement. 

Imagine asking an engineer to build a marketing website on their own, with no input from marketing — or asking a marketing team to plan a product launch without any input from the product team. It’s hard to imagine either of these projects going well without input and support from other players who can bring in expert knowledge, skills, and perspectives.

But this cross-team innovation is only possible when it’s managed well. 

Poor collaboration hurts everyone

Teams that don’t invest in effective collaboration may take on a variety of costs. Below, let’s explore what these costs are and their implications. 

Inefficient meetings waste time

If you’re not managing communication between your teams well, you risk wasting valuable time. For example, if cross-team meetings are spent bringing everyone else up to speed or steering people back on-topic, this signals a lack of clarity, agenda-setting, and direction from the meeting owner. 

Not only does this come with intangible costs — losing goodwill, a lack of trust, and an inability to maintain forward momentum — but also with monetary costs. If 6 people attended a meeting that failed to accomplish the core goal due to lack of preparation and strategy, and each earns an annual salary of $100,000, that hour-long meeting cost the company approximately $300 (1 hour x 6 people x $100,000 / 2,000 hours of work per year).

Inefficient asynchronous collaboration can also waste time 

Even outside of meetings, a lack of strategic alignment can massively waste time. For example, if you don’t communicate your vision clearly to the engineer who’s helping you build a reporting dashboard, you may both have to go through more iterations to get to the final product. Or, if you and another marketer are taking turns editing a slide deck asynchronously without communicating what the final output should look like, you risk compromising timelines because of an incessant flurry of back-and-forth revisions.

Team morale can suffer 

Mismanaged collaboration can negatively impact the teams involved when it comes to culture and morale. It’s hard to feel good about your job when you’re working inefficiently, attending meetings that could have been emails, and talking past one another. Left unchecked, that low morale can cause people to avoid working closely and openly with one another, disengage from their work, or even leave the company.

Company-wide goals become at risk 

Ineffective collaboration is particularly dangerous for large-scale goals that involve several teams. For example, a big product update may stumble because the marketing and product development teams aren’t able to come together to define primary objectives and outputs, the company’s revenue and its customers’ trust are at risk, costing the company both revenue and customers’ trust.

The opportunity to innovate is compromised

If cross-team collaboration always goes poorly, teams will start avoiding working together altogether and stick to their silos. As a result, they’re less likely to unlock the opportunity to ideate and come up with innovative solutions to business problems.

How to chart a path toward successful teamwork

While bringing people together can be complicated and challenging to get right, the teams that are determined to make collaboration seamless and effective are the ones that will be best positioned in the long-term. Consider the following strategies to set your team up for collaborative success. 

Focus meetings on discussions, not updates

When meetings are purposeful and focused, they’re more engaging. You can spend your time discussing hard decisions rather than getting people up to speed, and people leave feeling productive and participatory to outcomes. Setting a clear agenda, assigning a strict time-keeper, and sending out materials ahead of time are all ways to keep collaboration smooth and projects moving. 

Enable your teams to work in tandem 

Let’s return to an earlier example: two marketers who are taking turns editing a slide deck. They should probably use a collaborative, web-based slide tool to tackle this work in parallel, rather than sentencing themselves to painful handoffs. This is true when it comes to websites as well: for example, the team at Oyster got their websites to market six times faster after they started using Webflow’s page branching features to make web updates in parallel. 

Use tools that eliminate the need for unnecessary collaboration

While collaboration can be powerful, bringing too many cooks into the kitchen for every task or project can hinder success.  For example, Dropbox Sign’s marketing, engineering, and design teams use Webflow to improve their internal workflows for their website, bringing marketing, design, and development teams closer together to streamline development processes. Marketers and designers are able to gain more autonomy and technical teams are able to reclaim time to focus on high-impact projects. The outcome is a win-win that reserves time to collaborate on what’s most important to tackle their collective goals.

Similarly, features like edit mode make it possible for content editors to safely edit site content without risk of breaking the site or designs — and speeding up time-to-launch in the process. 

Effective collaboration is table stakes for today’s teams 

“Collaboration” can often seem like a buzzword, and some of the cynicism about it is well-earned. But when you get it right, collaboration is worth the hype. 

If you cultivate an environment where teams can come together and flourish, you can unlock solutions and outcomes that wouldn’t otherwise be possible to achieve when working in silos. To unlock the untapped potential of your marketing, design, and development teams, invest in a culture of clear communication and purposeful meetings, and bring on tools that create tight-knit processes that help your teams remain productive and put them on a path toward success.

How AI-powered data analytics tools are enhancing data management

Software Stack Editor · April 8, 2024 ·

image

AI is pushing data analysis into new territories.

AI excels at digesting and extracting critical insights from massive datasets. Pre-AI, data professionals performed this work, spending immense amounts of time collecting, refining, and interpreting information. But with AI’s advancing capabilities, you can automate data analysis processes that would require dozens or hundreds of hours to complete manually. 

That’s what makes AI and data analytics such a potent combination. AI helps analysts bypass tedious data collection and interpretation, skipping directly to managing, validating, and using data to craft accurate reports for businesses.

An overview of AI in data analytics

Applying AI to data analysis is a powerful way to quickly and accurately sift through massive datasets. This approach leans into what AI does best: detecting patterns and using them to predict outcomes.

AI-powered analytics tools combine machine learning (ML) and data analytics for faster processing than humans can perform. They excel at drawing straightforward connections and interesting conclusions humans might miss, such as trends with unintuitive correlations or extremely long-term cycles. And they can even help write SEO content that drives more traffic to your website.

When you pair an AI learning algorithm with your data analysis efforts, you can expect the following benefits.

Speed and efficiency

Analysts can feed an AI analysis system their data and turn to other tasks while it processes. This efficiency offers new freedom to data professionals — it assumes tedious tasks and lets employees focus on more meaningful work: interpreting data to discover insights.

Validation

Data validation is critical to finalizing an analysis, and AI supports this crucial step. After discovering a combination of data points to include in a report, analysts can use AI to instantly call up those points for review. This automation dramatically reduces the time it takes to write SQL queries and search through reports.

Ease of use

Most AI analysis tools offer natural language processing (NLP), which lets analysts use natural language to interact with their data. For example, you might write, “Search this dataset for the five most purchased products,” or “How have in-person and online sales changed over the last two years?”

This simplicity offers your team more freedom in how you interact with your database. It also lowers the barrier to entry for new analysts by fast-tracking much of the learning curve.

3 types of AI used in data analytics

You can distinguish different AI types by their relative complexity. The more sophisticated an AI tool is, the more capable it is of finding subtle correlations. 

Here are three types of AI commonly used in data analysis.

1. Machine learning

ML algorithms are trained, meaning developers feed them vast amounts of data and instruct them to extract conclusions. From this process, the algorithms “learn” what to look for in new datasets. 

When you feed information to a trained ML algorithm, you don’t need to provide it with any instruction. The algorithm uses what it’s learned to search your data and create conclusions. Along the way, it continues to refine that knowledge base for improved data analysis capabilities.

2. Neural networks

More advanced than ML’s system of overlapping processes, neural networks aim to simulate the human brain. They do so using interconnected processes representing nodes that pass information back and forth for analysis. This process enables them to discover connections an ML algorithm’s more straightforward process might miss.

3. Deep learning

The most advanced of these AI types, deep learning involves training a neural network with a massive dataset, teaching it to recognize things and interpret patterns. This technology is what self-driving cars use to identify other vehicles on the road and evaluate changing conditions. It’s equally effective at discovering patterns in data that a human might overlook.

How AI can improve your data analytics process

AI makes handling and interpreting data easier than ever because it seamlessly fits into many analytics processes. Here are a few suggestions for where to integrate AI into business data strategies.

Data cleaning

The first step in analyzing a database is checking it for errors. Analysts spend significant time scanning through hundreds of lines in a spreadsheet or writing detailed SQL queries to surface such mistakes. Thankfully, AI can perform this task much faster. You simply feed the AI your database and use NLP to form a query, such as “Check this database for missing information and errors.”

Data analysis

AI eases the burden of analysis for data professionals without replacing the need for a human eye. You can use AI to search the data, but it’s up to you to determine what’s important. For example, if you feed your data to a deep learning algorithm, it’ll churn out dozens of trends, predictions, and correlations you might never have found. But it’s up to you to sift through these results and surface the most relevant, informative bits for your business.

Data visualization

Another common task is creating visuals for the information you analyze. You might use tools like Zoho and Tableau to do this, which increasingly feature AI-generated visualizations to quicken the process. For example, Tableau Pulse uses AI to generate customizable data visualizations based on predefined KPIs.

Predictive analysis

AI excels at discovering intricate trends in data and mapping them out over a timeline — which requires simple math to plot hundreds or thousands of points over time. AI can process these trends significantly faster than a human can, and it can identify correlations to generate intricate forecasts. 

One example of AI predictive analysis is Life2Vec, a powerful tool that uses basic information about your age, weight, and exercise habits to predict your potential lifespan.

Industry use cases of AI data analytics

AI has quickly permeated every industry thanks to its uniquely versatile capabilities. Here are some examples of how AI supports industry processes, from basic data collection to complex analysis.

Healthcare

The healthcare industry generates enormous datasets every day, from X-ray and MRI images to BMI and blood test measurements. AI algorithms consume this data to find connections between data points sooner than a medical professional might. These advancements help with early detection of cancer, diabetes, and Alzheimer’s, improving healthcare outcomes and potentially saving lives.

Finance

With its convoluted regulations and mind-boggling complexity, the financial industry benefits from any advancement in AI technology that simplifies data analysis. AI is an incredible tool financiers can use to advance their portfolios through speculating on stock prices and analyzing economic conditions. For example, the financial platform OneStream uses ML to find signals in the economic landscape that indicate a financial strategy’s potential success or failure. 

Marketing and customer insights

Interpreting critical user data helps businesses optimize products, services, and marketing campaigns for certain goals, such as increasing conversions or driving engagement. AI tools that integrate with website platforms make this information significantly easier to access.

For example, Webflow supports a HubSpot integration that tracks website traffic. You can then use HubSpot’s AI-powered data analysis tools to extract actionable insights that’ll help you improve your site.

Upgrade your data analytics with Webflow

Webflow supports integrations and solutions that leverage AI to assist with analyzing data, writing content, and more. The platform has all the tools you need to create visually stunning, data-rich websites without writing a single line of code. 

Explore Webflow’s marketing automation and analytics integrations today and get the most from your AI tools.

The top 8 secure messaging apps for businesses

Software Stack Editor · April 8, 2024 ·

image

Mitigate cyberthreats all while enjoying better-than-ever team communication with a secure messaging app.

The rapid flow of sensitive information is at an all-time high — especially in healthcare, finance, and law.

Most private chat apps require phone numbers and emails during registration, and users often overlook the terms and conditions. Using these conventional platforms puts your business’s privacy and security at risk by leaving room for potential breaches and legal ramifications.

But secure messaging applications provide robust encryption capabilities and other security features that safeguard your communication. Read on to discover eight of the best security-focused communication apps for businesses.

What are secure messaging applications?

A secure or encrypted messaging application is a communication tool that protects the confidentiality of messages and multimedia exchanged between users. These apps use verification techniques, like two-factor authentication (2FA), to ensure the rightful user accesses messages after providing proof of two or more identification forms.

Most importantly, they deploy end-to-end encryption, which ensures only the intended recipient receives the message. iMessage and Google Messages are popular apps that use end-to-end encryption, with secure browsers using HTTPS over HTTP for added safety.

How secure messaging apps work

Secure messaging apps combine advanced technology and stringent privacy protocols to ensure security. This includes:

  • Encryption. When a user sends a message, voice note, image, video, or document, the secure messaging app encrypts the content using cryptographic algorithms that transform it into an unreadable format called ciphertext. Even if a hacker intercepts a message in transit, encryption ensures it remains indecipherable to anyone without the corresponding decryption key.
  • Open-source code. Many secure messaging apps use open-source code, so their underlying source code is freely and publicly available. Open-source code encourages transparency and trust among users and allows independent developers and security experts to inspect apps and conduct audits to identify potential loopholes, flaws, or backdoors for intrusion.
  • Privacy policies. Secure messaging apps typically have clear and transparent privacy policies that outline data collection, storage, and processing methods. These policies outline steps taken to safeguard sensitive information.
  • Rich media support. Despite the name, secure private messaging apps support many multimedia types, including images and videos, voice messages, and files. Encryption and privacy protocols apply to each media type and ensure users can safely exchange content.

The importance of secure messaging apps

Secure messaging apps combine end-to-end encryption with open-source code, privacy measures, and multimedia support for these essential reasons:

  • Data protection and compliance. Industries like finance, legal, and healthcare must follow strict privacy regulations from governing bodies, like the European Union’s General Data Protection Regulation (GDPR) and HIPAA in the U.S. Secure messaging apps comply with these regulations by ensuring sensitive data, like banking information and medical records, remain protected from unwanted access.
  • Cybersecurity risk mitigation. With looming online threats like phishing attacks, data breaches, and malware, it’s essential for secure messaging apps to prioritize cybersecurity. Adding an extra layer of protection through encryption and two-factor or multifactor authentication reduces security-related incidents and potential financial losses.
  • Secure collaboration. Secure business messaging apps allow team members, whether in-office or remote, to communicate safely. Employees with internet-enabled devices can share files, chat in groups, and make voice and video calls for meetings and training sessions.
  • Brand reputation. Data breaches and security incidents can damage a company’s reputation and undermine customer trust. By securing messaging apps, you demonstrate your commitment to protecting user data, enhancing your credibility as a trustworthy and reliable organization.

8 secure and encrypted messaging apps for your business

Choose a secure messaging app that best aligns with your organization’s needs while ensuring confidentiality. Here are eight encrypted messaging applications with diverse feature sets to suit different businesses.

1. WhatsApp

WhatsApp boasts end-to-end encryption for messages, calls, and multimedia. It also has 2FA with passkeys for further protection.

The Meta-owned messaging app is ideal for individuals and businesses who want a widely known and user-friendly encrypted platform with messaging, calling, and file-sharing capabilities. But it’s worth noting that, as a Meta-owned application, WhatsApp’s encryption doesn’t extend to metadata — which may raise privacy concerns for some users.

Price: Free

Compatibility: iOS, Android, Mac, Windows, and web browsers

2. Telegram

Telegram offers secure messaging with optional end-to-end encryption through Secret Chats — a feature where specific chats have a lock icon that only the recipient can access. Secret Chats also self-destruct and don’t support message forwarding.

With a group chat capacity of up to 200,000 members, Telegram suits large organizations seeking a feature-rich platform with file-sharing, channel, and voice call functionalities.

Price: Free

Compatibility: iOS, Android, Mac, Windows, Linux, and web browsers

3. Signal

Signal is well-known for its strong emphasis on privacy and security. The app offers end-to-end encryption for messages, calls, and video chats. Its open-source Signal Protocol also supports messaging for groups of up to 1,000 members, with secure file sharing and disappearing messages for added protection.

Typically favored by privacy advocates, journalists, and professionals requiring secure communication channels, Signal is ideal for companies dealing with sensitive or large datasets.

Price: Free

Compatibility: iOS, Android, Mac, Windows, and Linux

4. Threema

Threema offers standard features like text messaging, voice calling, and polls. But what separates Threema’s privacy-preserving protocol from the rest is that it doesn’t ask for a phone number or email during registration, providing increased user anonymity.

The company also favors local information storage over server-based data management. If you have capable local storage and work in healthcare, finance, and legal services, Threema is a great fit.

Price: Varies for individuals and businesses

Compatibility: iOS, Android, Mac, Windows, Linux, and web browsers

5. Wire

Wire fully complies with GDPR and only requires an email address to sign up. It also works on Signal’s robust security protocol. Since its inception, Wire has maintained an open-source philosophy, claiming that the company has no intention of selling user data to third parties.

With its always-on encryption, Wire keeps group conversations and file sharing reliably under lock. It also offers collaborative features like guest rooms and screen sharing, making it suitable for anyone in remote teams, creative fields, or large organizations looking for secure communication channels.

Price: Free

Compatibility: iOS, Android, Mac, Windows, and Linux

6. Rocket.Chat

Rocket.Chat’s open-source functionality has the backing of thousands of GitHub members to ensure its security stays up to date. Its on-premises hosting lets you keep all data in-house to reduce online threats while providing full ownership over messaging infrastructure.

This is the best secure messaging app for government, financial, and legal sectors. It’s especially valuable to technically experienced users looking for a customizable messaging solution with third-party app integration.

Price: Free for small teams of up to 25 members, with custom quotes for enterprises

Compatibility: iOS, Android, Mac, Windows, and Linux

7. Troop Messenger

Like Rocket.Chat, Troop Messenger is an end-to-end encryption app that supports on-premises server hosting for complete control over in-house data. With productivity features like file and screen sharing, this platform is often touted as a more security-oriented Slack (which doesn’t have end-to-end encryption).

Troop Messenger targets businesses and enterprises seeking a secure, collaborative messaging platform with total autonomy. It focuses on productivity and communication, and it’s suitable for teams of all sizes.

Price: Varies depending on the nature of the business and industry

Compatibility: iOS, Android, Mac, Windows, and Linux

8. NetSfere

NetSfere is a secure, enterprise-level communication platform designed to meet the regulatory compliance requirements of the healthcare, government, and finance industries. It focuses on four pillars: security, control, compliance, and collaboration.

With end-to-end, 256-bit encryption (a significantly robust cipher with a 256-bit key, superior to 128-bit and 192-bit keys), NetSfere is best for large organizations operating in highly regulated sectors.

Price: Free for the Professional plan and $7 per user for the Enterprise plan, with custom quotes for the Enterprise Plus plan

Compatibility: iOS, Android, Mac, Windows, and web browsers

Enhance your site security with Webflow

Secure messaging apps protect sensitive information, minimize enterprise cybersecurity risks, and foster trust among employees and customers. By integrating secure applications with a high-quality web platform, you can ensure safety for all your website users.

Whether you’re scaling a startup or running a thriving business, learn how Webflow builds security into your website. Create powerful platforms using Webflow Enterprise, secure them with our all-in-one security checklist, and explore our resources to learn how to scale your online presence.

21 best UI & UX design tools to try in 2024

Software Stack Editor · April 5, 2024 ·

Both UI, which focuses on design, and UX, which covers user experience, are essential to digital product success.

UI and UX are two facets of web design that work hand-in-hand. While UI focuses on the user interface design, UX covers the overall user experience as they interact with your product or service. In this blog, we’ll explain exactly what UX and UI are, as well as some of the best design tools to try, whether you’re looking to create wireframes or conduct user testing.

What is UI and UX?

User interface (UI) and user experience (UX) are closely related, but they’re distinct concepts in the field of web design and development.

UI is the visual and interactive elements that allow a user to interact with a digital product or system — think graphical elements like buttons, menus, icons, typography, colors, and layout. In essence, UI refers to the tangible component that users see and interact with directly.

UX, on the other hand, is a broader concept that encompasses the entire journey and interaction a user has with a product or service, including UI. UX design focuses on creating products that are easy to use, efficient, and delightful for users. It involves understanding user behavior, needs, and motivations, and designing solutions that meet those needs in an intuitive and satisfying way.

Types of UI and UX tools to use

Before we jump into the exact tools to try, it’s important to first identify what kinds of UI and UX design tools are useful in the design process.

Some common types of UX and UI tools to look out for are:

  • Prototyping tools — These tools allow designers to create interactive mockups and prototypes of their designs, enabling them to test and iterate on their ideas before implementation. Some prototyping tools include Figma, Adobe XD, InVision, and Marvel.
  • Wireframing tools — Wireframing tools help designers create low-fidelity mockups and blueprints of the user interface, focusing on the layout, structure, and information architecture. Popular options are Balsamiq, Lucidchart, and Miro.
  • UI design tools — These tools create high-fidelity prototypes, visual elements, and user interfaces. They often include libraries of pre-designed UI components and allow designers to create pixel-perfect mockups. Designers often use tools like Sketch, Adobe XD, and Figma for UI design. 
  • Collaboration and handoff tools — These tools facilitate seamless collaboration between designers and developers, enabling efficient handoff of design assets and specifications. Examples include InVision and Marvel.
  • User flow and journey mapping tools — These tools help designers visualize and map out the user’s journey through a product or service, identifying touchpoints, pain points, and opportunities for improvement. Popular options include Sketch and Adobe XD.

21 types of UX & UI design software tools

Let’s dive into each UX/UI tool and discover how you can craft beautiful projects.

1. Sketch

Best for easy handoff

Sketch homepage
Source: Sketch

If you have any UI design experience, you’ve heard of Sketch. There are quite a few reasons why it’s a revered design tool.

Being able to make universal changes — whether it’s through their library of symbols, layer styles, or text styles, or its smooth resizing and alignment features — saves designers time to deliver consistent prototypes and final products. It takes out what’s tedious and lets designers jump in and create. And with a multitude of third-party plugins and integrations, there’s no shortage of tools out there you can use with Sketch.

Related read: From Sketch to Webflow: how to turn mockups into live websites

2. InVision Studio

Best for creating interactive prototypes

InVision homepage
Source: InVision 

With a full suite of applications, InVision gives designers all of the UI design tools they need to create fully realized and functional prototypes with dynamic elements and animations.

Along with these easy-to-use UI design tools, they also make communication easy — with collaboration features that let developers share their work as they design it, receive feedback, and make documented changes at each step. Another useful aspect of InVision is the digital whiteboard that allows team members a place to start brainstorming, interact, and get important sign-offs before moving forward.

3. Axure

Best for realistic user experience

Axure homepage
Source: Axure

‍Axure functions in prototyping and keeping track of the workflow. This UI design software features a smooth interface to document as you go. High fidelity drives this app, resulting in prototypes full of details.

Axure offers many of the other features of popular prototyping and UI design tools. It allows for testing of functionality and puts everything together for an easy developer handoff. These features, combined with an emphasis on communication, ensures that everyone on a project stays up-to-date with progress and changes as they happen in real-time, making Axure a solid choice for streamlined UI design.

4. Craft

Best for placeholder content

Craft homepage
Source: Craft

‍Craft, a plugin from InVision, works right alongside what you might be doing in Photoshop or Sketch, with a sync function that updates what you’re working on. Along with this time-saving feature, Craft offers everything you need for prototyping and collaboration. Changes in styling, edits, and other tweaks are updated across the board so that everyone is referring to and working from the same version of a project.

Craft sets itself apart from other UI design tools with its placeholder content. You get access to both Getty and iStock photos, letting you fill your layout with better visuals. And if there’s data in your layout, you can use your own or bring it in from other sources. Not many UI design tools let you fill your mockups with more meaningful content. This special feature of Craft gives your mockups a more accurate representation of what a final design might look like.

Related read: The best Photoshop alternatives (free + paid)

5. Proto.io

Best for user testing

Proto.io homepage
Source: Proto.io

In their own words, Proto.io says using their UI design software results in “Prototypes that feel real.” And Proto.io delivers on this, giving you what you need to create, organize, integrate, and test accurate mockups. It also smooths out the collaboration process, fostering communication between team members through comments and video feedback, as well as integrating with some of the more well-known testing products, like Lookback, Userlytics, and Validately.

6. Adobe XD

Best for Adobe Creative Cloud users

Adobe XD homepage
Source: Adobe XD

It’s hard to knock Adobe off of their status as royalty in design software — their kingdom of design products reigns in the creative cloud. Adobe XD offers vector-based user interface tools for creating prototypes and mockups with an interface that’s familiar to anyone who has used other Adobe products. These tools, along with real-time collaboration, makes it a go-to for many UI designers.

Adobe XD has many sophisticated tools for design teams, but it is also stocked with what designers need to whip up interactions and other dynamic elements they can integrate into prototypes or mockups. It’s one of the rare design platforms that can combine different disciplines together, without anything lacking.

Related read: From Adobe XD to Webflow: how to turn your prototypes into live websites

7. Marvel

Best for small teams

Marvel homepage
Source: Marvel

Whether you’ve been a UI designer for a while or if you’re just stepping into the role, Marvel’s design platform makes things easy. With the ability to create both low fidelity and hi-fi wireframes, interactive prototypes, and do user testing, it gives a UI designer everything they need — in one intuitive interface. Marvel also has a feature called Handoff that gives developers all the HTML code and CSS styles they need to start building and tweaking product design.

8. Figma

Best for team collaboration

Figma homepage
Source: Figma

‍Figma lets designers build dynamic prototypes and mockups, test them for usability, and sync up all of the progress. Figma allows for a collaborative environment where multiple people can work on a project at the same time, much like Google Docs — letting you see who has it open for real-time collaboration. You’ll see who’s working and what they’re doing. It’s also browser-based, making it accessible to everyone in an instant. And as an added bonus, it’s free for individual use so you can check it out and get familiar with how it works.

Related read: From Figma to Webflow: turning your static designs into interactive websites

9. Origami Studio

Best for advanced prototyping

Origami homepage
Source: Origami Studio

With a Facebook pedigree (it was built by and for Facebook designers), Origami Studio packs in more complexity than something like InVison or Sketch — which are a bit easier for beginners in design. For those who need a more advanced prototyping tool as a part of their design system, Origami Studio has a lot to offer.

This platform has the tools you need to build complete prototypes that are powered by a sophisticated patch editor, giving designers the opportunity to integrate advanced functionality. Prototypes end up looking and working like a real app or webpage.

Origami Studio also integrates well with Sketch. If you’re working in parallel with Sketch, it lets you brings in layers and copy and paste them directly without any hang-ups.

10. Webflow

Best for all-in-one web design

Webflow homepage

Webflow gives you the power to design without knowing HTML or CSS. With drag-and-drop functionality and an intuitive interface, Webflow gives you the creative freedom to build whatever you imagine. Using Webflow for building a prototype gives you an actual website, and generates accurate HTML and CSS code or JavaScript when implementing micro-interactions. Instead of taking a prototype and building a design from it, you already have what you need to give to a developer. You can also use a template if you don’t want to start from scratch.

Even Ryan Miyoshi, the lead designer at Webflow, decided to ditch prototyping tools and start designing and building straight in Webflow.

Webflow also offers a library of essential web design and development courses for both beginners and experts alike.

The modern web design process

Discover the processes and tools behind high-performing websites in this free ebook.

Download now

↗

The modern web design process

Discover the processes and tools behind high-performing websites in this free ebook.

Download now

↗

Download now

11. FlowMapp

Best for creating user flows

FlowMapp homepage
Source: FlowMapp

When developing a user experience strategy, designers need to pay attention to structure, flow, and corresponding sitemaps, which are all at the foundation of UX design.

While so many tools out there try to combine UI and UX together into one platform, FlowMapp dedicates itself to UX design. Building user flows and constructing visual sitemaps are indispensable for UX, and these are the pillars of FlowMapp’s UX design app.

12. Balsamiq

Best for low-fidelity wireframes

Balsamiq homepage
Source: Balsamiq

With a user-friendly interface, Balsamiq makes it easy to create low fidelity wireframes. Even people with zero experience in wireframing could jump in and put one together that looks good. Balsamiq encompasses both UI and UX, but really stands out with its low fidelity wireframes. Balsamiq’s nod to the physicality of whiteboarding makes the tool accessible to anyone, no matter their skill level.

13. VisualSitemaps

Best for visual sitemaps

VisualSitemaps homepage
Source: VisualSitemaps

‍VisualSitemaps specializes in generating, you guessed it, visual sitemaps. It’s nice to have a tool designed specifically for this purpose. This tool has complete automation, the capacity to go through password-protected websites that haven’t gone live yet, and the ability to import into Sketch. VisualSitemaps takes the process of creating visual sitemaps and supercharges it for UX designers, developers, and anyone else who needs to be involved with the process of creating them.

14. Treejack

Best for information architecture

Treejack homepage
Source: Treejack

The visual components of a design are important, but without great content, it’s just an empty vessel. Having quality content isn’t enough — it needs to be arranged in a flow and structure that maximizes its accessibility. This is where information architecture comes in.

Treejack specializes in information architecture. It lets you test the tree structure of a website with real users. It then generates the results that show a user’s path and navigation through the content, giving you valuable insights you can use to edit and tweak the content organization.

15. Wireframe.cc

Best for minimalist wireframing

Wireframe homepage
Source: Wireframe.cc

Wireframes don’t have to be complicated; keeping them simple lets them communicate in a straightforward way how to structure a design.

‍Wireframe.cc focuses on minimalism. Intentionally limiting the color palette and using simple rectangular elements — along with an uncomplicated interface — lets UX designers construct a low-fidelity wireframe in a snap. There’s even an in-browser demo you can use to see how it works.

16. Optimal Workshop

Best for automated user insights

Optimal Workshop homepage
Source: Optimal Workshop

As far as a UX design platform goes, Optimal Workshop has all you need to analyze usability, figure out information architecture, and test and evaluate a design.

Optimal Workshop distinguishes itself in giving insights and providing in-depth data about users and how they interact with a design. This carefully curated UX platform offers tree testing with Treejack, first-click testing with Chalkmark, online surveys, and Reframer for doing qualitative research. Having these bundled together makes for a package of tools that any UX designer would find useful.

17. UXCam

Best for session replays

UXCam homepage
Source: UXCam

‍UXCam is a user experience analytics and feedback tool that helps companies understand how users interact with their digital products.

One of the best aspects of working with UXCam is its “Session Replay” feature. UXCam records user sessions, capturing every tap, swipe, and gesture made by users within the app or website. This information gives developers and designers important insights into user research and behavior, navigation patterns, and potential pain points.

Plus, UXCam also has touch heatmaps that visually represent where users interact the most (or least) with the user interface. And as far as identifying errors goes, UXCam is a great tool, too: their crash reporting feature automatically detects and reports crashes, freezes, and other errors that users encounter, along with relevant diagnostic information.

18. UXPin

Best for accessible prototyping

UXPin homepage
Source: UXPin

‍UXPin is a collaborative design and prototyping tool you can use to create and iterate on user interfaces and experiences for websites, mobile apps, and other digital products.

The platform’s wide range of built-in UI elements, components, and libraries allows designers to create mockups and wireframes quickly. Plus, UXPin supports interactive prototyping and real-time collaboration with multiple team members for seamless workflow processes.

One of UXPin’s most unique features is its usability testing tools, like the Contrast Checker and Color Blindness Simulator, which ensure that your digital product is accessible to a wide audience.

19. Justinmind

Best for mobile app prototypes 

Justinmind homepage
Source: JustinMind

JustinMind provides a canvas for creating low-fidelity wireframes and high-fidelity user interface designs. It offers a wide range of built-in UI components, widgets, and libraries that designers can use to quickly create mockups and layouts.

Plus, JustinMind supports real-time collaboration, allowing multiple team members to work on the same project simultaneously. It also provides some great collaboration tools for collecting feedback, comments, and annotations from stakeholders and users, as well as the ability to create your own UI kit within the platform.

For developers who are specifically looking to launch mobile apps, JustinMind is a great fit. The platform offers a suite of gestures that allow users to rotate, tap, swipe, scroll, and pinch their way through your mobile app prototype.

20. Lucidchart

Best for beginners

Lucidchart homepage
Source: Lucidchart

‍Lucidchart is a cloud-based software that allows users to create various types of diagrams, including user flows, wireframes, and journey maps. 

Designers love Lucidchart for several reasons, but especially for its versatility. The platform offers a wide range of shapes, templates, and customizable elements, so users can easily create anything from simple wireframes to complex user flows.

The platform is also fairly intuitive, which makes it easy for designers to create and edit diagrams without a steep learning curve. It’s beginner-friendly, yet powerful enough to meet the needs of professional designers.

21. Miro

Best for remote teams

Miro homepage
Source: Miro

‍Miro is another wireframing tool that lots of developers rely on.

The platform, while pretty robust in its features, also offers helpful resources like tools for conducting virtual workshops, design sprints, and ideation sessions. Designers can use templates and frameworks to structure their sessions, capture ideas, and prioritize features collaboratively.

Plus, Miro is cloud-based and accessible from any device with an internet connection. This accessibility makes it convenient for designers to work remotely and collaborate with team members across different time zones.

Nail your UI and UX design with Webflow

Both UI and UX design are fundamental pieces of the success of any digital product — whether it’s a mobile app or website. With great design, you can avoid clunkiness and user frustration and create a seamless digital experience for everyone.

With Webflow University, you can learn all the fundamentals of UI and UX design, as well as launch your own digital products with ease. From building a Saas website to launching an ecommerce shop, Webflow helps you do it all.

Unleash your creativity on the web

Use Webflow’s visual development platform to build completely custom, production-ready websites — or high-fidelity prototypes — without writing a line of code.

Get started for free

↗

Unleash your creativity on the web

Use Webflow’s visual development platform to build completely custom, production-ready websites — or high-fidelity prototypes — without writing a line of code.

Get started for free

↗

Get started for free

Last Updated

April 5, 2024

How to optimize web accessibility for business success

Software Stack Editor · April 4, 2024 ·

image

The internet is a shared space, but it’s not inclusive by default — making web accessibility vital.

Web accessibility refers to your site’s accommodation and availability to users — regardless of their abilities or challenges. The goal of accessible design and development practices is to eliminate barriers that prevent people from navigating, interacting with, and accessing your site’s content.

By ensuring your in-house design and development teams prioritize web accessibility and integrate accessibility into their design process, you can build a better website for your business while contributing to a more inclusive digital environment.

The benefits of web accessibility

For the end user, an accessible site means a more seamless and equitable online experience. This positive user experience (UX) empowers your target audience to access information, products, and services without extensive aid.

But accessibility isn’t only for your users. On the business side, web accessibility fulfills compliance requirements and extends your digital presence’s reach and engagement. A website that’s inclusive by design is available to more users, which enforces a positive brand reputation and fosters lasting relationships with customers.

Accessible website designs offer a bounty of benefits — here are some of the most advantageous ones.

Reach new audiences

Web accessibility makes your content available to people with varying abilities, so you can reach a wider audience. Newly accessible content might reach a fresh market segment you’d unintentionally neglected because you hadn’t catered to their abilities.

For instance, by optimizing your site for screen readers, you create a positive UX for people with visual impairments. This accessibility encourages these customers to engage with your site and increases the conversion potential as you meet your audience’s diverse needs.

By creating an inclusive UX, you broaden your demographic appeal, and this will likely cause a bump in your conversion rates. Inclusivity in web design is both a social responsibility and a strategic move to capture untapped markets and enhance your business performance.

Produce cleaner code

Accessible webpages possess more intentional designs and use a simpler code structure. This means they have cleaner code that loads faster with fewer errors. By improving your code hygiene, you enhance your site’s ranking in search engine results pages (SERPs).

For example, when designing an accessible website, you must use semantic HTML and proper document structure. This makes your site accessible and also simplifies your code structure. And by using descriptive and meaningful HTML tags, you help other developers on your team navigate and update the codebase. As a result, accessibility makes your code cleaner, better for the end user, and easier to maintain due to its straightforward language structure.

Improve UX

Web accessibility initiatives tend to bring your site design closer to industry-standard web design best practices. This, in turn, creates a better experience for your site users.

Consider color contrast. Proper color contrast most immediately benefits users with visual impairments, but it also makes content on your site easier to read for users who aren’t visually impaired. Similarly, accessible design impacts navigation and information comprehension. By providing clear and concise headings, you help all users navigate your site — whether they’re browsing your page directly or interacting through a screen reader.

Prioritizing accessibility this way lets you create a better browsing experience for all users and encourages positive interactions, resulting in higher conversions and reduced bounce rates.

Boost SEO rankings

Search engine optimization (SEO) and accessibility go hand in hand because search engine algorithms tend to reward highly accessible websites. So, accessibility’s principles often closely overlap with SEO’s.

These principles include:

For instance, providing descriptive alt text not only makes images accessible to screen readers but also helps search engines understand content. By helping search engine crawlers scroll your site architecture, you boost your search result visibility.

Accessibility also contributes to stronger UX. Enhanced engagement signals to search engines that your website has relevant, quality content, making them more likely to include your site in SERPs. Improved SEO rankings increase your online visibility and subsequently drive more organic traffic to your site.

Ensure compliance with legal and ethical obligations

Accessibility matters for reasons beyond boosting your site performance. Many countries and regions have established laws and regulations that mandate accessibility requirements for websites.

As an example, the Americans with Disabilities Act (ADA) in the United States, the Accessibility for Ontarians with Disabilities Act (AODA) in Canada, and the European Accessibility Act (EAA) in the European Union are pivotal legislations that enforce the importance of making digital spaces accessible to all. ADA compliance helps your business avoid penalties and also reflects your commitment to promoting ethical business practices.

Build a positive brand reputation

Adopting accessible design practices helps build trust with your consumer base because it demonstrates your commitment to providing an accessible and welcoming digital space. This trust enhances your brand reputation and fosters positive relationships with your users — a factor that contributes to long-term success.

Consider showcasing accessibility initiatives in marketing materials and on your website to demonstrate how you’ve integrated web accessibility into your brand identity. As satisfied users share your positive brand reputation through word-of-mouth, you’ll see an influx of new visitors and an increase in your site’s organic reach. As such, building a positive brand reputation through accessibility initiatives is a strategic investment that pays dividends in customer trust, loyalty, and brand success.

How to improve web accessibility with the 7 Principles of Universal Design

The 7 Principles of Universal Design, developed by Ronald Mace at North Carolina State University in 1997, can be used to ensure that digital spaces are inclusive and user-friendly. When building or redesigning a website, consider integrating these principles into your process to create an inclusive online experience for all users.

Other standards you might consider include W3C’s Web Content Accessibility Guidelines (WCAG).

1. Equitable use

Strive for designs that provide the same means of use for all users. This means your design should avoid stigmatization or separate accommodations. For example, when you design online forms, ensure that the same version is accessible for assistive technologies like screen readers as well as regular web browsers. This way, all your users can access the same form.

2. Flexible use

Offer varied ways for users to interact with your website to accommodate diverse preferences and abilities. This principle encourages web designers to consider a range of user needs. So you might provide both keyboard shortcuts and mouse-based navigation options to build in more interaction flexibility.

3. Simple and intuitive use

Design an interface that’s easy to understand, regardless of the user’s knowledge, language skills, or current concentration level. This principle aligns with the goal of creating user-friendly interfaces. You might consider using clear and concise language in navigation menus to accommodate users with varying language skills and cognitive abilities.

4. Perceptible information

Ensure you present information and interface components in a straightforward manner so users can perceive it regardless of abilities. You can incorporate alternative text for images that let users with visual challenges understand the graphics’ content. This way, visitors can still perceive your site, even if they can’t view visual elements.

5. Tolerance for error

Build your website to recognize inevitable user errors. This means you should provide clear error messages and suggestions to correct user actions and support visitors through their navigation. These directions minimize hazards and reduce user frustration. For instance, if users need to create a password, provide hints as to what the password requires, like a capital letter and a special symbol. Instructive information helps users self-correct and continue on their user journey.

6. Low physical effort

Aim for designs that reduce user fatigue. As an example, you could implement a clear and concise checkout process with the minimal number of steps and clicks required. This makes the user journey more efficient and less demanding — and keeps visitors from dropping out.

7. Size and space for approach and use

This final principle focuses on your site’s physical accessibility. Design a website with responsive layouts to ensure users with varying device sizes and motor abilities can interact comfortably. This promotes an inclusive approach to size and space considerations.

Outstanding website accessibility and experiences with Webflow

Accessibility is crucial not only for your end users but also for your business — and Webflow’s here to help you achieve it. Our visual web development platform empowers teams to adhere to accessible design standards so concerns like color contrast, text size, and alt text are at the forefront of design.

Learn more about how Webflow helped Greenhouse create their accessible website. Or see our resources on how content can improve your accessibility, tips for visual design, and design accessibility guidelines. 

Database scaling: 5 best practices to grow your website

Software Stack Editor · April 3, 2024 ·

image

Managing data and traffic influxes with scalable database systems is critical to growing a functional website.

Businesses constantly generate massive volumes of data, like internal workflows on enterprise applications and interactions on customer-facing websites. With data requests piling up, your back-end systems require scalable databases to handle surges in traffic.

Depending on your needs and resources, you can scale up or out by adding hardware to existing architecture. From there, you can create a system that manages current loads and accommodates future growth.

Read on to learn about different database scaling approaches and how to choose the best route for your organization.

What’s database scaling for enterprise websites?

Database scaling is the process of boosting a database system’s capacity to handle increasing information and a growing number of users without compromising performance, responsiveness, and reliability. As businesses and online platforms expand, building scalable databases is an effective solution to maintain smooth user experiences.

There are two approaches to database scaling:

  • Vertical scaling (or scaling up) increases a server’s capacity to handle greater loads by adding more storage, RAM, and CPUs. While vertical scaling offers a quick solution for improved performance, it can become costly, making it more suitable for smaller or less demanding databases.
  • Horizontal scaling (or scaling out) adds more servers to the existing system’s infrastructure, and each server operates independently to share the overall workload. Distributing the data and workload across multiple servers gives you greater flexibility for handling more requests and traffic, making it cost-effective for organizations with large databases and high-speed processing requirements.

Vertical scaling offers a quick and straightforward solution for improving individual server performance. In contrast, horizontal database scaling provides flexibility and is optimal for handling significant data and traffic growth. Choosing one depends on the nature of your enterprise application, expected growth, and specific performance requirements.

Why your enterprise should have a scalable database

Scalability enables your organization to respond to evolving requirements and effectively handle information and user influxes. Here are three reasons having a scalable database is essential:

1. Supports multiple data sources. Large organizations integrate data from various channels, including customer records, third-party vendors, and cloud services. A scalable database lets you consolidate these sources and provides a unified and centralized information hub.

2. Improves collaboration. A centralized repository allows multiple teams and managers to securely access and use data for their projects, leading to improved decision-making and streamlined workflows. And enhanced communication among teams helps break down data silos and promotes a more cohesive organizational structure.

3. Enables hybrid environments. Database scaling supports both on-site and remote team members by combining on-premises data with cloud-based solutions. With scalable infrastructure, you can quickly switch between sources and maximize resources, which benefits businesses with dynamic workflows and changing computing demands.

Database scalability challenges

While vertical and horizontal scaling approaches provide short- and long-term benefits, here are several challenges to overcome when scaling:

  • Consistency in horizontal scaling. ​​Ensuring consistent and up-to-date data across multiple servers in a horizontally scaled system can be challenging. With several nodes handling large information volumes, you may face synchronization issues and data inconsistencies, leading to errors, incorrect query results, and processing delays.
  • Uneven data partition. Poorly designed partitioning strategies can lead to unevenly distributed workloads that overburden some servers and underutilize others.
  • Poor query performance. As databases scale horizontally, coordinating queries across multiple servers or shards may introduce latency for complex queries involving aggregations and lengthy strings. Slower queries lead to poor user experiences, especially for high-traffic applications where visitors expect quick responses.
  • Cost and resource allocation. Scaling a database involves adding more hardware resources — such as CPUs, servers, and storage — which increases infrastructure costs. When allocating resources, you must recognize your requirements and balance vertical and horizontal scaling. Misallocation may lead to insufficient capacity and overspending, affecting your scaling approach’s cost-effectiveness.

How does a scalable database work?

Before designing a scalable database, it’s essential to understand how it works. Apart from vertical and horizontal scaling, there are functional components to ensure proper organization, data integrity, and efficient storage — but the most fundamental element is tables.

A table is a basic scaling structure for organizing and storing data in rows and columns. Every row represents a distinct record, and every column represents a specific attribute or field associated with that record.

For example, each row in a customer database represents an individual with attributes like their name, address, and contact information. The associated columns could include customer ID, name, address, and email.

But these values aren’t limited to words — each column has a specific data type that defines the information it stores. The most common types include:

  • Text
  • Numbers
  • Strings
  • Dates
  • Floating-point numbers (with a whole number and decimal points)

As the volume of data grows, designing tables to support efficient retrieval and updates is essential to scaling effectively.

How to scale a database: 5 tips and best practices

With the right database scalability techniques, you can create and grow a system to handle increasing demands without sacrificing performance. Here are five strategies to scale a database.

1. Index your data

Like a book’s index or contents page, data indexes help the database quickly locate specific rows in a table to find information faster. They speed up retrieval and search operations, keeping datasets organized for companywide access.

Suppose you have a database of third-party suppliers. You can create an index on the “Domestic suppliers” column to allow the database to find all local vendors in your region without scanning the entire table.

Avoid fragmented databases, which occur when you scatter data across the storage system. These increase pressure on the system’s hardware and degrade performance. You can defragment tables and indexes by reorganizing indexes regularly and tailoring queries to work in tandem with them.

2. Optimize query performance

A query is a request for information or an operation on a database, such as retrieving data, updating records, or adding and deleting items. You can enter queries as commands in structured query language (SQL), a web development syntax for communicating with a database.

Query performance refers to how quickly an SQL database system executes a request, which is optimized to fetch only the necessary data while minimizing response time and resource usage.

Writing well-structured queries is crucial for database performance — you can avoid unnecessary computations and steps to ensure your commands only collect the required information. For example, optimizing queries to retrieve transaction details from a specific date in a financial database is better than pulling all the records from the same month.

When you encounter performance issues, analyze queries, review system logs, and troubleshoot performance to identify database bottlenecks. If a specific query causes high CPU usage, for instance, consider adjusting the query or adding more indexes to solve the issue.

3. Use data partitions

Partitioning involves splitting large tables into smaller, more manageable sections based on logical criteria like date ranges and locations. Proper partitioning improves query performance and database management by helping the system find what it needs faster.

For example, your sales department can use this approach to organize the sales table by date, like the revenue during the first quarter or the annual customer retention rate. This way, each partition contains sales-related data for a specific period, allowing straightforward analysis and maintenance. And other departments like marketing, design, and web development can collaborate with the sales unit by using this data to improve their projects.

4. Use buffer cache

A buffer cache temporarily stores frequently accessed data in memory so browsers don’t have to retrieve it repeatedly from a server or built-in storage system. Caches facilitate hybrid environments by helping information move freely between physical and digital components, such as in-house files and cloud-stored databases.

When sending a large file, for instance, the system doesn’t transfer all the data in one go. Instead, it divides the file to fit into smaller, individual buffers. The database system reads the original file, processes it until each buffer fills, and sends it to the new location. At the same time, it receives additional data for the next empty buffer.

Buffer caching ensures the system handles large data volumes without experiencing delays. This is crucial for applications with high read-and-write workloads, such as content-heavy websites with responsive design and dynamic animations.

Increasing system memory can significantly improve performance by relying less on disk I/O (input/output) operations, where the system’s internal disk bears the burden of handling multiple data requests. With more memory, you can cache a larger portion of the database in memory, reducing the time taken to fetch information from the disk.

5. Distribute data through sharding

Sharding is a distribution technique that helps balance a heavy data load by spreading it across multiple servers or nodes called shards. Each shard handles a manageable portion of information. It’s a horizontal partitioning approach that prevents individual servers from becoming bottlenecks, ensuring optimal performance while accommodating growing data requests.

For example, a social media platform might categorize and distribute users according to their geographic regions. One server stores data from North American users, while European users are on another, to ensure each server manages a reasonable amount of data.

Scaling made simple with Webflow

Database scaling supports multiple sources and merges on-premises infrastructure with cloud-based solutions, keeping your website smooth and responsive without delays. But you need a robust content management system (CMS) to complement your database, ensuring information flows freely across a visually appealing and functional website. With Webflow, you can browse database templates created by users that you can duplicate and start using.

Webflow Enterprise allows you to create sites and improve content creation, product performance, and storage solutions at scale. Regardless of your company’s size, you can build and host secure digital ecosystems that grow with your business.

6 featured Webflow projects: March 2024

Software Stack Editor · April 2, 2024 ·

It’s hard to believe we’re through those full 31 days, but with a longer month comes even more stunning sites built in Webflow. Last month, Webflow sites trended towards immersive experiences, muted color palettes, and delightful interactions. 

We’re always impressed with the caliber of work our community is building and creating month-to-month, and so many really brought their A-game with interactive portfolios, quality video content, and eye-catching, bold typefaces. 

Here’s a round up of some of our favorites from March 2024. 

Sage East homepage

Sage East is a visual storyteller and photographer with a prolific client roster in the advertising and editorial worlds. She specializes in manipulating color and light and bringing emotion into her work, as well as “showing representation on both sides of the camera.”

Her portfolio is an immersive journey, with a stunning scroll animation that takes you through vibrant shots of her photography work on a clean black background. We especially love the scroll tracker in the footer that displays how far down the page you’ve made it. 

As you continue to scroll through her work, videos and photography come into closer view against complementary gradients with such slick precision that really draws you into the site. Best of all, Sage offers a list view for users that prefer a full screen experience. For anyone looking for inspiration on how to showcase creative work or examples of clean yet impactful motion graphics, this portfolio site does an excellent job of spotlighting projects while displaying unique creative style and taste. 

POV Budapest homepage

POV Budapest is the brainchild of two of the city’s local design studios who wanted to create a platform to celebrate and connect visual professionals. As Hungary’s first design conference, it aims to “enhance international collaboration, foster inspiration, and boost the local design community’s growth.”

The conference website is a fun, bold, modern take on event marketing. With giant red san serif font, scrolling tickers, and full-bleed imagery, it easily captures your attention — inviting you to scroll further and learn more. We’re big fans of the Lineup page, which takes creative inspiration from festival posters yet offers a classic list view for anyone who prefers a traditional event calendar look. 

The micro-interactions and animations hidden across pages provide the type of subtle moments that really show off that this event is for designers and creatives — without going too overboard or compromising accessibility. We love the pop art feel and encourage anyone looking to put a fresh spin on their event site to explore the full site.

Fruitful homepage snippet

Fruitful is a financial wellness membership that provides users with access to a financial planner, a high-yield savings account, and expert-tailored investment portfolios. The website’s sleek and clean aesthetic feels like an apt representation of the company’s core goal to make money simple. 

The homepage hero features a full screen sizzle reel of the Fruitful Guides, centering the business and the services around the real, human aspect of the business. We love the muted color scheme, high-quality videos, and easy-to-follow content. The subtle illustrations woven in alongside portrait photography across the site helps communicate both the human and services sides of the company.

The slick scroll animations are masterful, and the micro-interactions are so delightful you almost forget you’re browsing through a financial services company’s website. Anyone looking for top-tier video testimonial inspiration, examples of smooth multi-page scroll animations, or interactions that create tiny moments of delight should look no further.

Shirakaba Studio website

SHIRAKABA STUDIO is the design practice of Sara Ridky & Jimi Filipovski. This two-person team of experienced Creative Directors have a decade under their belt, offering services in web design, brand design, digital product design, social strategy, and more. Clients they’ve worked with range from Adidas and McDonalds to Carhartt, Mongo DB, and Mac Miller.

Their website functions more like a portfolio site, with a homepage that showcases past work in an above-the-fold carousel and below-the-field list. The quality of imagery of past projects makes it easy to understand the caliber of the creative work the team has done, and the way the team fills space on the page is satisfying and not overwhelming. 

We love the attention to detail and how they focus on bringing users into their world — from the curated playlists, to the placeholder for your project to be featured on their past work list, to the digital tour of their SHIRAKABA house. And the team perfectly highlights their capitalized business name throughout the site with their use of a modern, capitalized typeface across pages.

Redchurch homepage section featuring past work

Redchurch is a creative studio that focuses on two key pillars: sound and vision. The London-based studio’s past work includes campaigns with Rihanna for Dior, Scarlett Johansson for Huawei, and projects with IKEA and James Bond. 

From the jump, the perfect color treatment on the supercut of past work on the homepage hero gives users a preview of the studio’s high-quality work. We love the black and red color scheme featured throughout this site, the snazzy silver balloon homepage pre-loader, and expert-level scroll animations. The use of 3D animations is jaw-dropping, and while the team really flexes its creative muscles across the website, we love how they pare things back when needed, such as their simple navigation menu that simply jumps to different sections of their single-scroll site page. 

We’re big fans of the red-patterned pre-loader between site pages, the use of hover elements, and subtle interactions present throughout this stunning, sleek website. The Redchurch team’s twist on a classic “Contact Us” CTA button — swapped for a “Start a Project” button — is also a reminder of how creative work is an integrated effort, inviting users to begin their journey with them today, rather than simply inquire about services that could be provided to them.

BEGG's homepage

BEGG is an egg product manufacturer, offering both liquid eggs and liquid egg white products from free-range chickens.

The website is a fun visualization of how creative, expert design decisions can amplify any product — even eggs. We love how they’ve brought their packaging design aesthetic to life on the web — through the color scheme, multiple typefaces, and chicken illustrations. The fun interactions around nutritional info is a clever way to communicate essential information in a delightful way.

Our favorite moment on the site is when they use a stencil-like typeface in the recipe section, showcasing a photo of an egg dish within the lettering as you scroll. It’s the small details and subtle animations that really bring this website to life, and similar to how they describe their company as “a modern approach” — this site is the digital manifestation of that description for a farm product website.

Show off your latest project 

Whether you’ve been building for a client, your company, or your own special project — we’d love to see what you’ve been working on. Submit your site to Made in Webflow for a chance to be featured on our monthly roundups!

10 collaboration tools for a distributed workforce

Software Stack Editor · April 2, 2024 ·

image

Collaboration is key, and so are the tools that make it happen.

With the recent increase in hybrid and remote work, team collaboration tools have become more critical than ever. They bridge the distance so teams can generate ideas, distribute tasks, and share results effectively — regardless of physical location. 

This surge in demand has made collaboration tools a hot commodity. New apps are released constantly, each promising more features and reliability than the last. 

With so many products vying for attention, choosing the right suite of tools for your team can be challenging. Read on to determine which of the 10 best collaboration tools on the market meet your needs.

Why use tools for collaboration?

Maybe you’ve used Microsoft Teams or Slack for instant messaging, and Outlook or Gmail for email. And you may be familiar with Trello, Asana, or ClickUp for task management. These tools are common in many industries, and they’re especially useful for addressing increased cross-country and global collaboration.

In addition to keeping pace with changing workplaces, here are the main benefits of integrating collaboration platforms into your company’s workflow.

Increased productivity

Collaboration tools simplify basic tasks, like scheduling meetings, sharing files, and tracking projects. They reduce the time it takes to collaborate on projects and improve team collaboration overall.

For example, consider the ways to edit a document. You could download the file, make your proposed edits with strikethroughs and different font colors, and send it back to the writer. Alternatively, you could use Google Docs to seamlessly make comments and exchange ideas with the writer and other stakeholders in real time — a simpler and faster process that empowers you to make even the most subtle changes.

Reduced costs

Think of all the materials you use during a given workweek, like meeting agendas, design mock-ups, and reports. If you’re meeting in person, you might print numerous copies to hand out at meetings or send to stakeholders. 

Collaboration tools make it possible to share documents and designs digitally and host stakeholder meetings virtually. Cloud space is much cheaper than office space, and it also generates less physical waste. 

Improved project management

The best collaboration tools on the market provide intuitive ways to visualize, streamline, and manage projects. Asana, Trello, and ClickUp are popular examples — and for good reason. These versatile tools all offer customizable project views that can tell you precisely how things are progressing, at a glance.

Types of collaboration tools

You likely won’t need every type of tool you encounter, but it helps to understand the basic kinds so you can decide which bases to cover. Here are a few key categories of collaboration tools: 

  • File-sharing apps for storing, distributing, and managing access to files stored in the cloud
  • Communication apps for sending and receiving emails or instant messages
  • Project management tools that use strong visuals to help track and manage tasks
  • Design software that enables users to collaborate on documents and designs, often in real time
  • Scheduling tools for managing calendars that are shared across teams, to coordinate meeting times, important dates, and deadlines

What to look for in a collaboration tool

With so many options, selecting the correct tool for your company can feel challenging. You want to choose something with up-to-date features, but you also want something with a proven track record. Switching to a different collaboration platform in the future would be a hassle, with wasted time and effort, so making the right choice from the outset is important. 

Here are a few characteristics to look for when selecting collaboration tools for the long term.

Ease of use

Look for tools that are simple to learn relative to their complexity. Jira, for example, is a complex tool with many excellent features, but its cluttered design can make it challenging to learn. ClickUp, Asana, and Trello have similar features, but their intuitive, colorful user interfaces make them more accessible to new users. They also offer helpful templates you can use to create tasks instantly.

Compatibility

The most useful collaboration tools integrate with other platforms and ecosystems. Avoid tools that export files in proprietary formats. 

Microsoft, for example, makes a solid instant messaging app (Teams) that supports many integrations, but their Office 365 software locks you into a select group of file formats. Google has the opposite problem: Google Drive allows you to create and export documents in a wide range of formats but their instant messaging app, Google Chat, lacks the integration compatibility of its competitors. That’s why some teams rely on Google Drive for file sharing but use Microsoft Teams for communication.

Versatility

Prioritize tools that cover more than one function. You don’t need a one-stop shop for everything, but curating a tight tool suite that relies on as few unique products as possible can streamline workflows. 

Trello is an excellent example of versatility in action. Its primary function is creating Kanban boards, a visual system for organizing and streamlining tasks. And you can also use it to automate project management, schedule meetings, and gather productivity metrics.

The 10 best collaboration tools

The following 10 tools are the top performers in each category. They each have a strong mix of favorable characteristics: ease of use, compatibility, and versatility. Plus, they come from trustworthy brands with long histories of success.

1. Google Drive

Category: File sharing, design

Google Drive earns high marks for compatibility, versatility, and ease of use. Users can collaborate on documents in real time, export files in various formats, and manage file access in a snap.

2. Figma

Category: Design

Figma is a specialized tool made specifically for designing interfaces. It allows for real-time collaboration. Its various design tools make creating and updating designs intuitive to learn.

3. Zoho

Category: File sharing, design, communication, scheduling

Zoho is a collaboration platform centered around sales and marketing. In addition to its well-respected CMS, it offers email services, appointment scheduling, and document collaboration tools. However, it includes insubstantial project management functions, which is a drawback. If you already have a trusted project management tool, Zoho can help with everything else.

4. Slack

Category: Communication

Slack specializes in instant messaging. They’ve recently also been testing the waters of conferencing and file sharing with new features like canvases, huddles, and workflows. Plus, many other tools support Slack integrations for seamless information sharing.

5. Zoom

Category: Communication

Zoom video calls are consistently stable and easy to join. Zoom also offers instant messaging and a helpful digital whiteboard feature. The app integrates with popular calendar tools to facilitate seamless scheduling. The Scheduler feature enables users to share their availability across platforms.

6. Microsoft Teams

Category: Communication, scheduling

Microsoft Teams is a reliable, secure communication platform. The best features include the calendar, video conferencing, and instant messaging. But file sharing and document collaboration through Teams is a clunkier experience compared to Google Drive. 

7. Google Calendar

Category: Scheduling

Google Calendar is a trusted tool for scheduling and sharing availability. It automatically syncs with Gmail and supports integration with other communication platforms, like Zoom, Zoho, and Slack. And its UI is clean and straightforward, which makes incorporating it into your workflows simple.

8. Miro

Category: Project management

Miro is a versatile whiteboard tool that allows users to create curated boards to track tasks, analytics, and workflows. It supports integrations with over 100 other tools, earning it high marks for compatibility.

9. Trello

Category: Project management

Trello is a widely-respected industry leader in project management software — over two million teams use this product worldwide. The free version offers a robust feature set with no user cap, making it popular with teams who are scaling up. It’s most helpful in creating visually appealing and easy-to-understand Kanban boards.

10. ClickUp

Category: Project management

ClickUp is a relative newcomer to the project management industry with a lofty mission of becoming one app to replace all others. The platform offers document collaboration, whiteboards, and even chat. But the project management product is the most noteworthy. It’s an excellent addition to your toolbox now, and its capabilities might grow to replace other tools in years to come.

Bring collaboration to web design

Teams need versatile collaboration tools to efficiently manage projects, streamline workflows, and make sure bright ideas don’t get lost in the shuffle.

‍Webflow Enterprise is a powerful visual development platform, with purpose-built tools for collaborative web development. With distinct designing and editing modes with customizable collaboration settings, Webflow enables developers to work without interruption while designers and writers collaborate on content in real time.

Choosing a modern enterprise CMS — the options and how to evaluate them

Software Stack Editor · April 2, 2024 ·

image

In the 30 years that the commercial web has existed, enterprise companies have had to constantly change their approach to website building.

In the early days of the commercial web, developers would code websites page-by-page. As sites got more complex, engineers developed software that could support designing and building sites and help to manage the ever-increasing quantities of content running through them.

The software they developed was the groundwork for modern Content Management Systems (CMS). A CMS is now an essential piece of website development, especially for an enterprise company that has to be able to handle large volumes of content and many users. We are now taking part in the next major CMS shift — away from slower developer-dependent projects and towards a development approach that is led by agile marketing teams and powered by modern visual-first ools.

To find the right type of enterprise CMS for your company’s website, it’s important to consider not just the content it needs to manage or the end-result user interface but also what kind of workflow the platform enables for the teams who contribute to your website.

The types of tools used to build an enterprise website

The tools a company can use to build an enterprise-level site fall into four main types. Each type of platform handles the front-end website development and the back-end content management slightly differently, and each has its own strengths and weaknesses.

Open Source CMS: the most common option, built with a mix of code and plug-ins

An open source CMS is a piece of website building software whose source code is free and open for any developer to contribute to. This means you can install a large variety of add-ons, plug-ins, and templates when using this software, and your developers can code any additional functions your site needs. The collaborative nature of an open-source program enables a wide range of creative processes, but this decentralized approach can also be inefficient and complicated to manage.

Open-source web development programs like WordPress were the first move towards the contemporary CMS and more accessible visual development tools. WordPress is still the most ubiquitous platform on the web, though the need for plug-ins and developer support for additional coding means it has its limitations. To create an effective enterprise-level site, plug-ins for features such as visual design, e-commerce, forms, security, SEO, analytics, and content management are essential.

Digital Experience Platforms: a suite of tools for managing high volumes of content and building multiple sites

A digital experience platform, or DXP, is an integrated software framework containing a suite of tools to handle each detail of managing content, creating, and publishing a large, enterprise-level website. Examples are programs like Adobe Experience Manager (the most prominent DXP), Sitecore, and Acquia.

DXPs can handle larger volumes of content and unify that content over a network of websites — think subdomains for company subsidiaries or sites for different countries — which is important for enterprises with a larger reach. Developers code the websites themselves within the program, creating templates and components that designers can then assemble.

In the ten years since these programs were created, front-end development has evolved dramatically, but the programming language used, specifically for Adobe Experience Manager, hasn’t changed. As a result, it is fairly out-of-date, so it can be challenging to find developers willing to work with the program’s outdated language.

Headless CMS: organizes content separately from your front-end site development

In reaction to the threat of front-end development techniques evolving past back-end infrastructure, some companies moved towards what’s called a headless CMS approach using solutions like Contentful’s platform or a Jamstack architecture.

A headless CMS separates the back-end (content) from the “head”—the front-end website that users interact with. This separation means that if a tool or technique, like the DXP language mentioned above, goes out of date, web designers can create a new front-end with updated technology and plug it into the existing back-end. This avoids a company having to go to the massive effort of moving their content from one database to another just to update the front-end. The drawback of this approach is that you need to hire developers to custom-build each customer-facing site.

This approach also gives the company using a headless CMS a multitude of options for where to put their content. This can mean a network of websites, mobile apps, kiosks, or a retail point-of-sale system, all linked by their shared content database.

Visual-first, composable CMS: create dynamic, content-driven experiences that fuel business growth

At its core, a modern visual-first web development tool, like Webflow, is essentially a visual interface overlaying the actual code. It allows anyone to design a website without writing a single line of code. This means developers and non-developers alike can visually design layout elements like navigation bars, grids, columns, and buttons, seeing the results of their design changes instantly on the canvas. Scott Brinker, VP of Platform Ecosystem at HubSpot and editor of chiefmartech.com, explained:

“If you can draw an idea on a whiteboard, you’re not that many steps away from actually turning it into something real that you can share with the world.”

With visual development tools, you can also use features like symbols and classes to make design choices repeatable, consistent, and able to be changed instantly across the whole site. You can also use features that support responsive design to adjust your site to be legible on multiple devices, such as mobile phones and tablets, rather than needing to code multiple versions of the website. Clean, semantic code is still automatically written in the program as your team makes visual changes, so developers can step in and insert custom code for any added functionality you need.

A platform like Webflow allows all the teams who have a stake in your website — marketing, engineering, sales, and more — to take part directly in the development of your website. More specifically, Webflow’s visual-first, composable CMS enables teams across your entire company to create dynamic, content-driven experiences — like blogs, event pages, and job boards — that fuel engagement and respond to customer needs. This means designers are empowered to visually design and build with dynamic content without writing code or managing complex databases, marketers and content contributors have the ability to create and edit content in full visual context without relying on developers, and developers can confidently connect Webflow CMS with best-of-breed marketing tools and third party databases.

The most important considerations when choosing the right platform for your company

There are a few CMS features and characteristics you should consider before investing in a CMS. Primarily, you need the technical features that ensure your site is secure and performs well, and you need a platform that will support the type of workflow you want for your team. Here’s how to assess how each of the platforms above could perform for your company.

Security — will the platform keep your data and your website safe?

Make sure the platform you choose takes measures to protect both your information and that of your customers.

Compliance

The best way to assess whether a platform follows reliable security protocols is by looking to see what third-party certification standards they meet. SOC 2 certification is a comprehensive third-party audit. This audit considers how a platform secures customer data on five counts: security, availability, processing integrity, confidentiality, and privacy. This independent assessment makes it an excellent way for a company to quickly evaluate whether a platform has high standards for security. You should also be sure you can get a TLS/SSL certificate, so your website will have secure, end-to-end encryption. Encryption will keep any data communicated to or from your website private.

Visit the security page of the platform you are considering in order to get a comprehensive view of their approach to security updates and adherence to current protocols. Some platforms, like Webflow, offer integrated security practices, while others, like WordPress, use third-party plug-ins like Sucuri to enable security functions.

Evaluate what login and account security features the platform offers for both your account and the accounts of your users. Current best practices to look for include single sign-on and two-factor authentication.

Third-party additions

You need to consider more than just the security of the platform itself, particularly if your platform requires third-party plug-ins. Third-party applications and plug-ins each represent additional security risks. More established services like PayPal or Mailchimp have their own robust security practices, however, plug-ins created by independent developers with little oversight are much harder to evaluate.

For your website to remain consistently safe, you will need to trust that the third-party developer is keeping up with security patches for their plug-in, and you will need to make sure your development team is staying on top of installing every single plug-in update.

This is, unfortunately, the major security risk of WordPress. An Imperva Report identified 98% of WordPress’s security vulnerabilities were due to plug-ins. With a site potentially using dozens of plug-ins, each one represents an opening for hackers.

Performance — will the site function quickly and reliably?

Making sure your website loads quickly and stays online and available to customers is a non-negotiable for enterprise companies. Choose a platform that will support your site’s performance and grow with the demands of your user base.

Scalability and future-proofing

When you have invested time and money into building a website, you want to be sure that the platform you use will keep your website up-to-date for years into the future. Your site will also need to be able to grow in its capacity with the successful growth of your company.

If your company hosts, or expects to host, a large volume of visitors or content, a DXP may be the most robustly scalable option. Their systems can handle huge, far-reaching content and sites, but this infrastructure will be overkill for the average enterprise.

A headless CMS can feel more future-proof since you can change out the front-end as the web evolves, but it is reliant on developers to make changes or refreshes when the site needs them.

Webflow, however, supports future-proofing with regular improvements and updates without the user having to intervene manually.

Loading speed

Google’s research shows that 53% of visitors will abandon a page that takes over three seconds to load. Watch out for bloat that can slow your site, and make sure your programmers or the software itself can optimize content for the user. Mobile sites should be able to load quickly, even on slower networks.

Sometimes quick load times can be a trade-off with other considerations. For example, Adobe Experience Manager’s (AEM) interface handles lots of content, but its data-heavy back-end can make pages slow to load for users. WordPress plug-ins can also significantly slow load times.

Webflow offers several automatic features, like lazy-load photos and scalable responsive images, that optimize page load times, especially for mobile users.

Traffic surges and growth

In order to benefit from a successful marketing campaign or viral social media initiative, it is vital to build a site that can handle sudden spikes in traffic. This is especially important for fast-growing start-ups, businesses in fields that are prone to viral popularity, or companies that regularly host a high volume of users.

Headless CMSs like Contentful ensure the content infrastructure behind the site can perform at scale, but for developer-lead platforms like theirs or AEM, your team will need to program your site architecture with organic traffic spikes and DDOS attacks in mind. This can be a big engineering challenge.

Webflow supports scalability from the hosting side by using Amazon Web Services, so sites are backed by a reliable network of 100+ data centers and servers worldwide. For an open-source program like WordPress, make sure the hosting you choose for your site has similar support.

Agility — how quick and flexible is the development process?

For a business or industry that moves quickly or needs to enable responsiveness to customer needs, choosing a platform that is agile will enable quick site changes and market responsiveness.

Templates and repeatability

Included or developer-created templates and repeatable elements can support faster development processes while supporting the brand consistency your design team has created.

A headless CRM like Contentful will need developers to code all the front-end elements of your site, but there are Jamstack themes that are compatible. Slightly more repeatable is a system like AEM, which uses pre-programmed elements that designers can assemble into pages and websites.

Webflow has an extensive library of templates and community-created sites you can copy wholesale or element-by-element and then customize. It also uses a system of Components — reusable components that your team can design without coding and then insert anywhere in your site.

Speed of changes

The speed at which your team can execute changes depends on the techniques for creating and using repeatable structures and how much you will need developer labor to execute the overall workflow.

Designers can use AEM’s repeatable elements to assemble pages quickly, but they first need to be created by developers. If additional elements or changes to existing elements need to be made, you will need engineers to execute that. SmugMug struggled with the slow process of making changes in this manner:

“One time we had to change the copy on a button, and that alone took 3–4 days. We couldn’t experiment or test things out with the design in an agile way with those timeframes.”

– Michal Pechardo, Senior Designer, SmugMug

WordPress themes offer several settings that designers can change to shift the full layout of the site. They can execute these changes themselves for the most part, but more complex updates do need developer support. Virta-Health’s director explained their experience:

“[When we used WordPress] updates were tedious. Frequent and simple changes, like those to our press page, required engineering involvement, which wasn’t the best use of their time.”

– Paul Sytsma, Senior Director, Corporate Marketing, Virta Health

A major benefit of Webflow’s Symbols is that you can change the settings of any Symbol, and those changes will cascade across the entire website, making design changes consistent and quick to implement without having to send change requests to your development team. MURAL’s design team benefitted from this workflow, explaining:

“Ultimately, we wanted to control our own destiny when it came to the website, and Webflow gives us the freedom to make the changes we need without relying on other teams.”

– David Chin, Design Strategist, MURAL

Ownership — which teams does the platform empower to design your site?

Ultimately, your website is a marketing asset. Empowering marketing to execute changes directly on your website enables them to respond effectively to the needs of your customers and take full ownership of your site as an important element of their work.

For full transparency, this is the area where Webflow truly shines, and with the rise of visual-first solutions and citizen-creators, this type of workflow is what the future of web design is rapidly moving towards.

When trickier website details need attention, engineers can step in to write custom code, but they aren’t needed for the day-to-day design and updating of the site. Reducing how many things need to go through engineering has the added benefit of freeing their team up for more business-critical functions. Attentive found freedom with this workflow for their website update.

“Our new designs didn’t need to go through anyone else besides brand and marketing — no engineers needed. The freedom and flexibility we gained through Webflow was invaluable.”

– Elyssa Albert, VP of Design, Attentive

Even when an enterprise has needs for a heavier-duty CMS, teams at your company can use visual development tools in a hybrid approach by using them as a DXP for the main site and using visual-first tools to build functioning design prototypes and smaller satellite sites with more direct input and agility. With a fully functional prototype, engineers know exactly what design intends to build, and they can make adjustments before your company spends hours and dollars coding the final site.

Pacific Funds built a fully functional website on its own by turning to Webflow. While their parent company used a DXP for their extensive primary site, they could use Webflow’s visual-first development capabilities to gain control of their subsidiary website as a vital marketing asset.

“We were able to get a published, working version of the entire website live in less than two weeks. And we didn’t have to compromise on our original designs.”

– Karen Yue, Director of Digital Marketing Technology, Pacific Funds

To choose the right enterprise CMS, rethink what it means to create a modern website

A traditionalist team with WordPress. A company that has extensive engineering support might choose a headless approach For a forward-thinking business that values agility, is looking to scale content production, and wants to reduce developer reliance, a visual-first, composable CMS is likely the answer.

To learn even more about the picking the right CMS, watch our recent webinar, Next-gen CMS requirements, to hear five reasons why a cutting-edge enterprise CMS is not just a nice-to-have, but a necessity for teams aiming to thrive in the digital arena.

Turning Webflow analytics into actionable steps to hit website KPIs

Software Stack Editor · April 1, 2024 ·

image

Tracking website analytics isn’t just about vanity metrics like page views; it’s about unveiling valuable data directly impacting your business’s success and growth.

Analytics provide concrete data that sheds light on what’s working and what’s not on your website. This empowers you to make informed choices about your content, marketing strategies, and website design, all of which aim to achieve your specific goals.

To better understand how your team can leverage analytics to scale the impact of your website, let’s explore how we at Flow Ninja use data to create data-driven roadmaps that help us consistently hit our KPIs. 

Improving content performance

Not all content is created equal. Some pieces naturally capture your audience’s attention and drive engagement, while others might fall flat. 

Identifying which content resonates most with your audience is crucial for optimizing your content strategy and boosting website performance. 

  • The good news: Tracking content performance can be done for free with GA4. 
  • The bad news: You might have to play around with the custom setup of Google Analytics, which requires developers and can be complex.

We managed to bridge this gap between GA4 and Webflow with Data Goat. Once connected, this Webflow App starts automatically tracking website analytics within the Webflow Designer. You can access key metrics, generate reports, and gain valuable insights directly from your design environment.

Some of the following metrics can help you track content performance:

  • Engagement metrics: Look at metrics like clicks, time spent on a page, bounce rate, and even shares, and comments. These indicate how deeply your audience is engaging with the content.
  • Conversion metrics: Analyze metrics like form submissions, email signups, or product purchases triggered from specific content pieces. These reveal how effectively your content is achieving your desired goals.
  • Bounce rate: A high bounce rate, indicating visitors quickly leaving your page, could suggest the content isn’t meeting their expectations.

Content with consistently high engagement and conversion rates is likely to resonate with your audience. Use these insights to:

  • Replicate successful elements: Analyze high-performing topics, formats, and writing styles and incorporate them into your future content creation.
  • Tailor content to specific audience segments: Segment your audience based on their interests and preferences, then tailor your content to cater to their unique needs.
  • Experiment and refine: Experiment with different content formats and approaches. Track the results and continuously refine your strategy.

Webflow’s flexible CMS empowers you to experiment with different content formats without technical limitations. More importantly, all changes can be easily published live, meaning you can immediately start tracking their impact.

Boosting engagement metrics

While creating high-performing content is crucial for increasing engagement, it’s important to remember that it’s not a one-time fix. Instead, it’s an ongoing cycle of analysis, improvement, and iteration.

  1. You create content
  2. You analyze engagement metrics.
  3. You improve content.
  4. You return to the engagement metrics and watch their performance.
  5. You improve content.
  6. …and so on

When talking about content, we often only think about blogs and landing pages, which aren’t the only factors contributing to website engagement. To increase those numbers, you can consider some of the following: 

  • Videos: Create short explainer videos to break down complex topics in an easily-digestible format.
  • Infographics: Develop interactive infographics that allow users to explore data and discover insights.
  • Podcasts: Produce engaging podcasts that cover industry trends, offer expert interviews, or share interesting stories.
  • Interactive content: Embed quizzes, polls, calculators, or even games to allow users to interact directly with your website and content.
  • Mobile performance: Ensure your website and content provide a seamless experience across all devices, as many users browse on their phones. 

Which one of these works best for your site? Well, this brings us back to the cycle described above. To test a type of content, first create it and start tracking its performance.

Analyzing and optimizing the user journey

How do you identify areas where users might be getting stuck or frustrated? A user journey analysis helps you understand how users navigate your website, pinpointing friction points that hinder their experience.

Tools like Microsoft Clarity can be valuable for user journey analysis. They provide recordings of user sessions, heatmaps showing where users click, and scroll depth data revealing how far they delve into your content.

Here’s how to transform data from Microsoft Clarity into actionable tasks for optimization:

  • Analyze recordings: Identify common user behaviors, patterns, and pain points. For example, do users frequently click on elements that don’t lead them to where they expect?
  • Examine heatmaps: See where users focus their attention and identify low-engagement areas.
  • Inspect scroll depth: Understand how far users are typically scrolling on your pages and identify content that might be getting missed.

Based on your analysis, you can create data-driven tasks to improve the user journey:

  • Simplify navigation: If users struggle to find what they need, restructure your navigation menu or add search functionality.
  • Optimize content placement: Move important information to areas with higher focus based on heatmaps.
  • Break down long content: If scroll depth data reveals users aren’t reaching the bottom of your pages, consider splitting long content into multiple pages or adding visual breaks to improve readability.

Webflow Designer’s visual interface allows you to edit your website directly based on your insights. You can reorganize navigation elements, adjust the content layout, and visually optimize your website without extensive coding knowledge. 

This streamlines the optimization process, allowing you to quickly iterate and test your changes to see their impact on user journey and engagement.

Optimizing CTAs 

Simply having a CTA isn’t enough; it needs to be prominent, compelling, and strategically placed throughout the user journey to maximize its effectiveness.

Website analytics offer a treasure trove of insights that can be used to optimize your CTAs:

  • Identify key pages: Track clicks to see where users naturally flow to identify key pages for your CTAs.
  • Track conversions: Track which of the existing CTAs convert the most on which pages to try to replicate the formula in other places.

Besides clicks and conversions, CTA optimizations require looking into the following metrics:

  • Identify high-engagement areas: Use heatmaps and scroll depth data to see where users naturally focus their attention. 
  • Analyze user behavior: Use clickstream data to understand how users navigate your website. This can reveal natural transition points where users are ready to take action, making them prime locations for CTAs.
  • Test different variations: A/B testing allows you to compare the effectiveness of different CTA designs, wording, and placements. This data-driven approach helps you identify the combinations that resonate most with your audience and drive higher conversion rates.

With global components and button elements, Webflow streamlines testing and optimizing CTAs, meaning you can quickly identify the best next course of action.

Analyzing and improving performance across devices and browsers 

Most analytics platforms offer detailed reports on device types (desktop, mobile, tablet) and browsers (Chrome, Firefox, Safari, etc.) used by your visitors. Analyze these reports to understand:

  • Traffic distribution: Identify which device types and browsers account for most of your visitors. This information is easily accessible via GA4 and, consequently, Data Goat.
  • Engagement differences: See if engagement metrics like bounce rate, time on page, and conversion rate vary significantly across different devices and browsers.
  • Compatibility issues: Use tools like Google Search Console to identify browser compatibility issues that might affect the user experience for specific audiences.

Based on your analytics data, you can implement several strategies to ensure your website is optimized for different devices and browsers:

  • Responsive design: Implement a responsive design that automatically adjusts the layout and content based on the user’s device screen size. Webflow offers built-in responsive design features to make this process easy.
  • Device-specific design: Consider creating targeted designs for specific devices based on their browsing habits and common pain points. For example, you might offer a simplified mobile navigation menu or emphasize specific information relevant to mobile users. Webflow breakpoints can help with this.
  • Browser testing: Regularly test your website across different browsers to ensure consistent functionality and appearance.

Regularly optimizing individual landing pages 

Data-driven optimization is vital to identifying underperforming pages and maximizing their conversion potential. 

Everything discussed above can be used on a single-page level, which could give you a more nuanced understanding of how each of your strategies are performing.

For each page, you should be able to see:

  • Conversion rate: This is the percentage of visitors who complete your desired action on the landing page, such as signing up for a newsletter or making a purchase.
  • Various engagement metrics: Analyze time spent on a page, scroll depth, and click-through rates to understand how visitors are interacting with your content.
  • Heatmaps and recordings: Tools like Microsoft Clarity can reveal where users focus their attention and identify potential areas of confusion or frustration.

Some of the actionable steps you can take based on landing page analytics include: 

  • Simplifying the call-to-action (CTA)
  • Optimizing page load time
  • Improving content relevance
  • Enhancing visual appeal
  • Personalizing content
  • Improving mobile responsiveness
  • Optimizing form fields
  • Improving scroll depth
  • Optimizing navigation
  • Experimenting with content formats
  • Regularly monitoring and analyzing metrics

The Webflow Designer now offers page-by-page analytics through the power of one-page metrics with the help of Data Goat. This allows you to directly view key analytics data for each landing page within the Webflow interface.

Using analytics to hit your web goals 

In summary, Webflow now features tools like Data Goat, allowing you to analyze data, identify opportunities, and implement changes directly within your design environment. 

Moreover, Webflow’s flexibility and visual editing tools enable you to test and iterate on your website quickly based on analytics insights — without any complex coding or platform switching.

Simply put, Webflow and analytics are your powerful combo for website success. Using data as your guide and Webflow as your tool means you can instantly focus on growth.

How to measure your market size with TAM, SAM, and SOM

Software Stack Editor · April 1, 2024 ·

image

Leveraging metrics like TAM, SAM, and SOM is key to strategic market positioning and impact.

Whether launching a new product or scaling an existing venture, understanding your market’s size is essential. Beyond identifying potential customers, this involves analyzing demand trends and pinpointing growth areas, competitive advantages, and underserved niches within your industry. These insights are key to developing strategies that resonate with your audience and capitalize on untapped market potential.

While metrics like total addressable market (TAM), serviceable available market (SAM), and serviceable obtainable market (SOM) help in this analysis, their true value lies in how they transform market data into actionable insights, guiding your business decisions and strategy.

How to calculate TAM, SAM, and SOM

In business, a market defines a group of potential customers who share common characteristics and needs, making them likely to purchase a product or service. But calculating a market’s size depends on how you define it, which is where TAM, SAM, and SOM become crucial. Each metric offers a different perspective on market definition, providing unique insights into your potential customer base and revenue opportunities.

Here’s how to calculate each metric and how they differ.

Total addressable market

Formula: TAM = average revenue per user (ARPU) x total potential customers in market

In business, TAM quantifies the total potential demand for a product in a specific market. Businesses typically calculate it using two methods:

  • Top-down market sizing. This method starts with the broad market, using industry reports, government data, and other external sources to estimate the overall market size. From there, refine this estimate to focus on your target segment. A software company specializing in enterprise project management (EPM) tools might begin with the global demand for EPM software, which could be 1 billion dollars, and then narrow it down based on its market niche.
  • Bottom-up market sizing: This approach begins at the niche level and expands outward. It starts with data about your specific target audience before estimating the broader market demand. If the software company’s tools are popular among graphic designers, web developers, and design agencies, it will use this data to extrapolate the overall market demand within the creative industry.

You arrive at a more comprehensive TAM estimate by combining top-down and bottom-up approaches. The software company, for instance, could use the top-down method to analyze data on various segments of the project management software market, such as corporate enterprise solutions and small business tools, before identifying its niche in specialized software for creative industries. And a bottom-up analysis of its current user base’s popularity can help estimate the broader market demand in this niche.

Integrating both these approaches, the software company might estimate its TAM at 150 million dollars within the 1 billion dollar global project management software market. This figure represents the company’s total potential revenue opportunity in its specialized segment, offering a clear target for business growth and strategy development.

Serviceable addressable market

Formula: SAM = target segment of TAM x ARPU

When comparing TAM versus SAM, the latter is a more focused estimation that accounts for the constraints limiting your business’s reach. It refines the broader concept of TAM by focusing on the market portion realistically accessible to your business, considering factors like geographical limitations and regulatory restrictions. SAM narrows down your potential audience, providing a more targeted estimate.

Consider the earlier project management software example, which faces regulatory restrictions limiting its operation to North America. While its TAM might be estimated at 150 million dollars, SAM represents the market portion it can actually serve. If 72% of its potential market is outside North America, the company’s SAM would be significantly smaller than its TAM, at around 42 million dollars.

Serviceable obtainable market

Formula: SOM = last year’s market share x this year’s SAM‍

SOM further refines SAM by estimating the market share your company can realistically capture. This calculation factors in your company’s operational efficiency, capabilities, and existing market share within the SAM. It offers a more pragmatic and feasible measure of your market share, acknowledging that completely capturing the SAM is unlikely.

For example, if the EPM software company secured 10% of the North American market last year, based on its SAM of 42 million dollars, its SOM would be 4.2 million dollars. This figure represents an attainable target, reflecting the company’s actual market potential, guided by its resources and strategic approaches.

What’s the difference between SAM and SOM?

SAM and SOM are similar metrics that differ in scope and practicality. SAM is a segment of the TAM that your business can serve within its constraints. SOM is a more focused measure, estimating the part of SAM your business will likely capture while considering competition and operational capabilities. While SAM outlines the serviceable market, SOM pinpoints what’s realistically achievable within that space.

Tips to calculate market size

Each market varies in size, but calculating it typically follows a consistent method. Here are some valuable tips to guide you through the process.

Adopt a realistic approach

While estimating market size, it’s crucial to keep your projections realistic. Avoid overly optimistic forecasts that could lead to inflated expectations. Unrealistically high expectations may result in allocating excessive resources like funds, time, and effort without understanding the actual market dynamics, leading to disappointment and financial strain.

To be realistic, recognize and consider your market’s constraints and challenges, such as market saturation, potential competition, and economic conditions. If you’re entering a highly competitive market like ecommerce, consider the dominance of established players and factor in a gradual market share gain over time. Adopting this realistic approach helps set achievable targets and prevents resource overcommitment, aligning your business strategies with actual market potential.

Understand when to use TAM, SAM, and SOM

Each market definition — TAM, SAM, and SOM — serves a specific purpose. TAM offers a broad market overview, SAM refines this view based on specific constraints, and SOM further narrows it to what you can realistically achieve. Knowing how and when to use each is crucial for different business strategy aspects:

  • Use TAM for high-level strategic planning since it helps you understand the market’s full scope, making it ideal for long-term vision and growth potential strategies.
  • Apply SAM for targeted marketing efforts. It’s beneficial for focusing on specific market niches and segments you can realistically serve, given your current business model and constraints.
  • Apply SOM to guide resource allocation and set achievable targets. It helps pinpoint the market share you can feasibly capture, making it useful for short-term planning and specific goal setting.

If you’re running a tech start-up, you might analyze TAM to gauge the overall market potential for your software. This helps in envisioning the broader scope and opportunities for growth. As your business matures and you consider expanding operations, SAM becomes essential to identify the most viable markets, whether they’re specific regions or industries. Finally, SOM is key in helping you set realistic sales and marketing targets within your serviceable market, ensuring efficient resource use.

Use reliable sources

Your market size estimation’s accuracy connects closely to the quality of your data sources. Ensure precise, current information by relying on credible sources such as industry reports, government statistics, and established market research findings.

When estimating the market size for a new initiative on a healthcare platform, for instance, use data from authoritative medical journals, clinical studies, and regulatory information. Leveraging these reliable and respected sources ensures a trustworthy foundation for your market analysis, boosting the credibility and relevance of your findings.

From potential to reality with Webflow

Evaluating your market size through TAM, SAM, and SOM offers progressively focused insights, shaping your strategy from broad market potential to a realistically attainable market share. But understanding potential is only half the battle.‍

Webflow Enterprise helps you transform your vision into reality. When you’re ready to expand beyond your typical market, our localization features provide an end-to-end solution to tailor your content for a global audience.

Head to the Webflow blog to learn more about localization and internationalization, as well as testing strategies for optimizing marketing strategies to new segments.

Webflow’s new look: Designing a product for pros

Software Stack Editor · March 29, 2024 ·

Last year, Webflow rolled out a fresh look — complete with a bold logo.

The role for our engineering, product, and design teams?

Bring that boldness to life in our core product experiences, including the user interface for the foundation of our product — the Designer.

Webflow turned ten last year. Like a community quilt, different teams had added to the brand and product over the years. The result was a rich and complex experience, warm and familiar on the one hand, but with a mash-up of design aesthetics and diverging UX patterns. 

We wanted the product experience to feel both professional and delightful, and like a handcrafted experience. So, to build a more consistent and polished UI, our team put the work in and sweated the details because we know that’s what you — the freelancers, designers, visual developers, marketers, and entrepreneurs who use Webflow — do every day, too. 

Wondering how we created a revamped app that’s unmistakably pro? And how we planned and executed this huge redesign and launch to 100% of our customers at the same time? Here’s a peek at our process — and what we learned along the way.

Good things come from collaboration

We kicked things off at the beginning of 2023 by bringing together a team of folks from our creative, education, design systems, and product design teams to explore the future of Webflow’s new brand identity from every angle. This included everything from examining the logo, to advertising concepts, to illustrations — all the way down to the button designs. Such a wide range of exploration proved challenging at first, but the contributors’ varied viewpoints sparked new ideas. 

By starting with open-ended inquiry, we opened up space to find unexpected solutions. Instead of only tackling a redesign, we considered entirely new products and features. Rather than just creating a new logo, we explored all the ways the brand might be better expressed. 

For a project like this — one with many moving parts, tons of collaboration, and an unmissable deadline  —we made sure we had buy-in from our leadership team from day one. During the early stages, our cross-functional team shared a video walkthrough of the latest work with all key stakeholders every Friday. After the initial exploration phase, we kicked off a focused sprint to implement the first phase of the project. During this sprint, we decided exactly what was achievable by the deadline, and which ideas had the most impact for customers. 

Clearly define brand values to guide exploration 

‍

We developed four brand values at the outset to guide our brand exploration and  product design direction. The principles we landed on are “cinematic,” “sophisticated,”  “aspirational,” and “pro.” The cinematic came through most strongly in the updated product designs, with dramatic lighting, engaging camera angles, and thoughtful compositions.

Taking cues from the aesthetics of neomorphism, we steered clear of purely flat visuals and added a sense of depth, materiality, and substance. The Webflow Designer app, loaded with dense interface controls, needed a simple design, but with very clear guidelines to help users intuitively and efficiently understand how to navigate. 

We also looked outside of traditional SaaS software for inspiration. Products such as Cinema 4D and Unity, for example, are ultra-powerful professional tools that offer enormous amounts of control with dense yet legible designs. 

To improve user experience, tap into valuable customer feedback 

Our customers played an essential part in the process. We tested early concepts and significant user-experience changes with new and experienced Webflow community members. Customers in this early testing group even used Chrome Dev Tools to adjust the design and provide direct suggestions for improvement. 

As a result, we learned that some of our new ideas needed tweaks, and we iterated to get them right. For example, in response to feedback from early testers, we adjusted type sizes to improve legibility and hierarchy in the Designer and Dashboard. When customers working in very bright environments told us that the almost-black background was too high-contrast, we made adjustments to improve the experience.

Later in the project, we formed a panel of customer experts who previewed our refreshed design. Their feedback? Pure gold. It helped us further refine our designs and squash bugs that only popped up in real-world scenarios. 

We have continued to make changes based on customer feedback post-launch, too. Recently, we launched a new Appearance Settings option for better accessibility controls to help pros work comfortably under any environment. . 

When engineering and design teams partner, the product wins

From the get-go, engineers played an integral part in the process. We made crucial structural decisions early on and gave engineers the green light to tidy up the existing code and implement styling variables throughout. This paved the way for a smooth integration of the new design token values later in the process. Our designers used Figma to build full designs for key screens, while working closely with engineers to ensure consistency and swiftly resolve edge cases. 

If you’re interested in how Webflow engineers implemented some of the most complex elements of the new interface, check out lead engineer Jon Quach’s tweets, including a deep dive into how we developed the new margin and padding control as well as other lessons we learned throughout the project. 

What we learned while redesigning one of Webflow’s core products

‍Redesigning the user interface for our Designer was a complex process. Each lesson we learned along the way will help us continue to hone our approach to innovation and collaboration:

Go big or go home.

When it’s time to revamp, don’t just tweak around the edges; be brave and aim high. We learned that bold moves can lead to exciting and meaningful improvements. 

Teamwork makes the dream work.

Keeping a tight loop with our team members and decision-makers meant everyone stayed on the same page — and bright ideas didn’t get lost in the shuffle.

Embrace the new and tweak as you go.

Stepping into something new can feel a bit awkward at first. Think of it as a fresh opportunity and a journey of learning and adapting. Stay open, embrace  change, and adjust based on perceptive feedback. 

Spread the excitement.

From showing off our cool design drafts to celebrating every new feature, we kept the excitement brewing and energy levels high. This helped us stay motivated and connected to our mission. We also shared community feedback along the way to connect our contributions back to the people we were designing for.

The lessons we learned will continue to shape Webflow’s future moves. The boldness of our new brand is now woven into every pixel, signifying more than just a design upgrade — it’s our commitment to being unmistakably pro.

How to work with freelancers: 8 collaboration tips

Software Stack Editor · March 29, 2024 ·

image

Freelancers and independent contractors bring external expertise to your web development project, complementing your internal team’s skills.

Your talented in-house team drives web design forward, but certain projects demand additional support or specialized skills, like expert copywriting. Instead of onboarding full-time employees for these niche requirements, hiring freelancers or contractors is a flexible, efficient solution. 

If you’re currently working with freelancers, you know that this strategy also allows for a more dynamic and adaptable workflow. It enables your team to scale up or down as needed, ensuring that the best talent handles every aspect of the web development process whenever necessary.

Make the most of these temporary teammates by learning how to effectively work with freelancers. 

How to effectively work with freelancers: 8 tips

Consider freelancers as precision tools in your project toolkit, providing specialized solutions and fine-tuning operations with expertise and flexibility. To fully benefit from freelance talent, you must adopt strategic approaches for onboarding and collaborating with these independent professionals.

With this goal in mind, we’ve compiled 8 tips to help you build a successful working relationship with freelancers, ensuring you maximize their unique skills.

1. Create and use templates

Prepare your freelancers for success by crafting bespoke development maps and templates, detailing everything from API integration specifics to responsive design parameters. These specialized guides act as navigational tools for freelancers, directing their efforts precisely and efficiently from the outset. By handing over a document that speaks directly to your project’s technical and creative nuances, you ensure that every line of code and design element is purposeful and aligned with your strategic vision.

Consider a scenario where you’re developing an ecommerce platform with a unique user interface (UI) that integrates augmented reality (AR) for product visualization. Providing freelancers with a development map that outlines the AR feature’s technical requirements, user flow diagrams, and interactive design guidelines ensures your freelancers clearly understand the project’s innovative components.

This approach accelerates the development process by minimizing back-and-forth communication about the project’s details and design requirements and ensuring the final product closely mirrors your initial concept. 

2. Set clear expectations

Clear expectations regarding goals, deliverables, and timelines lay the foundation for successful collaborations. Articulating project goals establishes a mutual understanding of your overarching objectives, while defining deliverables offers freelancers a roadmap, reducing ambiguity and enabling them to organize their work efficiently. Setting timelines also fosters urgency and helps freelancers prioritize tasks. Combined, these elements ensure timely and accurate project completion.

3. Refer to the original policy

Before working with a new freelancer, it’s best practice to create a comprehensive policy or contract detailing both parties’ responsibilities, including project deadlines, communication protocols, payment terms, and confidentiality agreements. You can refer to this document throughout your working relationship to clarity requirements and resolve any misunderstandings regarding expectations.

4. Streamline the onboarding process

Onboarding isn’t just about familiarizing freelancers with your project — it’s about integrating them into your company’s culture. Providing a comprehensive onboarding experience helps freelancers fully grasp your work environment and project’s nuances, facilitating smoother collaboration.

In addition to outlining their responsibilities, introduce them to essential team members, provide access to critical project documentation, and equip them with necessary collaboration tools. Even as temporary team members, freelancers should feel connected and equipped to contribute effectively from the start.

5. Foster open communication channels

Freelancer management doesn’t stop once you’ve successfully onboarded a new contractor. You have to lay the groundwork to facilitate effective communication by establishing open channels for regular updates, discussions, and feedback. Consider implementing regular check-ins, scheduling project updates, and using communication tools to maintain clear and consistent dialogue. This approach ensures freelancers integrate with your team, fostering a collaborative and high-performing dynamic.

6. Regularly give constructive feedback

Feedback is the cornerstone of growth and improvement in any project, especially when working with freelancers who may not be physically present in the office. Constructive feedback, given consistently, helps freelancers understand your expectations more clearly and adjust their work accordingly. This practice demonstrates that you value and care about their performance.

It’s crucial to be specific. Instead of saying a design needs to be “better,” point out that aligning the elements more closely with responsive design parameters could enhance the landing page’s cohesion. By regularly sharing detailed insights into what’s working and what’s not, you create a constructive dialogue that elevates the project’s quality and fosters a positive working relationship.

7. Incorporate freelancers into existing processes

Integrating freelancers into existing workflows and processes is crucial for maintaining project continuity and efficiency. By familiarizing freelancers with your standard operating procedures, you ensure they can work cohesively with your in-house team, adhering to the same quality standards and timelines. This integration might involve granting access to your project management tools, including them in relevant meetings, and providing clear guidelines on communication channels and project documentation.

When working on a web development project, for instance, you could introduce freelancers to your version control system from the get-go. This process includes walking them through your team’s naming conventions and review process. Taking this approach fosters a unified and cohesive team environment and minimizes the learning curve for freelancers, allowing them to contribute more effectively from the start.

8. Use freelancer management software

While some businesses establish their own freelance management system, you can use freelancer management software to streamline collaboration with independent contractors. 

These freelance-focused tools automate and centralize various aspects of managing freelance work, including workflow management, communication integration, time and expense tracking, performance analytics, and document sharing.

Get started with Webflow

Harnessing freelance talent helps you support your team’s skills with outside expertise and scale project work.

Webflow Enterprise offers robust features – like page branching and dedicated roles and permissions – that help businesses and freelancers collaborate and build websites together.

Join Webflow Enterprise and unlock the full potential of collaborative web design and development for both your in-house team and your freelance talent.

Website project management best practices: 10 fundamentals for success

Software Stack Editor · March 29, 2024 ·

image

Introduce project management tools and techniques from the outset of a web design project and prepare your team for success.

Every website project has its fair share of ups and downs. That’s inevitable, with multiple departments and team members coordinating to deliver on several components while working toward a common goal.

Whether your challenges lie in resource allocation, managing potential risks, or implementing new technology, working without organized structures can lead to chaotic and inefficient processes.

However, project management best practices let you streamline your operations on all fronts so you can complete web projects quickly and successfully. Here’s how to manage projects while empowering teams to achieve more with your current resources.

What’s project management for websites?

Website project management is the ongoing process of planning, organizing, carrying out, and monitoring tasks to achieve web and business objectives within a defined timeframe. This involves guiding initiatives from conception to completion and ensuring teams allocate resources judiciously, stay within budgets, and collaborate effectively toward overarching objectives.

Consider a scenario where a project manager oversees the development of their company’s new online store. They begin by collaborating with stakeholders to define the project’s goals, scope, and requirements. Together with the marketing team, they understand the branding guidelines and the target audience’s needs and expectations. Simultaneously, they coordinate with the IT department to determine the kind of infrastructure and technical support required.

After defining the project scope, the manager delegates tasks to web developers and UI/UX designers, ensuring alignment with timelines and objectives. Developers work on back-end coding, while designers create wireframes and prototypes for how the site should look and feel.

Throughout this process, the manager monitors each department’s progress, addresses any issues, and adjusts deadlines and resources to keep the project on track.

As the website takes shape, the project manager ensures different departments collaborate efficiently by hosting regular meetings and status updates so everyone remains informed and aligned with various milestones. Eventually, effective project management ensures the company launches the website successfully while meeting all requirements and staying within budget.

The benefits of project management for a web design project

Systematically managing projects helps you organize and simplify complex business operations and multiple moving parts into fine-tuned, effective workflows. Here are several benefits that project management strategies provide:

  • Defined and aligned goals. Website projects stall without clear objectives. Project management establishes and communicates well-defined goals from the get-go to align the team’s efforts and provide benchmarks for measuring success. A meticulous management approach also lets you break larger projects into smaller pieces to easily track milestones and monitor successful task completion. For example, instead of creating multiple webpages simultaneously, you can divide a website into different pages and work on each section at a time.
  • Improved collaboration and communication. Effective project management encourages team members to work together and share ideas openly. It breaks organizational silos by ensuring all members are on the same page and establishes methods for sharing information, updates, and feedback. Creativity shines with two-way communication and heightened collaboration, leading to streamlined workflows and smoother project completion.
  • Clear roles and responsibilities. Overlapping or ambiguous roles and responsibilities cause delays and waste resources. Project management ensures each member knows their position and responsibilities, which reduces errors and optimizes team skills. For instance, a manager will delegate specific tasks, like instructing the marketing team to create heatmaps, while the designers use those heatmaps to modify site interfaces.
  • Increased efficiency and output. The right project management techniques help you maximize your time and resources. By creating structured timelines, setting milestones, and deploying streamlined workflows, project managers ensure you use resources effectively to deliver web projects on time.

Regardless of your organization’s size, you can use project planning and management techniques to your advantage by implementing best practices and transforming how you approach your next website-building initiative.

10 effective website project management practices

Whether you’re preparing for a single project or taking on multiple simultaneously, there are some fundamental components to factor into your project management approach. Here are 10 best practices to help you organize teams at all levels and deliver projects successfully.

1. Communicate effectively

Clear, timely, and open communication ensures all departments and team members access the latest information and updates. Effective correspondence not only promotes two-way collaboration and transparency but also guides everyone toward the same goals without misunderstandings or misalignment.

Project management software, like ClickUp and Asana, lets you organize and delegate tasks across multiple projects, while cross-functional design tools like Webflow serve as a centralized creative hub where teams can update and communicate milestones across different initiatives simultaneously.

2. Set realistic objectives

Setting lofty goals might drain resources, delay projects, compromise quality, and overwhelm team members. On the other hand, setting realistic goals fosters a sense of achievement and motivates employees to deliver high-quality work.

Before starting a new project, conduct a feasibility study to consider the project’s complexity, available resources, and potential issues — especially if you’re kick-starting multiple projects, as this only increases the risk of scope creep and budgetary hiccups. Align your objectives with these constraints and assign realistic tasks to set your team up for success.

3. Establish a project scope

Defining project scope involves creating a comprehensive outline of objectives, deliverables, timelines, budgets, and success criteria. Suppose you’re redesigning a mobile application’s user interface. Your project scope might include goals such as adding interactive features and calls to action (CTAs) in two months to increase downloads by 15% over the next quarter.

Ask department heads and relevant team members for input when drafting a project scope to factor in various opinions and needs for optimal alignment. Consider holding a kickoff meeting to set expectations and ensure everyone understands their specific part in the bigger picture. These measures are critical because a well-forecasted scope allows you to accommodate multiple tasks without compromising the quality and delivery of any project.

4. Assign clear roles and responsibilities

When drafting multiple project plans or conducting kickoff meetings, assign each team member a role that suits their abilities and brings out the best in their skills and work style. You can also pair team members who work well together or create teams whose individuals have complementary skill sets. These well-defined roles promote collaboration and accountability while preventing confusion and miscommunication.

Create an organizational chart outlining specific roles and responsibilities, and make a digital diagram available to everyone on your centralized communication platform to streamline cross-functional workflows. For a web design project, for instance, you’d specify who’s responsible for content, coding, and quality assurance. You can also use webinar platforms to record videos outlining roles and responsibilities and distribute them for team members to view at their convenience.

5. Develop a resource plan

When drafting your resource plan, ensure your team receives critical support throughout a project’s lifecycle. You can also develop an overarching plan for multiple sub-projects. By optimizing workforce efficiency, you can prevent bottlenecks and ensure the right people and assets are available at the right time.

To draft a plan, identify and allocate human, financial, and technological resources for all milestones. You might plan for a website’s peak development period, like an A/B testing and feedback loop, and assign more resources during these times, such as adding extra developers and UI/UX designers to handle increased workloads.

6. Monitor scope creep

Scope creep occurs when a project’s deliverables and requirements change or increase beyond the initial agreement. This leads to delays, increased costs, and unnecessary burdens on team members.

Say the product team wants to add a new feature to the ecommerce store mid-project, like creating two additional webpages or adding a payment portal. While the idea may add value to the product, you must determine whether its required resources and time will fit within your schedule, budget, and team capabilities.

You can avoid scope creep by thoroughly assessing agreements and contracts before the project begins and inserting clauses against additional work. If you surpass the established limits, initiate a formal change request process — document new timelines, budgets, and other resources, and incorporate them into a renewed contract that all parties agree to.

7. Create a risk response team to mitigate threats

Handling multiple projects gives rise to several internal and external risks. For example, cross-functional teams may not collaborate effectively, leading to miscommunications and overutilized resources.

Having a proactive risk management team is an agile project management methodology that helps identify potential threats from the outset and reduce their impact. This team involves executive-level risk owners who monitor scope creep and anticipate the cross-functional impacts of potential risks.

For instance, you may face delays from a third-party vendor delivering new inventory. A risk response team can consider this challenge in advance and determine impact areas, like timely project completion and strained workflows. The team can then proactively develop a contingency plan to implement if needed to help steer your project back on track and minimize damage.

8. Leverage technology and data

Project management software and data visualization tools streamline the project lifecycle by providing actionable insights and analytics tools to gather information on key performance indicators (KPIs). These tools come in handy when managing multiple projects and departments, since you might receive huge data volumes from various sources.

For example, Google Analytics and Google Search Console monitor website traffic, bounce rate, and other valuable metrics. If your marketing team discovers high bounce rates and low scroll depth, they can ask designers and developers to implement changes, like including revised CTAs or redesigning the visual hierarchy, to improve user flow. And you can create charts and graphs to monitor progress on these changes and help team members grasp this complex data at a glance.

9. Follow up and ask for feedback

Schedule regular meetings and feedback sessions to discuss progress and improve workflows. Encourage colleagues to share their thoughts and create an open environment where everyone feels comfortable sharing ideas and constructive criticism.

Consider hosting a weekly feedback session for your design, development, and marketing teams where the project manager and each member can provide input based on customer feedback and data insights. And if you have several ongoing projects, ask department heads to conduct routine checks before sharing their insights.

10. Conduct a project conclusion meeting

A concluding meeting lets the team reflect on successes and improvement areas. When conducting a post-project meeting, include everyone involved in the initiative and document each department’s strengths and weaknesses.

For instance, the marketing team may have feedback on a specific landing page design, which the design team can consider during the next project. This way, effective collaboration continues after the project and sets the tone for future initiatives.

Empower your projects with Webflow

Implementing website project management best practices helps managers bring teams together, make data-driven decisions, and approach tasks proactively. With the right tools and techniques — like a powerful site and robust content management system — you can steer your organization to success.

Webflow Enterprise lets your teams unleash their creative potential and maximize available resources. Manage your web projects with precision and reassurance using Webflow.

A complete guide to crafting a winning targeting strategy

Software Stack Editor · March 29, 2024 ·

image

Targeted marketing focuses on specific customer needs by transforming general audiences into dedicated segments for personalized engagement.

An effective targeted marketing strategy relies on two components — segmentation and targeting. Segmentation organizes potential customers into groups based on common characteristics, such as demographics and interests, and lays the groundwork for focused messaging. Targeting takes segmentation a step further by identifying and engaging with the segments most likely to convert.

By delivering resonant messaging, optimizing ad spend, and tailoring campaigns to user behavior, target marketing strategies enhance the efficiency and effectiveness of marketing efforts. This focused approach ensures higher returns on investment (ROI) and helps foster more authentic connections with your audience, ultimately driving brand loyalty and sustainable business growth.

Why brands should have a well-crafted targeting strategy

For brands to navigate the complexities of consumer preferences and market competition effectively, understanding the importance of targeting in marketing is crucial. It’s more than just a component of your marketing strategy — it’s a pivotal approach that defines how you connect with specific audience segments.

By tailoring experiences and communication to these specific customer groups, targeting strategies enhance engagement and help brands cement their position in a market where personalization and relevance are decisive factors for success.

Here are more benefits these strategies offer.

Improved customer engagement

Targeted marketing aligns your marketing efforts with your target audience’s specific interests and needs. This increases the chance of capturing their attention and fostering meaningful interactions.

Consider a landing page designed for older audiences who may not be tech-savvy. By focusing on ease of navigation and readability, such as using larger fonts and high-contrast color schemes, you increase the page’s accessibility and make it more inviting. This thoughtful customization delivers a more user-friendly experience while encouraging longer site visits and increased interaction, both indicators of effective customer engagement.

Enhanced brand loyalty

An effective targeting strategy enables consistent, relevant messaging, which strengthens brand recognition and loyalty. Customers who feel like your brand understands their values and specific needs are more likely to choose your offerings over the competition. That’s how targeting can cultivate long-term customer relationships and promote brand advocacy.

For example, the home automation solutions company Wired Media Solutions (whose website was designed by Dunclyde) caters to tech-savvy residential homeowners and commercial space dwellers. Their site speaks to this audience by highlighting common issues, like clunky physical music and electrical hardware, using the tagline “Cohesive and invisible, as home automation should be.”

And by offering specific features like advanced lighting and security automation tools, the company directly addresses both homeowner and tech-focused employees’ needs and concerns. This approach demonstrates the brand’s deep understanding of their customer base and potentially leads to increased trust and repeat business from those who value the targeted solutions provided.

Increased market competitiveness

By acknowledging and offering solutions for specific customer pain points, a targeted marketing strategy positions your brand as responsive to consumer needs and significantly differentiates itself in a crowded market.

Consider Wired Media Solutions again. Their residential landing page uses direct, second-person brand messaging like “Light your way.” to directly speak to homeowners and their concern regarding standard, cold lighting they have less control over. This focused communication makes the brand more relatable and appealing to this segment, which enhances their competitive edge over other brands that may not speak to this specific pain point.

Better cost efficiency

Adopting a targeted marketing strategy improves cost efficiency by helping you strategically allocate resources such as finances, time, and personnel. Engaging the most promising market segments ensures your marketing efforts are more impactful and cost-effective.

In web development, for example, creating landing pages tailored for larger customer segments creates fewer but more effective interfaces. This not only streamlines design and development efforts but also maximizes the impact on key audience groups. Such focused strategies lead to higher conversion rates and increased customer satisfaction because your efforts are more likely to resonate with the core audience.

The 4 main targeting strategies in marketing

Different targeting strategies offer distinct features and applications, and your approach hinges on your business’s specific goals and audience traits. Let’s explore common strategies and how they impact business growth and market penetration.

1. Undifferentiated marketing

Also known as mass marketing, an undifferentiated targeting strategy assumes that all consumers share similar desires and disregards segment-specific needs or preferences to craft a universal marketing message for a wide audience. This strategy, often adopted to exploit economies of scale, minimizes the marketing costs of generalized approaches.

For instance, a smaller business with a limited budget might opt for an undifferentiated strategy and focus ad spend on a single, broad-reaching campaign rather than multiple segment-specific ones. This targeting method can be cost-effective but might lack the precision required to penetrate niche markets effectively.

2. Differentiated marketing

A differentiated marketing strategy, or multi-segment targeting, involves customizing marketing efforts for various target groups and acknowledging and addressing their diverse needs. Differentiated marketing typically demands more resources but can significantly enhance customer engagement and sales by meeting each segment’s unique requirements.

Consider a cosmetic brand that caters to various skin tones. On their website, they might create separate landing pages for each skin tone category, each with a distinct color palette and messaging that resonates with that group’s specific needs. Phrases like “Get your tan on” might appeal to people with lighter skin tones, while “Melanin mood” could attract customers with darker skin. By tailoring their approach, the brand effectively connects with each target market and enhances the likelihood of conversion.

3. Select target segments

Carefully identify market segments that best align with your business objectives and exhibit the highest growth potential. For example, a tech gadget company might target tech-savvy millennials, as this group tends to adopt new technologies quickly.

Assess each segment’s size, profitability, and how well it aligns with your brand values. Prioritize audiences for which your products or services uniquely address specific problems or fulfill needs more effectively than your competitors. This ensures you concentrate your marketing efforts where they make the most significant impact.

4. Choose the right targeting strategy

Selecting the appropriate targeting strategy involves determining the best way to approach and engage your chosen segments and should be based on an in-depth understanding of their characteristics, behaviors, and preferences.

Consider factors like the marketing channels they frequent, the type of content they often engage with, and their purchasing behavior. Your strategy might range from concentrated efforts on a single, highly specific segment to a more differentiated approach that targets several segments with customized messaging. The key is to tailor your strategy to effectively reach and resonate with your target audiences so you can maximize engagement and conversion opportunities.

5. Customize your messaging

Once you’ve identified your segments and targeting strategy, craft messaging that addresses that group’s specific needs and preferences. Understanding each demographic’s language, pain points, and aspirations will help you create more compelling and relatable content.

For example, a financial services company might use straightforward, informative messaging for retirees that focuses on security and stability while adopting a more dynamic, opportunity-focused approach for young entrepreneurs. This customization increases the relevance and impact of your targeting, leading to higher engagement rates.

6. Monitor and adapt

After launching your campaign, actively monitor performance using tools such as Google Analytics to track website traffic and user behavior, Facebook’s Audience Insights for social media engagement, and Ahrefs for search engine optimization (SEO) performance. These tools provide key metrics, such as engagement rates, conversion rates, and ROI, and offer insights into customer interactions with your campaign, enabling further refinement and optimization.

Leveraging your targeting strategy with Webflow

To effectively implement a winning targeting strategy, you need the right tools and platforms to create and manage digital projects. Webflow offers features that empower marketing teams to leverage advanced targeting strategies seamlessly.

Webflow’s suite of features simplifies the creation of custom websites so you can align your site perfectly with your target audience’s preferences. Our intuitive visual editor allows for effortless web page designs that resonate with your brand identity and captivate your customers.

Discover the potential of Webflow Enterprise for your marketing team and experience firsthand how it can enhance customer experiences and drive sustainable business growth. Explore Webflow today and transform your targeting strategy into tangible results.

18 no-code apps and tools to help build your business

Software Stack Editor · March 29, 2024 ·

Whether you’re a startup, freelancer, or in-house team, no-code platforms can help you build and grow your business without having to write code.

We love hearing about underdogs rising up and winning. Today’s no-code and low-code tools allow businesses to be the underdogs — enabling them to build and launch and develop without writing code.

What is no-code?

No-code apps and tools enable people without coding skills to create software using graphical user interfaces in place of writing code. Before no-code solutions, website and app development relied on programmers. Removing that barrier has opened the door to many more people, enabling them to build beautiful, functional websites and apps without writing code. 

18 no code app development platforms to try

From launching websites, building workflow automations, and developing apps, no-code platforms can help startups and enterprises quickly build and launch.

Here are 18 top no-code solutions to help you build apps, chatbots, ecommerce stores, workflows, websites, and more — all without having to write code. 

1. Webflow

We’re passionate about empowering everyone with the development tools to build professional websites, so of course, we’re starting this list with us. Webflow gives you the ability to create whatever website you’d like without knowing a single line of code — from SaaS websites to ecommerce stores, and even fully functional (and cloneable!) job boards, like this one by Chris Spags.

Screenshot of Jetboost cloneable job board. Background photo is an overhead shot of 5 people working at a table with laptops.

With a variety of templates to get you started, and an intuitive drag-and-drop user interface, you’ll be able to bring your website from idea to launch quickly. Whether you want to start with a responsive template or build from scratch, Webflow allows full customization. And if you happen to have some coding skills, you can always take a peek at the code behind the design. Many Webflow creators like to use Webflow as a low-code platform to really explore the possibilities. Regardless of your experience, visual coding and development lets anyone take what’s in their imagination and turn it into a working product.

Most startups don’t have a huge budget to spend on a website. Webflow gives you an affordable entry, letting you put up a high-quality website without spending a huge amount of time or money. SIDE, for example, used Webflow alongside several other tools such as Airtable and Jetboost to build Dovetail — a directory of Tech for Good agencies:

Dovetail homepahe. Peach-beige background Right side, line illustrations of two people, one with a blue color accent and the other with a pink accent. Left side, black text

2. Bravo

Bravo is one of the most popular no code app builders amongst designers because it allows you to convert Figma or Adobe XD designs into native apps for iOS and Android. 

Bravo app homepage with headline

Bravo calls itself a “bring your own design and backend” app builder. Once you create your design in Figma or Adobe XD, you connect to one or more databases or APIs of your choosing. Bravo’s visual design interface simplifies the process of turning a design into a functional app. Not only can you test the app directly within the tool, you can also share test access with colleagues. And once you’re ready to launch, you can publish to the Apple and Google Play app stores directly from Bravo’s no code app builder interface. 

3. Mailchimp

Building a small business means growing and understanding your audience. Mailchimp’s platform includes all you need to collect customer information, analyze who they are, and get in touch with them.

Mailchimp homepage. Headline: Turn Emails into Revenue. and yellow button

You can conduct surveys, launch social media campaigns, and categorize your customer databases from Mailchimp’s all-in-one marketing platform. They also offer a number of no-code integrations with software like Square and LiveChat, making it versatile and simple to automate whatever you need.

Growing your customer base and communicating with them is important, especially at the beginning stages of a startup. Mailchimp’s web app makes this a faster and smarter process.

4. Parabola

Integrating data into automations and connecting apps can be a pain. Parabola makes all of this manageable. Whether it’s an API, external database, or the intricacies of ecommerce, Parabola streamlines the process of connecting and automating data-related tasks in a visually driven user experience.

Screenshot of Parabola's homepage

With Parabola’s drag-and-drop tools you can automate a process or create a workflow. Whether your data is in Salesforce, Mailchimp, Shopify, or one of the other multitudes of platforms they support, Parabola is an indispensable data management tool for your business.

5. Voiceflow

As recently as a few years ago, it was hard to imagine how far voice-activated technology would come. Not too long ago, Siri and Alexa were just names. Now, they are go-to voice-activated assistants. 

Voiceflow homepage. Headline: The collaborative platform to build AI agents

Chat and voice apps shouldn’t just be limited to people who know how to program. Voiceflow makes AI voice app development possible for everyone without entering even a single line of code. 

Creating a voice app involves arranging drag-and-drop blocks, which builds the logic and structure for rapid application development. It’s a user-friendly visual interface that removes all of the complexity behind creating voice apps for Google, Alexa, in-car assistants, chatbots, and more. 

If you’re an aspiring app creator who has always wanted to build a voice assistant, Voiceflow’s no-code application development platform lets you do just that.

6. Bubble

No-code also removes the obstacles to software development. Bubble lets you build your own no-code app without having to know any programming languages.

Screenshot of Bubble's homepage

Bubble’s no-code app builder gives aspiring app developers a visual set of components to assemble and launch fully functioning end products. The abundance of options for functional customization makes Bubble a powerful tool for software development and building apps, dashboards, CRMs, social networks, and more.

Bubble allows anyone who has an idea to build, prototype, and launch it into the world. No-code opens the gateway for creatives to make their dreams happen, no matter what their skill sets may be.

7. Makerpad

You may know a little bit about what no-code can do but want to learn more. Maybe you’d like to create something, but don’t even know if anything out there can help you. Makerpad has tutorials, tools, case studies, new apps, and other resources to help anyone find a solution for what they want to do.

Makerpad homepage. White background, black text headline: Build [blank] without writing code next to video labeled

Along with these resources, Makerpad has paid services that offer education, implementation, and support to startups and entrepreneurs with no-code solutions.

If you’re looking for an extensive collection of all things no-code, Makerpad has so much to offer.

No-code for enterprises

Our free ebook explains how no-code can help businesses scale. Learn how no-code can transform your company.

Read now

↗

No-code for enterprises

Our free ebook explains how no-code can help businesses scale. Learn how no-code can transform your company.

Read now

↗

Read now

8. Airtable

What if you could have all of the functionality of Excel or Google Sheets and combine that with the data wrangling powers of sophisticated databases, all without having to enter in a single formula? Airtable brings spreadsheets and databases together in one program. 

An image of the Airtable website.

Airtable stands out from other business applications by offering a versatile and customizable product that can be used for so many different things.

Whether you need to organize a calendar of project deliverables, compile a customer list, or organize any other type of information, Airtable makes it easy to create and collaborate. Their modular system of building customized tables lets you go beyond basic spreadsheets so you can build exactly what you need. 

9. Coda

Coda wants to bring unity to your workflow with an all-in-one collaborate workspace. Instead of an unconnected web of spreadsheets, apps, and databases, Coda brings these all together in one central place: a Coda doc.

Docs can be connected through Coda Packs. You can link other platforms like Slack, Google Calendar, and Jira without having to worry. Coda’s building block system streamlines the process of creating Coda docs (with fun graphic embellishments!) and simplifies cross-team communication. 

10. Gumroad

When we talk about startups, most of us think about the big glamorous world of tech. But those with entrepreneurial aspirations aren’t limited to the digital realm. Plenty of people would like to make a living off of their own creativity.

An image of the Gumroad website.

If you have a podcast, do illustrations, make beats, or even want to do something like launch your own online course, Gumroad could be the no-code application for you. This tool offers an ecommerce solution to get your creativity out there, letting artists become their own business owners. 

11. Landbot

When done well, chatbots can be a useful tool for businesses and a helpful resource for customers. Chatbots can greet site visitors, help them find the information they’re looking for, and gather solid leads that a person can follow up on. But out-of-the-box chatbot responses won’t wow your customers — customized chatbots are a must. 

Screenshot of Landbot's homepage

Landbot lets you assemble your own chatbots and create conversation prompts that will guide your users. With an easy-to-follow workflow, you’ll be able to tie in all of the different parts of a conversation together. And with the WhatsApp integration, you can reach fans of your brand where they’re already having conversations.

12. Zapier

Do you have multiple applications, all generating important data that you’d like to tie together into an automated process? Zapier lets you connect different app platforms together — automating and expediting your workflow.

Zapier homepage with the headline

Zapier’s automations extend to many of the familiar tools that companies use. Twitter, Slack, Dropbox, and Shopify are but a few that you can implement into an automated workflow. Zapier helps you manage business needs through simple but powerful workflow automation, making it a fan favorite no-code app for everyone from solo freelancers to large Saas companies.

13. Thunkable

If you’re looking for another option for building mobile applications, Thunkable offers a no-code app development platform for helping you build and launch your digital creations.

Thunkable's homepage

With drag-and-drop functionality, Thunkable lets you connect a variety of functional components to construct different user flows for your own app building. Your final mobile app creation will work on both iOS and Android without having to make any modifications on your own. Thunkable’s no code app builder offers a variety of open source projects for free, so you can create native apps for the Apple and Google Play stores without starting from scratch. 

14. Typeform

If you’re looking to build submission forms, surveys, or find ways to generate leads, Typeform is a great no-code solution. Typeform makes data collection easy and offers a great user experience that can be fully customized to fit your brand.

Typeforms are super easy to make, and we have plenty of tutorials on Webflow University that show you how to integrate them into your no-code stack. Thanks to the variety of form types — quizzes, polls, tests, and more — Typeform has many use cases like gathering feedback, performing research, and generating leads. 

With Typeform Professional, you can create personalized question paths and logic jumps where needed. Building personalized experiences for different personas and customers is now more important than ever, and Typeform allows you to do just that.

15. Glide

If you have basic spreadsheet skills, you can use Glide’s no-code app builder. 

Glide homepage with headline

This no-code platform pulls from data sources like Excel files or Google Sheets and then prompts you to add visual components via a drag-and-drop interface. Thanks to the variety of templates and pre-built components, it’s very accessible to people with zero coding experience. And Glide does more than just make your spreadsheet easier to look at — it turns them into powerful progressive web applications. 

Glide is a great way to create mobile apps for specific internal business processes. For example, apps for managing inventory, monitoring your sales pipeline, or  maintaining an employee directory.

16. Adalo

Adalo is a customizable no-code development platform that lets you create your own web and mobile apps without having to write traditional code.

Screenshot of Adalo's homepage

Adalo provides a drag-and-drop interface for building apps, and lets you publish your app directly to the App Store, Google Play, or the web. They also include features to make your app interactive, including a database, extensive logic, and various actions you can use to make things happen in your app.

17. Softr

Softr is another tool for making web apps that use a database without needing to be a coding expert.

Softr screenshot

Softr is known for its ease of use and beginner-friendly interface, so it’s a suitable tool if you’re new to app development. You can connect it to your Airtable data and quickly create simple membership sites and apps that work well right at the start.

18. Draftbit

Draftbit homepage, with headline

Draftbit stands out as a user-friendly no-code platform that allows users to create powerful mobile apps. Users can quickly design, build, test and publish native mobile applications, responsive web apps, and internal tools using their visual development platform and pre-built Bits, Blocks, and Examples. Draftbit’s intuitive mobile app builder is perfect for beginners who want to quickly create basic apps without extensive coding knowledge.

No-code development lets anyone be a creator

No-code doesn’t mean anti-code. There will always be a place for developers and their expertise. But not knowing how to code shouldn’t stop you from being able to launch your ideas, build businesses, and follow your entrepreneurial aspirations. It’s exciting to see so many no-code tools and development platforms out there opening up the gateways for non-programmers to create.

Unleash your creativity on the web

Build completely custom, production-ready websites — or ultra-high-fidelity prototypes — without writing a line of code. Only with Webflow.

Get started for free

↗

Unleash your creativity on the web

Build completely custom, production-ready websites — or ultra-high-fidelity prototypes — without writing a line of code. Only with Webflow.

Get started for free

↗

Get started for free

Last Updated

January 9, 2024

  • « Go to Previous Page
  • Page 1
  • Interim pages omitted …
  • Page 21
  • Page 22
  • Page 23
  • Page 24
  • Page 25
  • Interim pages omitted …
  • Page 29
  • Go to Next Page »

Get your Software Stack together. softwarestack.tech

Software Stack

© 2024–2026 - Software Stack is a trading name of SouthwestCIO Limited ac ompany registered in England & Wales 11319049

  • Knowledgebase
  • Home
  • About Us
  • Contact Us