• Skip to primary navigation
  • Skip to main content
software stack logo

Software Stack

Get your Software Stack together

  • Knowledgebase
    • All Categories
    • Accounting Software
    • Automation & Workflow Software
    • Customer Relationship Management
    • E-Commerce Shopfronts & Payments
    • Marketing Automation
    • Online Courses & Membership
    • Project Management
    • Surveys & Forms
    • Web Hosting
  • Home
  • About Us
  • Contact Us
  • Show Search
Hide Search

Online Learning & Community

Inside Sloper School: what Jenny Rushmore learned after leading thousands of women worldwide

Software Stack Editor · June 28, 2024 ·

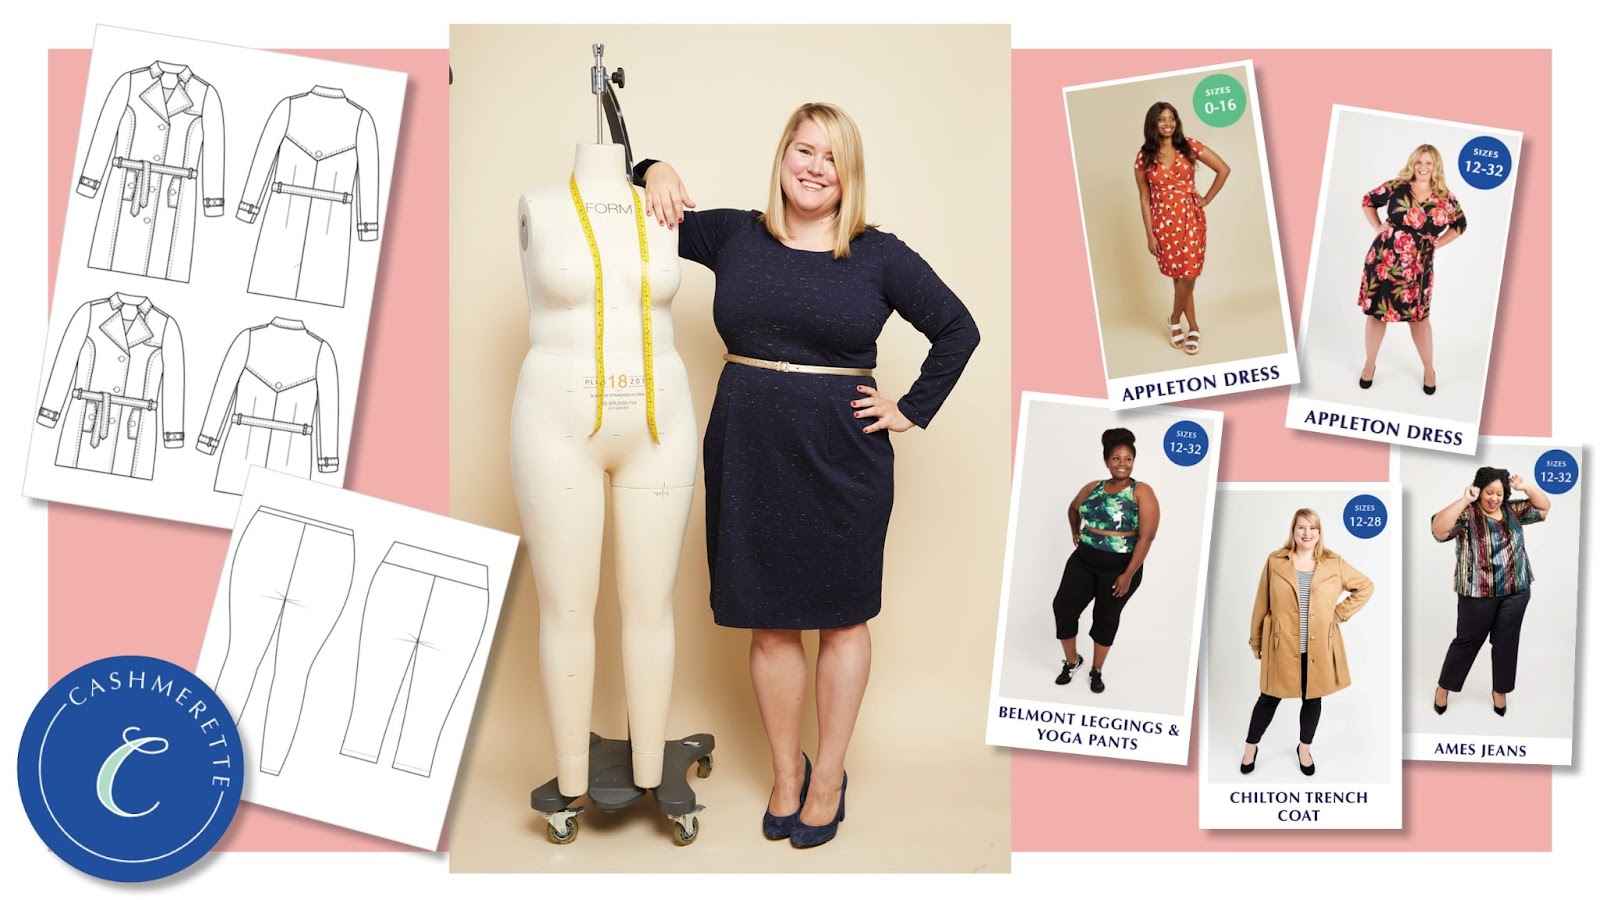
Are you ready to meet a trailblazer in the world of custom-sized clothing? Jenny Rushmore, the founder of Cashmerette, has revolutionized the way women approach their wardrobes. Frustrated with the lack of well-fitting clothes in stores, Jenny embarked on a mission to empower women to sew their own custom-sized garments. 

Through her innovative Sloper School on Teachable, Jenny has created a thriving community of nearly 3,000 students who are transforming their lives one stitch at a time. Let’s dive into how Jenny is leveraging community and online courses to make a real impact.

[embedded content]

{{communitycounts-component=”/blog-shortcodes/popups2″}}

The Importance of Building a Strong Online Community

Building a strong online community is more than just a gathering of like-minded individuals; it’s about creating a space where people feel empowered and supported. Jenny Rushmore, the visionary behind Cashmerette, understands this better than anyone. 

“I couldn’t find clothes that fit me well. I really struggled in the stores.” -Jenny Rushmore 

This common struggle led her to create a supportive online space where women could learn to make clothes that fit their bodies perfectly.

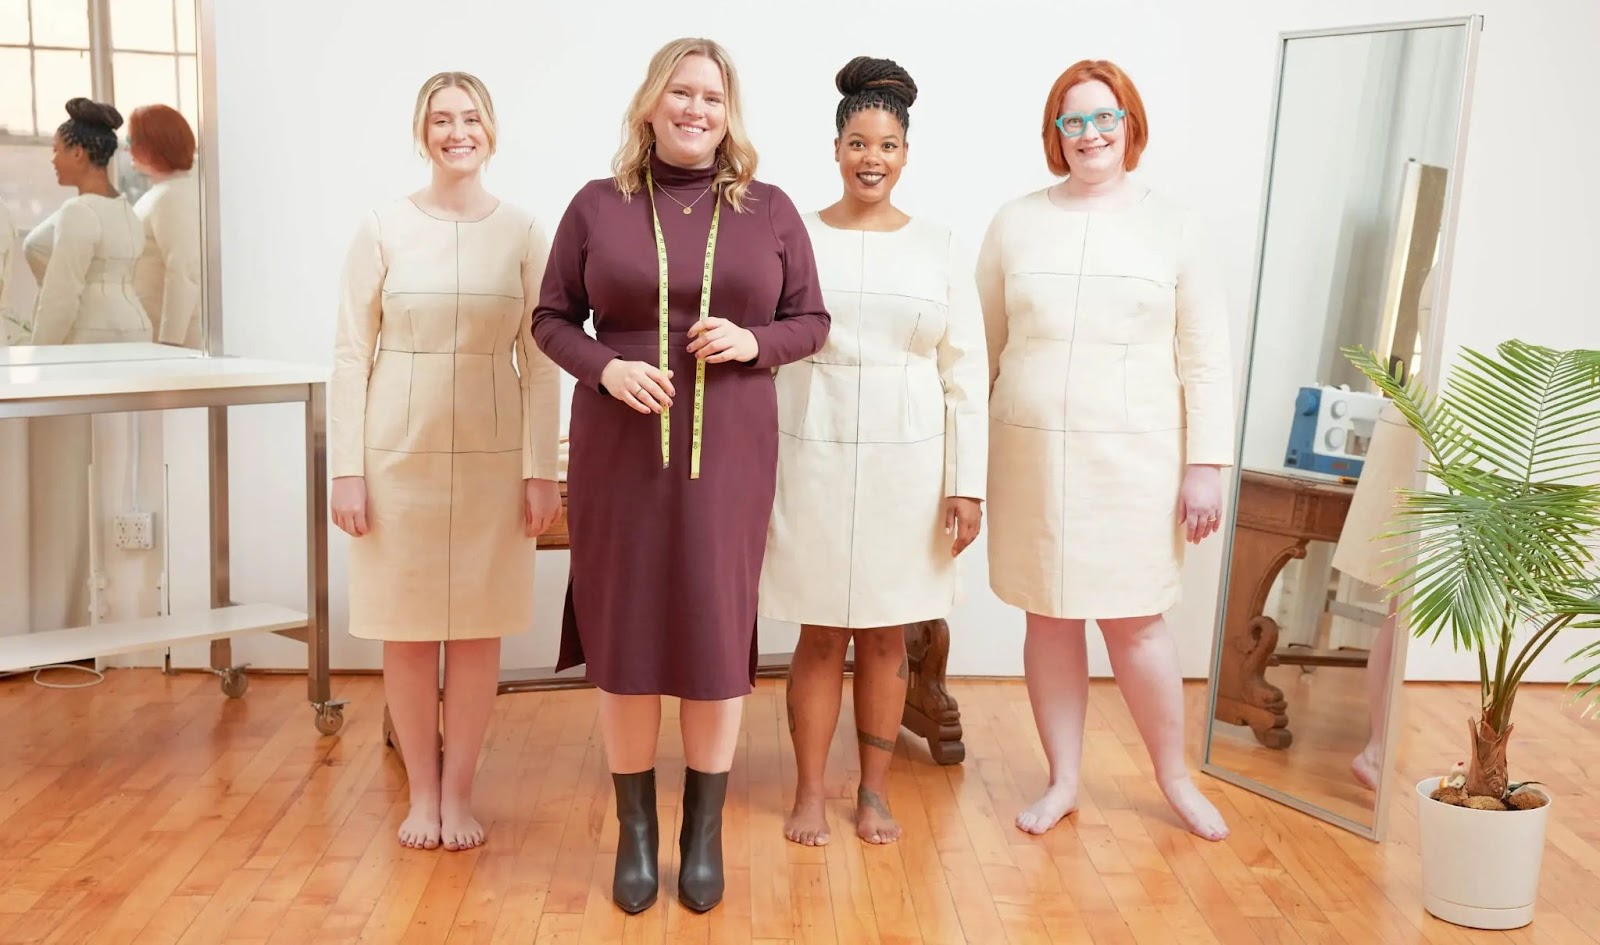
The Cashmerette community is a safe haven for those who have felt marginalized by the fashion industry. “Sewing is a very isolated hobby for most people. So it’s something you do in your house. A lot of people don’t know anyone else who sews,” Jenny explains. 

By bringing people together in a supportive online environment, Jenny has built a community where members can share their experiences, offer advice, and celebrate each other’s successes.

This sense of belonging is crucial, especially in a field like sewing, which can often be a solitary activity. The Cashmerette community not only provides technical support but also fosters a body-positive environment. 

“I learned that I didn’t have to change my body to fit clothes. I could change my clothes to fit my body.” -Jenny Rushmore 

This philosophy has resonated deeply with the community, helping many women to embrace their bodies and feel confident in their custom-made clothes.

{{lookinglaunch-component=”/blog-shortcodes/popups2″}}

How Cashmerette’s Community Empowers Women

At Cashmerette, the focus is not just on sewing but on empowering women to feel good about their bodies. Jenny’s personal philosophy, “It’s not you; it’s the clothes,” is a powerful message that she instills in her community. By emphasizing that the problem lies with the clothes, not the body, Jenny helps women shift their mindset and approach to clothing.

The impact of this community goes beyond just sewing. Many members have shared how being part of Cashmerette has transformed their lives. 

“We get emotional emails all the time. People say it improved their marriage, that they’ve quit their job and started a new job, that they feel different” -Jenny Rushmore 

Cashmerette’s community is also incredibly active and engaged. Members from around the world are constantly posting, learning, and supporting each other. Jenny and her team are deeply involved, providing personal feedback and ensuring that everyone feels heard and supported.

The community aspect is further enhanced by the shared experiences of its members. Jenny notes, “The big change in them comes when they see it in someone else. For instance, I will be very nonchalant about sharing my measurements… and we’ve had multiple people being like, I thought I looked terrible, and I could only ever look terrible. And I would look at pictures of Jenny Rushmore and be like, she looks amazing.”

Seeing others with similar body types looking confident and happy helps members realize they can also look and feel great in their clothes.

Through Cashmerette, Jenny Rushmore has created more than just a company; she has built a community that empowers women to take control of their wardrobes and their confidence. This strong, supportive network is a testament to the transformative power of community in online education.

{{customizecommunity-component=”/blog-shortcodes/call-to-action”}}

How Jenny Rushmore Uses Teachable To Serve Her Students

Jenny Rushmore’s Sloper School is hosted on Teachable, a platform that has enabled her to reach and teach nearly 3,000 women worldwide. 

“Teachable has been a game-changer for us. It allows us to create detailed, high-quality courses that our students can follow at their own pace.” -Jenny Rushmore

The flexibility of online learning means that women from all walks of life can join Sloper School and learn how to make clothes that fit them perfectly.

Teachable’s features have been instrumental in creating an engaging and interactive learning experience.

“The ability to include videos, downloadable patterns, and step-by-step instructions has made it possible for us to teach complex sewing techniques in an accessible way.” -Jenny Rushmore

Moreover, Teachable’s community features have played a crucial role in growing the Cashmerette community. Jenny points out, “The discussion forums and comment sections on Teachable have become spaces where our students can ask questions, share their progress, and support each other.”

These interactive elements help to build a sense of community and connection among the students, even though they are spread across the globe.

“We hear from women who have never sewn a garment in their lives, and within a few months, they’re making clothes that fit them perfectly,” Jenny shares. 

Jenny’s approach goes beyond technical sewing skills. She exudes a sense of empowerment and self-confidence. “It’s amazing to see how our students transform not just their wardrobes but their self-esteem. When you feel good in what you’re wearing, it affects every aspect of your life.” Jenny says.

{{communityteachable-component=”/blog-shortcodes/call-to-action”}}

The Future of Cashmerette and Sloper School

Looking ahead, Jenny Rushmore has ambitious plans for Cashmerette and Sloper School. “We’re constantly working on new courses and resources to help our students continue their sewing journeys,” she reveals. The goal is to expand the range of courses offered, covering more advanced techniques and different types of garments.

Additionally, Jenny is exploring ways to further enhance the community aspect of Sloper School.

“We’re looking into more interactive features, like live Q&A sessions and virtual sewing meetups,” she says. These initiatives aim to strengthen the bonds within the community and provide even more support to the students.

{{communityiskey-component=”/blog-shortcodes/popups3″}}

Conclusion

Jenny Rushmore’s journey with Cashmerette and Sloper School on Teachable is a powerful example of how online education and community can come together to create transformative experiences. By leveraging the features of Teachable, 

Jenny has built a supportive and empowering community where women can learn to make clothes that fit their bodies perfectly. Her work goes beyond sewing; it’s about helping women embrace their bodies and feel confident in their own skin.

Want to know how you can build an impactful online community and make a real difference by sharing what you know?

Click the link below to start your free plan today!

{{likefree-component=”/blog-shortcodes/call-to-action”}}

What is DEI Training: Benefits, Types, and Examples

Software Stack Editor · June 28, 2024 ·

75% of companies don’t have DEI training in their leadership development programs, according to The Real Story of Diversity and Inclusion report.

But if you’re reading this, you’re part of the 25% that cares about diversity, equity, and inclusion. You want your company to lead differently when it comes to creating a more inclusive and equitable workplace, which is reasonable, considering DEI training fosters healthy and inclusive work environments.

DEI training or ‘inclusion training’ is more important than just fulfilling a mandatory requirement. It’s an opportunity to truly drive positive change. For it to be successful, it needs to come from the business strategy, be owned by the entire organization, and then be backed up by HR initiatives – it cannot exist within a vacuum.

With that, let’s look at why your organization needs to prioritize DEI strategy and training and how to ensure its success.

What is DEI Training?

DEI training is a type of professional training that teaches a company’s workforce how to create a work environment that is diverse, equitable, and inclusive for all. If done right, this training becomes an integral part of your company’s business strategy. It addresses the more covert and disguised forms of biases, underlying prejudice, and structural inequity, which are often based on race, sexual orientation, socioeconomic or ethnic background.

DEI is an abbreviation that stands for diversity, equity, and inclusion:

  • Diversity: Diversity is the presence/ representation of differences including, but not limited to, race, gender, identity, sexual orientation, religion, ethnicity, nationality, socioeconomic status, language, physical or mental ability, and age. Unlike equity and inclusion, diversity is more obvious and often quantifiable.
  • Equity: Equity promotes impartiality, fairness, and equal access to opportunities, advancement, and participation. Equity addresses structural inequalities and barriers; it means providing people with an equal amount of resources based on their unique circumstances.
  • Inclusion: Inclusion is creating and fostering an environment where everyone, including members of traditionally underrepresented or marginalized groups, feels respected, welcome, and psychologically safe.

The training addresses people’s overlooked pain points and encourages open dialogues around uncomfortable and less discussed topics.

The Importance of DEI Training

As we’ve established, DEI training can be a powerful tool when executed properly, not only for the employees but also for the company’s bottom line. In the 2021 Happiness Index report by CNBC|SurveyMonkey Workforce, it was found that 78% of workers say it is important to them to work at an organization that prioritizes workplace diversity and inclusion.

Imagine being able to attract and retain top talent to your organization. That’s what having a dedicated and effective diversity, equity, and inclusion training program will do for you. Showing employees you care about their safety and well-being indirectly increases their job satisfaction; better job satisfaction means higher productivity and greater profits!

3 Benefits of DEI Training

In addition to attracting and retaining top talent and increasing your organization’s profits, there are a host of other benefits, too – let’s explore them:

⁃ Employee happiness

A survey revealed that workers are happier when they are pleased with their company’s DEI efforts. A diverse workforce and inclusive culture help employees feel a greater sense of belonging and connection. They don’t feel isolated but valued and welcomed regardless of their background or who they are. A happy employee is engaged, productive, and more invested in their work.

⁃ Improved company reputation

Millennials, Gen Z workers, and consumers are more socially conscious than ever. These groups require companies today to show their dedication to issues that concern workers and society, like diversity, equity, and inclusion.

Google, for example, has been leading the industry in DEI training and initiatives, and according to employees, people feel more comfortable discussing race and ethnicity openly.

On the other hand, makeup brand Youthforia is an example of a company with a ruined reputation because of poor DEI training. They were recently caught up in a scandal and accused of not being diverse or inclusive after releasing a foundation shade intended to match the darkest of skin tones. After launching the product, multiple dark-skin creators tried the brand and verified that the shade was in fact, jet black. No undertones. Just black.

This scandal revealed Youthforia to be lacking in the diversity department. They rushed to release a product that wasn’t vetted or tested on people with dark skin tones. The launch and rollout of this product was lazy and showed a lack of empathy and unfortunately, has tainted their reputation.

⁃ Innovation

With greater DEI efforts, you attract talent from various backgrounds with different skills, perspectives, and experiences. These people bring different characters and innovative ideas that elevate the organization. DEI training also makes existing staff feel more respected and embraced in the company, encouraging them to contribute more.

Types of DEI Training Programs

DEI training comes in different types and is carried out for a multitude of reasons. For instance, if your organization has a geographically distributed workforce, then you could carry out diversity, cultural sensitivity, and possibly microaggression training.

Types of DEI Training and descriptions of each type.

It’s important to know the different types so you choose the best one based on your company goals and strategies. Here are some common types:

  • Basic Diversity Training: this training is useful to educate employees on issues surrounding race, ethnicity, gender identity, religion and sexual orientation. It’s a great foundation for organizations that want to build a more inclusive workplace.
  • Cultural Sensitivity Training: cultural sensitivity training helps employees be mindful of cultural nuances when interacting with co-workers, clients, and partners. This type of training empowers employees to build authentic and respectful relationships with their co-workers.
  • Microaggressions Training: this training helps employees identify instances of micro-aggressive behavior, like comments about weight, outward appearance, or racial stereotypes. It helps minimize these occurrences and creates less hostile work environments.
  • Unconscious Bias Training: the goal of this specific program is to remove any biases formed by social conditioning and stereotyping. It helps people recognize their hidden biases and stops words or actions that may cause unintentional harm.
  • Allyship Training: this training educates employees on how to support and advocate for people with fewer privileges by understanding their challenges, recognizing personal privileges, and learning practical support strategies.
  • Inclusive Leadership Training: this training aims to equip leaders with the skills to create and sustain inclusive work environments. It teaches strategies for managing diverse teams and fostering a culture of belonging. The goal is to enable leaders to champion DEI initiatives effectively.
  • Anti-racism Training: this type of training helps participants understand and combat systemic racism by providing historical context and explanations on how racism manifests. It teaches participants to identify and challenge racist behaviors and structures, promoting racial justice and equity in their environments.
  • Disability Awareness Training: this training educates employees about various disabilities and the challenges faced by individuals with disabilities. It covers accessibility, inclusive language, and reasonable accommodations, aiming to create a more inclusive and accessible environment for everyone, regardless of their abilities.

Different types of DEI training can be leveraged to different ends depending on your organization’s needs and culture. So, when choosing what to focus your training on, remember that every company is unique, and no two companies will require precisely the same kinds of training. Let’s explore a few topics you should include in every DEI training program.

Topics to Cover in DEI Training Programs

The topics covered in DEI training will depend on the type of training being taught and your organization’s goals. However, you should include certain topics in every type of training. Let’s take a look at some of them:

  • Difference between diversity, inclusion, and equity: Define what DEI is so people understand what the program and training entail.
  • Self-reflection: This exercise should be the starting point of every training as it encourages people to look within themselves and identify their own biases.
  • Workplace scenarios: Role plays and case studies that mimic everyday office scenarios will uncover how small behaviors can have large impacts on people in the workplace.
  • Deliberate Inclusion: Yes, training employees to be inclusive is beneficial, but what’s even more effective is giving them actionable tools for how they should treat their peers and approach conflict in the workplace.

Every topic covered in DEI training should provide flexible tools that can help foster inclusive attitudes and improve workplace culture. It should also create opportunities for feedback and dialogue and improve everyday relations between team members.

With your knowledge of the different types of training programs and the topics they cover, let’s examine the steps you need to take to build an effective one.

How to Build an Effective DEI Training Program

Here are 4 steps to building an effective DEI training program for your organization:

  • Assess your organization’s training needs

    To build a successful DEI training program, you need first to identify the areas where your team/ company may need extra education and training. Also, as part of your assessment, define the goals and objectives of the training program before building a curriculum. This will help guide you throughout the process and efficiently evaluate its success.

  • Pick the topics to be covered

    Once you’ve defined the training goals, tailor the topics taught to achieve the objectives. For instance, if your assessment reveals division within the teams, consider conducting inclusivity training to build more connection and community. If on the other hand, your organization interacts with clients all over the world, carry out a cultural diversity training program.

    In addition to this, speak to your employees, find out what training they would like to have, and develop programs that cater to their specific requests.

  • Choose the right format

    The next step is choosing the right training format. Today, many training formats exist, including webinars, e-learning modules, interactive games, and seminars.

    Picking the right format is vital to the success of your DEI training because it helps motivate and engage whoever is taking it. But you don’t need to be rigid with the format. You can go with one method at first, get feedback from staff, and then make adjustments.

    Check out our comprehensive guide to teaching online to ensure success in your training programs!

  • Evaluate the success of the training program

    This step is a great way to measure the success of your training program. Tracking results is not easy, so get a list of your desired metrics to monitor. One thing you can do is create a course evaluation framework to get honest and constructive feedback from employees.

    Ask open-ended questions like, “What would you improve about this course and how?”. It not only gives you valuable and robust information from different perspectives but also gives your employees a voice and makes them feel heard.

Examples of DEI Training Courses

In this section, we’ve featured 3 existing and successful DEI training programs to give you inspiration on what to look out for when building your program or choosing the right one for your employees.

1

Community Builder Certification Program by Know More

The community builder certification program, an example of DEI Training.

Know More is a DEI training agency that helps organizations build greater diversity, create inclusive workplaces, and uncover unconscious biases that impede inclusivity.

Course Overview + Outcome: This program helps leaders build their competence and confidence and recognize behaviors needed to grow the organization from an equitable perspective. Successful completion of this program prepares leaders to head diverse teams effectively. The training also equips you to address social issues affecting vulnerable populations and promote diversity, equity, inclusion, and belonging within the organization.

Price: $3,950

Who should attend: Leaders at all levels, HR professionals, or others who are responsible for or wish to take responsibility for diversity and inclusion in their organization.

Location/format: In-person workshops + online learning

Length: 3 months + Capstone Project

2

Leading Inclusive and Diverse Teams and Organizations by University of Michigan

Leading Inclusive and Diverse Teams and Organizations course outline by University of Michigan is another example of a DEI Training program.

Course Overview: This program is for organizations that care about building and leading diverse and inclusive teams. Throughout this course, attendees will be taught by expert DEI trainers, who will help them gain personal awareness of how they show up in diverse settings. The program will also equip them with evidence-based tools for becoming better allies and change advocates. At the end of the course, your team will have learned better conflict management skills and how best to regulate emotions.

Price: $2,000

Who should attend: Team leaders, managers, and employees with desires to create and develop an accepting, diverse, and inclusive workplace.

Location/format: Asynchronous & Synchronous sessions

Length: 5 weeks

3

Diversity, Equity & Inclusion Certificate Program by American Management Association (AMA)

The diversity, equity and inclusion certificate program, as another example of DEI training.

Course Overview: This is a 3-day certificate program for leaders at all levels to develop skills to become diversity champions and go beyond the standard DEI training. This course teaches attendees how to recognize and celebrate the uniqueness and individuality of each person in the organization and how to identify and understand hidden biases on a deeper level.

Price: $3,295 non-members/$2,995 AMA members

Who should attend: Leaders at all levels, HR professionals, or anyone who wants to take responsibility for diversity and inclusion in their organization.

Location/format: In-person/ Live Online/ On-site

Length: 3 days

DEI training FAQs

Are there ways to measure diversity and inclusion within an organization? If so, how?

Some areas that you can look at include the diversity of your staff; assess how varied your workers are in race, ethnicity, sexual orientation, and gender, and also how that diversity is spread across leadership teams. For inclusivity, measure employee engagement, retention rate, and happiness.

Does having a diverse organization help with employee retention?

Not on its own. People need to feel valued, connected and welcomed in an organization, and if they don’t, no level of diversity will make them stay.

How can a company promote diversity and inclusion within the organization?

Firstly, emphasize the importance of diversity and inclusion in the company during the hiring process and training sessions. Also, make sure there is a culture of accountability when it comes to DEI, so if employees behave in ways that don’t foster an inclusive workplace, they should be given instructions on how to correct their behavior.

What are the benefits of getting a DEI certification?

As an individual, DEI training helps you become more well-rounded. You gain a deeper understanding of the world around you and how you can help create a more just and equitable society. It also helps you build trust and credibility with your colleagues.

How can bias be eliminated from the hiring process?

Regardless of how good your intentions may be, when it comes to diversity and inclusion, some unconscious biases may creep in during the hiring process. To avoid this, your company can use a blind hiring process, which can include a blind resume practice, where you black out all the personal information on resumes—such as addresses, dates of birth, and gender —so that you’re not using these factors to evaluate candidates.

Create an Equitable, Diverse, and Inclusive Environment For Your Employees

DEI training will only be successful if you are intentional about it. To make sure it’s not one-and-done and truly engrained into the company culture, you need first to define what success looks like at the start of the training.

Also, make sure it is owned by C-suite executives and leaders on all levels to drive implementation. Include it in the company’s culture, encouraging inclusive behaviors, creating ongoing strategic initiatives, and having each training facilitated by trained professionals.

Diversity, equity, and inclusivity training begin at the onboarding stage; it is continuous, and you can always refine it along the way. Get started by leveraging a robust learning platform like LearnWorlds to host your organization’s training, or choose from one of our many courses and expand your knowledge on DEI initiatives.

Your professional looking Academy in a few clicks

Start FREE Trial

Further reading you might find interesting:

  • How to Start a Profitable Online Course Business From Scratch
  • Knowledge Economy: How to Sell Knowledge Online
  • How to Teach Online: Your Handbook to Success

The post What is DEI Training: Benefits, Types, and Examples appeared first on LearnWorlds.

How to create a value-packed lead magnet in under 30 minutes

Software Stack Editor · June 28, 2024 ·

Learn how to come up with a lead magnet idea that attracts your target audience and set it up in Podia – in less time than you think!

Jump ahead

In this article

Have you ever pulled up to the coffee shop drive-through window and learned that the car in front of you paid for your order? Getting something for free, especially something as valuable as that early-morning cup of joe, can make your whole day feel brighter.

Your audience also likes getting things for free, and your impact can go far beyond a caffeine buzz. Giving a helpful free resource to your followers can lead to positive customer relationships, more sales, and feelings of trust and appreciation toward your business.

The best way to do this is with a lead magnet.

What is a lead magnet?

A lead magnet is a piece of content like a free ebook, video training, email course, printable, or checklist that you offer in exchange for your followers’ contact information. It acts as an incentive to attract target audience members, and the ultimate goal is to build an email list of potential customers who love your work.

Lead magnets should help your audience do something specific. The most effective lead magnets are actionable and show someone the answer to a problem they can solve in the next few minutes.

Essentially, they’re bite-sized wins that leave the viewer wondering what else you could teach them.

Lead magnets are…

  • Action-oriented: They help the reader do something specific and make progress toward a goal.

  • Concise: The viewer should be able to consume the content in a short period of time and walk away feeling accomplished.

  • Related to your niche: You want to attract your specific target audience, not everyone and the kitchen sink.

  • Things people want: You only have a few seconds to pique someone’s interest. Go for quick, juicy wins over big-picture solutions.

Why should I make a lead magnet?

Sitting down to create anything takes work, and you may be wondering if it’s really worth it to make a product that you’ll give away for free.

Even though lead magnets won’t put money in your pocket today, they can be incredibly lucrative for your business in the long run.

  1. First, a lead magnet can help you establish credibility with your followers. By showcasing your expertise and providing something of value for free, you can position yourself as an authority in your field. When followers need information related to your niche, you’ll be the one they turn to.

  2. Second, a lead magnet is a fast way to build your email list. With an email list, you have a direct and reliable way to communicate with your audience, promote your digital products, and nurture relationships over time. 

In this article, you’ll learn how to make a lead magnet that attracts the right people, provides value, and stays true to your brand.

In Podia’s
step-by-step website guide
, I set up a site for my road trip planning business,
Your Best Road Trip
. Now, I want to grow my email list by creating a helpful free lead magnet.

Throughout this post, I’ll give you a front-row seat to my creative process so you can see exactly what I’m doing at each step of the way. If you’d like to follow along,
grab your free Podia account now.

You don’t have to spend weeks on your lead magnet to make a big impact. In fact, you may be able to set one up in as little as half an hour. Let’s get started.

What lead magnet should I make?

Let’s say you have an online business teaching yoga classes. You create a lead magnet that’s all about picking the right color palette for your home office, and it’s good – really good. In fact, it’s one of the best resources ever created about home office color palettes. 

The problem is that this lead magnet isn’t going to attract the right audience for your business. Sure, it might be an amazing resource, but you’ll end up with an email list filled with home decor DIYers instead of yoga enthusiasts. 

While putting together a random freebie can be fun, one of your lead magnet’s main jobs is to draw in your target audience. There’s no point in building a list of people who aren’t interested in what you offer, so here are four questions you can ask yourself to find a topic that resonates:

  1. What questions do you get asked the most often? Creating a resource that answers a frequently asked question is helpful for your audience and also saves you time. Instead of answering questions in your DMs, you can direct people to your free resource. 

  2. What questions are people asking in the wild? Take a look at the questions people are asking on other blogs or in YouTube comments. Find a creator in your niche and scroll down to the comment section on their videos or website. Pro tip: You can use the command+find feature and search for the question mark symbol (?) to find questions faster.

  3. What’s the main problem your audience is trying to solve? Can you provide the first step to solving this problem or one resource that would get them going in the right direction? 

  4. What products or services do you want to launch in the future? Are there any smaller products you can make that would be a natural introduction to your bigger offers? For example, if you hope to offer a 12-week fiction writing course, a free workbook about fiction world-building or character development would be a logical first step.

After you answer these questions, see if you can find a common problem with a straightforward solution. The solution should be something that the viewer could implement in a matter of minutes. 

Remember, lead magnets should give people quick wins, they don’t need to be overly extensive and elaborate.

BUILD TOGETHER

I wasn’t certain what topic to cover for my road trip lead magnet, so I used the questions above to get clarity.

What questions do you get asked most often? When I reflected on conversations and emails with friends and family about their upcoming road trips, I realized that people always ask me about car maintenance items and what they should pack. People seem very concerned with being prepared should they experience car trouble or get lost.

What questions are people asking in the wild? I checked out the comment section under YouTube videos about road-tripping and made note of some common questions.

Lead magnet guide: YouTube Audience Research

Here are some of the questions that came up most frequently:

  • How much time do I need to road trip from point A to point B
  • What exactly do I need to bring on my road trip?
  • Do I need to pack XYZ items?
  • How much will all this cost?
  • Are road trips safe?

Think of the main problem your audience is trying to solve: Since my website is about planning road trips for beginners, I expect that the biggest problems will be where to go, what to do, and logistics. For someone new to this type of travel, overwhelm is a big issue.

What products or services do you want to launch in the future? I want to launch a coaching service where I help people plan custom road trips, so providing a resource for people who also want to plan a road trip makes sense here.

Questions like how much time it takes to get from Point A to Point B or how much a route costs will vary based on each trip, but a packing list feels like something helpful to everyone and it could reduce overwhelm.

Plus, I know that a person interested in a road trip packing list is probably in the planning stages, so they’re a potential customer for my future products.

I’m going to make a road trip packing list based on my experiences, but to give it some extra intrigue and make it stand out from the millions of other packing lists out there, I’m going to focus on 10 unexpected things that people should bring. This makes the list less overwhelming and piques curiosity since viewers will wonder what they’re missing.

Designing a lead magnet that’s unmistakably yours

You have your lead magnet topic nailed down, and the next step is to write out a draft of what you’d like to say. 

The best lead magnets are short, actionable, relevant to your business, and filled with value. This is true whether you’re making a PDF, spreadsheet, video, cheat sheet, case study, mini online course, email sequence, or any other type of lead magnet. 

The goal of your lead magnet is not just to collect email addresses, but also to create a strong foundation for a long-lasting and mutually beneficial relationship with your audience. 

Here are some tips to remember as you outline: 

  • Keep it short: You want to provide a quick win for your audience, something they can easily consume and implement. No need to write your magnum opus at this stage. 

  • Remember your niche and products: Think of your lead magnet as the first step on a journey that connects with the other products or services you offer. 

  • Help your audience take action: When you solve one of your audience’s problems, you build trust and establish yourself as an authority. If you’ve helped subscribers achieve something that matters to them, they’re more likely to open your emails, trust your recommendations, and ultimately make purchases from you. 

With that in mind, open up a blank document and start brainstorming. Write a script for your free video training, list out ideas for your checklist, outline the lessons of your mini-course, or draft your ebook. 

Here are some tools to make the creation process quicker and smoother: 

  • Grammarly:
    Free proofreading software that can help you catch typos and improve your sentence structure. 

  • Hemingway:
    Another writing and editing tool that can improve readability and give you suggestions for other ways to phrase things.

  • Unsplash:
    Free-use stock photos you can use without attribution. (Don’t pull images off Google Images since they might not be royalty-free, which could cause copyright issues.) 

  • Descript:
    A video editing and transcription tool that you can use to add effects and overlays to your videos, or transform your video and audio files into text. 

BUILD TOGETHER

For my road trip free lead magnet, I started by brainstorming all the packing list items I wanted to include in a Google Doc. Then I went through and wrote a few sentences about why that item is important and what it can be used for.

Lead magnet guide, example of written content for road trip packing lead magnet

The full document is less than two pages long, but if someone has never gone on a road trip, this simple packing list will help them feel more prepared and potentially prevent sticky situations.

Now that you know what to say, export your lead magnet into a format that your audience can access. There’s a few ways you can do this, depending on what you’re making. 

  • Option 1: Saving your written lead magnet as a PDF: This is the simplest option. If you’ve typed your lead magnet content into Word, Pages, or Google Docs, save the document as a PDF and export it to your computer. 

  • Option 2: Uploading an unlisted YouTube video: If you’d like to use a video or webinar replay as your free lead magnet, you can upload it to YouTube and save the video as unlisted. Only people who have the exact URL can find the video, and you can send the URL to subscribers instantly when they sign up. 

  • Option 3: Creating resources with Canva: If you’d like to add more design elements to your lead magnet, you can do this with a popular graphic design tool called
    Canva
    . It’s free to use and there are tons of templates for all types of projects, like ebooks, printables, checklists, journals, brand kits, and more to help jumpstart your creativity.  

  • Option 4: Create a drip email sequence to deliver your course or challenge content slowly over a few days. You can do this with an email marketing platform like
    Podia Email.

Of course, there are tons of other ways you can set up your lead magnet, so your choose the option that makes the most sense for your product and press publish. 

For my road trip packing list, I used Canva to make the information more visually appealing. You can see my step-by-step process in the video below.

[embedded content]

“Is my lead magnet any good?” 5 step checklist

How do you go from a good lead magnet to a great lead magnet? Follow this quick 5-step checklist to ensure you’re giving your ideal followers exactly what they’re looking for. 

  1. How could someone make a meaningful improvement to some aspect of their life within 10 minutes of downloading this lead magnet?

  2. Why would your audience rate the pain point that your lead magnet addresses as above a 7 out of 10 in importance?

  3. What is one major benefit, pain, or technique that your audience will remember and take away from your lead magnet?

  4. What about the title of your lead magnet will make your audience stop what they’re doing to sign up?

  5. Have you gone through the signup process for your lead magnet yourself, to make sure it looks right on different devices and the confirmation emails all work?

Now that your lead magnet has passed with flying colors, it’s time to share it. In the next chapter, you’ll learn how to add your lead magnet to Podia and create a landing page to capture sign-ups.

How to create a lead magnet for free in Podia

Podia includes lead magnet functionality on all plans, including the free plan, and you can easily make your lead magnet available to the public. 

To distribute your lead magnet for free,
create a digital download product
and set the delivery method to free email delivery. Simple and easy!

This method works well with files, such as ebooks, audio files, video files, or PDFs. 

In this video tutorial, I’ll walk you through how to set up your lead magnet as a free digital download with email delivery. If you prefer to read, keep scrolling for text and photo instructions. 

[embedded content]

Step 1: Click on Products in the top bar of your navigation, and select “New Product.” 

Step 2: When the window pops up, select “Digital download.”

Step 3: In the digital download editor, you can add files to your digital download product. You can upload as many files as you like as long as each individual file is under 5GB. If you upload multiple files, these will be automatically zipped by Podia’s system once they’re downloaded by your customers. 

Step 4: Once you’re done uploading the files, head over to the Pricing tab to set up the file delivery method.

Step 5: Under Pricing, select Edit, then choose Free Email Delivery. This will ensure customers need to enter their emails to sign up for your free product without needing to create an account.

Step 6: Once you have everything set up, make sure to Publish your product.

Step 7:
Edit your lead magnet sales page
to share more information about your lead magnet and encourage people to download it. Click on the three dots on the right-hand side of your product and choose “Edit site” from the drop-down menu. 

This will take you to your lead magnet’s landing page. All Podia products automatically come with a sales page so you can easily promote your offer, and
Podia’s point-and-click website builder
has several different customization options.  

This is the default page: 

If you just want a simple place to promote your product, this page works great out of the box. You can also add other details like text, images, testimonials, FAQs, CTAs, and grids by clicking the plus sign under each section. 

Finally, edit the page settings to to add an SEO description and make sure your lead magnet URL is what you’d like it to be. Your best bet is something short and easy to remember. 

Hit publish and you’re good to go. 

Customers can now visit this page and download the lead magnet you created in exchange for their email address. After entering their email address, the file will be delivered via email, and the user will be added to the product as a customer.

The last step is getting more followers onto your email list. You’ve worked hard on your lead magnet, and there are many people out there who could benefit from your resource. In the final chapter of this guide, we’ll cover how to promote your list, gain subscribers, and make a bigger impact.

 Now that you have your lead magnet and sales page set up in Podia, it’s time to share your link far and wide. Here are some ways you can publicize your lead magnet on your channels to get your work in front of more eyes.

#1 Leverage your website

Your website is prime real estate, so make sure you’re featuring your lead magnet on your most visited pages. In Podia, you can include a lead magnet sign-up form on any page by adding a product block. 

For my road trip website, I’m adding a link to my lead magnet sales page to the header menu and putting a call to action banner on the home page. 

#2 Create blog or podcast content

Another way to feature your free resource is to write blog posts related to your lead magnet topic and include an opt-in form within the content. You can also create podcasts about your lead magnet topic and include a link to the freebie in your show notes. 

I have three articles about road trips on my website, and I added a lead magnet opt-in section to the bottom of each so website visitors can easily find it.

#3 Use social media 

Share snippets or teasers of your lead magnet on platforms like Instagram, Facebook, Twitter, Pinterest, or LinkedIn. Don’t forget to add the link to your opt-in page to your social bios so people can easily find it. 

Podia creator
Emily Mills from Sketch Academy
includes links and the word “Freebies” in her Instagram bio to point people in the right direction. 

(Need a custom link in bio page?
You can create one for free with Podia
.)

#4 Collaborate with influencers and other creators 

Another way to reach more people is to partner with other creators and small business owners in your niche who have a similar audience. You can cross-promote each other’s lead magnets, contribute guest blog posts, do social media takeovers, or arrange podcast appearances. 

In your author bio or within the content, mention your lead magnet and provide a link to your opt-in page to capture new subscribers.

#5 Engage with your audience

When audience members reach out to you through email, direct messages, or in the comments section on your social media platforms, respond to their questions and mention your lead magnet as a resource that can further help. You can also add a link to your lead magnet in your email signature. 

#6 Connect in communities and online forums

Are you a part of any entrepreneurial groups or online communities? This can be a great place to share your new lead magnet. Check the group rules to see if there’s an appropriate place to link your work, but often there’s a section where self-promotion is allowed. 

#7 Join “Get Noticed!”

If you’d like to learn more about growing your audience,
check out Podia’s free Get Noticed! course
. Get Noticed! is an in-depth 5-module course based on dozens of creator interviews, thousands of survey responses, and the techniques 19 successful creators used to get in front of the right people.

You’ll explore audience growth myths and truths, how to find irresistible angles in your content, examples of growth across different platforms, and tips for staying consistent.

Get free access to the “Get Noticed!” course
Sign up now

Creating a lead magnet is an important step in building your online business. Lead magnets help you grow your audience, showcase your expertise, build connections with followers, and share your knowledge with those who need it. With this solid foundation, there’s no limit to where your creator journey will take you. 

Build your lead magnet for free with Podia today
. We can’t wait to see what you make. 

SIGN UP NOW

Get your free Podia account

Join the 150,000+ creators who use Podia to create websites, sell digital products, and build online communities.

Start free →

Rent vs. buy: Video equipment for online course creators

Software Stack Editor · June 28, 2024 ·

image

Are you getting more serious about creating video content? If so, chances are you’re grappling with the age-old conundrum of whether to rent or buy your video production gear.

Truth be told, it’s a big decision, and the choice between investing in your own equipment or opting to rent it can affect everything from your budget to your timelines to your video quality. 

And video quality is a huge consideration. Whether you are producing quick tutorials or an elaborate online course, high-quality visuals and crisp audio aren’t just nice-to-haves; they’re crucial for keeping viewers engaged and making your video content look top-notch. 

So, let’s take a look at the pros and cons of both renting video gear and buying video gear, so that you can make an informed decision that feels less like a gamble and more like a strategic move.

{{tableofcontents-component=”/blog-shortcodes/table-of-contents”}}

Types of film and camera equipment that course creators may need

Before we dive into the pros and cons of renting versus buying video production gear, let’s unpack the toolkit of a typical video creator. While there’s no set standard of what you’ll need for your specific project, most productions that make online video content will need:

  • A camera and accessories (battery, lenses, etc.)
  • A tripod
  • Lights and lighting equipment (stands, meters, etc.)
  • A microphone 
  • An audio recording device 
  • A computer or laptop
  • Video editing software

As you see from this list, your gear can easily extend beyond just a camera and a microphone. The camera you need can range from your smartphone, to a camcorder, to a DSLR that needs interchangeable lenses, to an action camera that allows you to get footage whether skiing down a mountain or swimming in the sea. 

No matter what camera you use, you’ll likely also need a tripod of some kind to hold it steady while you film, as well as lighting to ensure that your video subject is easy to see and is portrayed in a flattering light. 

Your audio gear will make sure that you record crystal-clear sound, and a computer loaded with the right production and editing software will piece your content together. (You might even need to book some studio time if your home setup doesn’t quite cut it, but that’s a whole other conversation!)

Each piece of equipment plays a role in how your video content is produced and received, so it’s worthwhile to give some careful thought to what you need. 

Related: Creators’ top video gear to invest in for your first online course

{{videostudio-component=”/blog-shortcodes/popups2″}}

Understanding your video equipment needs

The first step of deciding whether to rent video equipment or buy video equipment is to get clear on what kind of content you want to create and what gear you’ll need in order to bring it to life. 

Here are a couple of questions to consider:

1. How often will you film? 

Think about how frequently you plan to record your content and what your video production needs are. If you’re cranking out videos every week like clockwork, then it might be smart to own your gear. After all, nothing beats the convenience of having your equipment ready to roll whenever inspiration strikes. 

On the other hand, if you create video content infrequently rather than on a fixed schedule, the financial commitment of buying video gear might not make sense just yet. 

2. What are your technical needs?

This question is twofold, because it involves assessing your video content needs, as well as your technological prowess and intent. 

Tackling the first part of that, does your video content need Hollywood-level cinematography, or will a simple setup do? This depends largely on the kind of videos you’re making—for instance, TikTok videos in your car versus full-scale online courses. So depending on your video content, simpler gear may do the job for you, or you might need higher-end gear to produce cinema-quality video. 

Switching over to your technological prowess, how capable do you feel when it comes to handling video gear and using it to its full capability? Are you a gadget geek who loves tweaking settings… or does “automatic mode” sound more your speed? Be sure not to take on more advanced gear than you’re prepared to handle, especially if you’re buying it. And keep in mind that high-tech gear often comes with a steeper learning curve, so you’ll have to learn it in order to operate it.

3. What’s your budget?

Let’s talk money: how much is the video gear going to cost you… and how much money do you have available to spend on it? 

Figure this out, and then do a detailed cost-comparison between how much it’d cost to rent the gear and how much it’d cost to buy it, in order to clarify which option aligns with your financial bandwidth. Renting can minimize your initial expenses and lower the barrier to entry, while buying often reduces costs in the long-term, especially if you’re frequently planning to hit the record button.

4. Do you prefer the latest and greatest?

Tech these days evolves faster than a New York minute; today’s cutting-edge gadget could be tomorrow’s paperweight. So keep that in mind as you consider whether to rent or buy your video equipment.

Renting gives you access to the latest models, and allows you to try out cameras and lights, etc., without making a full investment in them. Buying your video equipment, however, is helpful if you plan to use the same gear consistently over several years… but do keep in mind that it can sometimes leave you with outdated equipment as new technologies emerge.

Related: How to DIY home video recording studio setup and video editing

{{recordgreatvideo-component=”/blog-shortcodes/popups4″}}

Pros & cons of renting camera equipment

It can be tough to decide what’s right for you, so let’s lay out a few of the quick and dirty pros and cons of renting video gear: 

Pros

  • Renting reduces your upfront investment: If you want to rent a video camera, for example, you can gain access to professional-quality options without the hefty initial cost.
  • It’s cost-effective for infrequent use: If you’ve only got one-off projects or need to make occasional updates to your online course, getting the exact equipment you need when you need it is one of the clear advantages of renting. 
  • You get flexibility to upgrade: You can test different kinds of gear before committing to any one model, allowing you to try several and find what really works for your style. Not only that, renting might grant you access to better technology than you could afford to buy, for a fraction of the price.
  • You’ll get the full picture: The more you make videos, the more you may discover other accessories that you need/want to buy, so renting it first may help you realize what your budget might truly be when purchasing, and prevent unexpected sunk-costs. 

Cons

  • Flexibility to film: It can be difficult to have spontaneous shooting sessions or act upon last-minute creative sparks when you’ve got to rent the gear first. You’ll need to plan your shoots around rental availability and potentially face delays if the gear isn’t available when you want/need it. 
  • Popular items may be booked: Planning ahead is essential since you need to secure your equipment in advance—sometimes way in advance if it’s a popular item. If your go-to rental shop is out of your desired equipment, you might find yourself scrambling or settling for less.
  • Coordination required: If you need to also book studio time or hire a crew, for instance, you’ve got to make sure it all coordinates with the dates available to rent the equipment; this can sometimes turn into a logistical headache.

Related: Choosing the right camera for your at-home videos made easy

Pros & cons of buying video equipment

There are quite a few advantages and drawbacks to buying the gear outright, so let’s take a look:

Pros

  • Availability and convenience: When you outright buy your video camera, for example, you can shoot whenever inspiration strikes—no waiting, no fees. 
  • Long-term cost savings: If you make videos frequently, you may find that buying the gear is more cost-effective than renting it each time. 
  • Full control over your equipment: You can tweak your gear to the settings you need and keep them there, instead of getting a reset piece of equipment each time you rent it. Also, though the rental companies inspect and take care of their gear, if you own yours, then you don’t have to worry about receiving a compromised piece of equipment. 
  • Familiarity breeds content: Owning your gear will lead to you learning it inside and out, improving your skills, and streamlining your production process, making it quicker and less stressful to film.
  • Asset ownership: Equipment can be resold if needed, providing a return on your long-term investment.

Cons

  • Upfront investment: That initial price tag for all the video gear can be a doozy, and big purchases can certainly put a dent in your wallet… as well as lead to debt if not managed wisely.
  • Depreciation: Like cars, tech can lose value quickly as new models hit the market. If your needs change or technology leaps forward, you might find yourself with outdated gear. Selling equipment can offset some costs, but it tends to be a hassle and doesn’t always recoup much money, thanks to depreciation.
  • Storage and maintenance: Think about where you’ll store everything and the potential upkeep involved. If you don’t film frequently, the costs and logistics of maintaining and storing equipment can outweigh the benefits of immediate access. 
  • Commitment to learning: Owning equipment means staying updated on its best uses, which can be a steep learning curve.

Related: 10 pro audio equipment upgrades for your at-home audio recording studio

Making the decision: rent or buy?

Choosing between renting and buying boils down to how you balance cost, convenience, and flexibility against your production frequency and technical needs. There’s no one-size-fits-all answer here, just the best fit for your particular situation.

Think about how often you’re filming, the scale of your projects, what kind of tech you need, and how thick your wallet is. Getting clear on these elements and aligning them with your overall goals will help steer your decision in the right direction. 

Because whether you rent or buy your video equipment, the goal is the same: to create engaging, high-quality videos that resonate with your audience! So now that you’ve read our “rent or buy” guide, give it some careful thought, so that when you hit record, you’re ready to create video content that you’re proud of. 

And when you’re ready to publish your content, be sure to explore Teachable’s resources for online course creators!

{{freeplan-component=”/blog-shortcodes/call-to-action”}}

Should YouTube Shorts be a part of your content marketing strategy?

Software Stack Editor · June 28, 2024 ·

image

Remember when videos had to be long in order to be good? Well, times have changed, and YouTube Shorts have quickly become a big deal in the world of short-form video content. With each video clocking in at 60 seconds or less, YouTube Shorts are quick, they’re catchy, and their popularity is impossible to ignore; after all, they’ve racked up more than 5 trillion views since their debut in 2020. (That’s trillion with a T.)

Because of this, YouTube Shorts might be what your digital marketing strategy is missing! These videos allow your brand to play around with different messages and creative approaches, in a format that’s easy to share and can go viral quickly. And with their ability to hook viewers almost instantly, YouTube Shorts can increase your reach, engage more viewers, and boost your brand’s visibility in a competitive marketplace.

So, in a world where bite-sized videos are king, the big question for any digital marketer or content creator is: should you jump on the trend? The short answer is probably yes, as long as you create a clear strategy that considers your overall marketing goals, your target audience’s preferences, and how YouTube Shorts can fit with your brand’s story. This article will give you a YouTube Shorts overview and explore how YouTube Shorts might be smart to include in your brand’s content marketing strategy.

{{tableofcontents-component=”/blog-shortcodes/table-of-contents”}}

What are YouTube Shorts?

YouTube Shorts are vertical videos up to 60 seconds long, designed specifically for quick consumption. Launched by YouTube as a response to the rising popularity of similar formats on platforms like TikTok, YouTube Shorts allow creators to capture fleeting moments or messages in a format that is easily digestible to audiences.

Unlike regular YouTube videos, which can span from a few minutes to several hours, YouTube Shorts give you a literal minute to make your point and make it memorable. In this way, YouTube Shorts can serve as the spark to ignite interest in your brand, and bring in viewers who might then stick around for longer content pieces or dive deeper into your product offerings.

Related: YouTube Shorts: Should you make them?

Benefits of using YouTube Shorts

YouTube Shorts are not just about capturing fleeting attention; they offer tangible benefits that can elevate your digital marketing strategy. From boosting viewer engagement to expanding your reach across younger demographics, these short-form videos offer a lot of value. Let’s take a look: 

  • Engagement and reach: YouTube Shorts really knock it out of the park with their ability to significantly boost engagement. The short duration of the videos encourages users to watch multiple videos in one sitting, increasing overall watch-time from a single user session. This works wonders in reaching younger audiences who prefer quick and entertaining content snippets over longer-form videos. 
  • Algorithm leverage: YouTube loves content that keeps viewers glued to the screen and on their platform longer, which is exactly what YouTube Shorts can do. Their favor by the YouTube algorithm means that YouTube Shorts have a better shot at appearing in feeds and recommendations. So by folding YouTube Shorts into your strategy, you can get more eyes on your content without the heavy lifting required by traditional SEO tactics. 
  • Visibility benefits: YouTube Shorts are also a fantastic way to increase a channel’s visibility. Since they are featured prominently on YouTube, even new creators have a chance to reach large audiences if their content is engaging and meets the algorithmic preferences of YouTube. 
  • Opportunity for creativity: With only a minute to tell a visual story, you can tap into some incredible reserves of creativity, finding unique ways to showcase your story. 

Related: How to make YouTube Shorts: An in-depth guide

YouTube Shorts vs. other platforms

While TikTok definitely pioneered popularizing short-form video content, YouTube Shorts offers a distinct advantage with the added benefit of YouTube’s massive audience and sophisticated analytics. So participating in short-form video content on YouTube Shorts isn’t just about going viral; it’s about strategic visibility and data-driven content tweaks.

Similarly, when compared to Instagram Reels, YouTube Shorts often offers better integration with the rest of the YouTube ecosystem, including the ability to easily share and promote content across platforms and use existing YouTube channels to boost Shorts visibility.

Related: TikTok vs YouTube Shorts vs Instagram/Facebook Reels: Which platform is best?

{{getaudience-component=”/blog-shortcodes/popups”}}

Examples of how to use YouTube Shorts in marketing

Many successful YouTube Shorts creators and businesses have leveraged YouTube Shorts to great effect. Let’s take a look at a few creative examples of how different businesses could use YouTube Shorts to uplevel their marketing efforts.

Fashion Retailers: Product Launches and Style Guides

A fashion retailer could use YouTube Shorts to create buzz around new collections or product launches. Imagine quick, visually appealing videos showcasing models wearing new outfits in everyday scenarios or offering a sneak peek behind-the-scenes of a fashion shoot. Additionally, Shorts can be used for quick style tips or fashion hacks, like how to style a scarf in 5 different ways in under 60 seconds. This not only engages the audience with useful content but also highlights multiple products in a single, digestible format.

Tech Companies: Feature Highlights and Quick How-Tos

Tech companies can utilize YouTube Shorts to demonstrate new features of their products. For example, a smartphone manufacturer could produce a series of Shorts, each highlighting a key feature of their latest model, such as camera capabilities, battery life, or special apps. Another approach could be quick how-to videos, like setting up voice commands or customizing widgets, which help users get more from their purchases while subtly promoting the product’s ease of use and versatility.

Food and Beverage Brands: Recipes and Quick Tips

Brands in the food and beverage sector can create engaging Shorts featuring quick recipes, cooking tips, or even food challenges that encourage viewer participation. For instance, a coffee brand might post Shorts showcasing different ways to brew a morning cup at home or tips for making the perfect espresso shot. These videos could also highlight the versatility of a product, such as using a popular snack in various recipes, thereby driving interest and multiple uses for a single product.

Fitness and Wellness Brands: Mini Workouts and Health Tips

Fitness brands have a great opportunity to use YouTube Shorts for quick workout routines, such as “60-second high-intensity workouts” or “one-minute yoga stretches for office workers.” These can be exceptionally engaging and useful for viewers looking for fitness inspiration without the time commitment. Additionally, wellness brands could share quick health tips, like mindfulness exercises or hydration reminders, which fit perfectly into the concise format of Shorts and encourage daily engagement with the audience.

Each of these approaches not only capitalize on the brevity and visibility of YouTube Shorts, they also align with the brands’ goals to engage their audiences more creatively. Not only will these efforts help in building brand awareness, they can also drive actual product usage and customer loyalty.

Related: How to make YouTube Shorts: An in-depth guide

Creating effective YouTube Shorts 

Okay, let’s dive into actually creating effective YouTube Shorts! Honestly, the sky’s the limit when it comes to how you approach it, but there are a few keys that can make your content strategy sing. 

Choose good content that fits your brand 

Focus on high-energy, visually appealing content that fits your brand and is immediately captivating. Quick tutorials, humorous skits, visual transformations, fun behind-the-scenes, before-and-afters, intriguing information, DIY projects, and clear calls to action all perform well as YouTube Shorts. The key is to keep it engaging and packed with value, even in just a minute.

Pay attention to your production

The best YouTube Shorts are those that are well-planned and excellently executed. Good lighting, clear audio, and high-quality video are essential, even for brief clips. And remember, the first few seconds are crucial—include an engaging hook to keep eyeballs on your video.

Optimize it

Optimize each YouTube Short by using relevant hashtags, catchy titles, and engaging thumbnails. Also, encourage viewer interaction by asking questions or prompting viewers to comment, which can boost the algorithmic performance of your videos.

Challenges and Considerations

While YouTube Shorts can offer significant advantages, there are a few YouTube Shorts challenges that could impact your strategy. Keeping these things in mind, as well as other short-form video considerations, will help you seamlessly weave YouTube Shorts into your broader marketing efforts.

  • Content saturation: To say it’s a crowded medium would be a serious understatement. One of the main challenges with YouTube Shorts is the sheer amount of content being uploaded daily, which can make it difficult to stand out. However, it is possible to combat this by maintaining a unique brand voice, consistently producing high-quality content that resonates with your target audience, and bringing fresh angles to common topics.
  • Quality vs. quantity: While producing a high volume of content can be beneficial for staying relevant, it should not come at the cost of quality. High-quality, well-thought-out content often performs better than large quantities of mediocre content, so focus on creating memorable YouTube Shorts rather than churning out forgettable ones.
  • Strategic alignment: Make sure your YouTube Shorts strategy aligns with your bigger marketing goals. YouTube Shorts should be a part of a content strategy that supports your brand message and business objectives, and they should complement, not complicate, your overall brand narrative. 

Related: The ultimate guide to YouTube Shorts monetization & strategies

Integrating YouTube Shorts into your content strategy

By now, you know that incorporating YouTube Shorts into your existing content strategy can open up new avenues for engagement and audience growth. But you might be asking yourself how to go about achieving this. 

Thankfully, it’s as easy as 1-2-3, and this section of our content strategy guide is devoted to walking you through the steps to blend YouTube Shorts into your broader digital marketing efforts. 

Step 1: Planning

Develop a content calendar specifically for YouTube Shorts that complements your other content efforts. This should outline what types of videos will be created, when they will be released, and how they tie into other marketing activities. Remember: your YouTube Shorts should be part of a larger plan, not just random shots in the dark.

Step 2: Execution

Consistency is key. Regular posts keep your audience engaged and your channel favored by YouTube’s algorithms. Additionally, monitor trends within the Shorts community to adapt and innovate continuously (while still staying true to your brand).

Step 3: Performance tracking

Use YouTube’s analytics tools to track the performance of your Shorts. Insights such as view count, watch time, and engagement metrics are super valuable for refining strategies and understanding what content works best.

Get started with YouTube Shorts

“To short or not to short; that is the question.” Well, there’s no denying it: YouTube Shorts offer a fresh, engaging way to connect with an audience that craves quick, entertaining content. They can amplify your reach, boost engagement, and even give you a leg-up in the YouTube algorithm game. 

Soooo…. to answer the above question… we’d say, yes, give YouTube Shorts a try! Experiment, analyze, and tweak your strategy to see how these under-a-minute short-form videos can work for you. Here at Teachable, we’ve got our fingers crossed that this YouTube Shorts overview has given you the tools to create a clear YouTube Shorts strategy that fits well with your overall marketing goals, your target audience’s preferences, and your brand’s story.

{{joinfree-component=”/blog-shortcodes/call-to-action”}}

How to create, sell, and profit from an online course

Software Stack Editor · June 28, 2024 ·

This guide is everything you need to know about creating, launching, and selling a course this year.

Jump ahead

In this article

No matter who you are, you have something to teach the world.

Maybe it’s a long-time passion of yours – something you’ve always loved to teach and answer questions about – or maybe it’s something you’ve only considered creating content for in your most far-flung dreams.

Either way, you know if you could just find a way to bottle up that spark and deliver it to the world, to customers, you’d be unstoppable.

Luckily, today it’s easier than ever to turn your knowledge into revenue-driving online courses that can change the lives of your customers.

No matter what subject matter or topic you want to teach, how much experience you have in creating videos and lessons, or whether you’ve ever put together a marketing campaign in your life, creating an online course can be accomplished in a few simple, easy steps.

Sound good? Then let’s get started.

Who should create an online course and what are the benefits? 

The rewards of creating an online course – making more money, earning passive income, reaching more people, making a bigger impact – can be tempting.

But getting there takes work. And the only way to stay motivated to do the work (and actually enjoy it) is to know that you’re doing something that you should be doing.

Here are two questions to help you decide if making an online course is the right move for you:

“Do I have something to teach?”

There’s a very good chance that for the people in your circle, you’re an expert on something. Maybe you’re great at managing money, or computer skills, or cooking, or finding cheap travel deals, or home decorating. Maybe you’re super-organized and can do magic with spreadsheets.

You might already know what gift or skill people come to you for. Or you might not (though chances are, the people around you do!), in which case, we’ll help you figure it out.

If there’s something that you can teach others that will help them in their life or work, creating an online course is a great way to get it out there.

“Do I want to start an online business?”

You’ve probably seen the photos on Instagram. An inspirational guru posting a snapshot of their “daily life” in the form of a cocktail on the beach on a Tuesday.

“Start an online business,” they tell you, “you’ll make money in your sleep. Just buy my coaching program and I’ll show you how.”

In reality, building an online business looks nothing like that Instagram photo. It can be hard work and a lot more time consuming behind the scenes. But it’s incredibly rewarding work, too. When a student who completes your course tells you that you changed their life, it will be one of the most gratifying things you ever hear. 

So ask yourself, do you really want to start an online business and put in the work required to get the results you want? 

“There are so many ways to make a living online – how do I know if courses are the right fit for me?” 

These days, you can build a business selling digital products, coaching, blogging, YouTubing, getting brand sponsorships, and about a million other ways. So how do you know if courses are the right call for you? Try making a small, simple course and see how it goes. You’ll… 

  • Overcome any mental barriers before sinking tons of time into a big project. Even building a small course and getting it in front of people will show you that these concerns can’t hold you back from success.

  • Get valuable student feedback without much time invested. The very best courses aren’t first versions; they’re courses that have been iterated on over time, incorporating student feedback along the way. The most important step in this process is simply to get started.

  • Learn a lot along the way! Everything that may seem challenging to you now, like creating content and writing a sales page, will get much, much easier after you do it for the first time.

How to come up with ideas for your online course

[embedded content]

To come up with an idea for your online course, start by thinking about your ideal audience – or the people who you think would buy your course one day. 

If you already have a blog, email list, or social media following, look at your followers. If you don’t have an audience already, simply look to the people around you: your friends and co-workers. 

Try asking the people you have access to these 5 questions, either over email, on 1:1 calls, through a survey, in your social media comments, or any other way that you can do today. 

  • “Tell me about your experiences with [topic].”

  • “What’s your biggest challenge with [topic]?”

  • “How are you currently dealing with those challenges?”

  • “What would solving these challenges allow you to achieve?”

  • “What blogs do you read frequently? What communities are you a part of online?”

Keep a note of any common trends you hear. If multiple people are experiencing the same challenges and pain points, there might be an opportunity for you to share a solution. 

Another way to do this is to head to public channels and forums like YouTube or Reddit and search for questions around your course idea. Remember: Any problem worth solving in a course has probably already been written about. And if it’s a real problem for people, they’re probably seeking solutions online. So head to the comments section and see what you can find. 

Do you see any patterns or recurring ideas?

By now you should have a list of potential online course topics that you could tackle based on what you’re good at and what you’ve learned from your research, so let’s hone in on the best ones.

We’ll be judging all of the ideas based on two factors:

  • Passion: How excited are you to work on this? If you hate working on something, its’ profit potential doesn’t matter, because you’re likely to quit before you get there!

  • Profit potential: Is it a problem that people would pay to have solved for them? A good framework for thinking about this is “do people already spend money to solve this problem, in the form of books, apps, services, etc…?”.

Plot the ideas from your list on the Passion/Profit Matrix.

We’re looking for the ideas that land in the top right quadrant: the ones that you’re excited to work on and that you’ll be able to sell.

Once you have your idea chosen, it’s time to get to work on building your course.

How to plan and build your course content

The first time you make a course, it’s tempting to sit down and brain dump everything you can think of into a list, then use that as your course outline. But this can quickly lead to information overwhelm for you and your students, so we have another approach you can try. 

Start with the end result.

You don’t need to teach your students everything you know about a topic. You just need to teach them exactly what they need to know to achieve the result you promised.

At Amazon,
they write a press release announcing a product launch
before they even start working on the product. They don’t publish the release, of course. But the internal process of writing the press release makes them focus on what’s most important: the elements of the product that are exciting and useful for their customers.

Amazon starts with the end result and builds backward from there. And that’s how we’re going to approach your course, too.

What is the end result you want your students to achieve?

When you begin to build your outline, the answer to the question above goes at the top.

Then, your first module or course section will get your student excited about why they’re taking the course.

After that, break down the end result into the various steps that need to be taken to achieve it.

Remember that your goal is not to teach everything you know. It’s to teach everything your student needs to achieve a result.

Once you have the end result broken down into its component parts and dropped into an outline, you’re ready to make your course content.

Online courses typically have the following components. You can mix and match these media types depending on what makes sense for each lesson, so don’t overthink this step. 

Use the tools you already have (like a smartphone, your computer webcam, your headphones, and anything else that you’ve got on hand. You don’t need the most fancy equipment to share what you know, and getting too caught up in the logistics of “perfect” content will only slow things down. Plus you can always go back later and update modules as your business grows. 

  • Video

    • Pro: Engaging, multi-sensory, builds the strongest relationship between the student and teacher.

    • Con: Can be more time-consuming to create.

  • Audio:

    • Pro: Students can take the content “on the go” and listen anywhere.

    • Con: Easier to get distracted while listening to, can be harder for non-native speakers to understand.

  • PDF:

    • Pro: PDF guides are easier to go back to and reference than audio/video, and PDF worksheets help walk students through doing the work.

    • Con: Typically lower engagement than audio/video.

  • Text:

    • Pro: This is the “easiest” to produce for creators that are comfortable with writing. Requires no additional tools or skills.

    • Con: Writing well can be difficult (but anyone can learn!)

  • Quizzes:

    • Pro: You can use quizzes as a way to see how well learners are grasping the course material.

    • Con: Not every topic lends itself well to quizzes, so it might not make sense for your program.

A note on accessibility: When publishing video and audio content, consider that you may have students who are hearing-impaired or who don’t natively speak your language. Make sure that everyone has a good learning experience by including transcripts of any video/audio files. 

As for the online course creation process, this video tutorial will show you exactly how to set up your course in Podia in about 10 minutes.

[embedded content]

Still need an online course platform? You can create unlimited online courses and digital products, as well as your website, landing pages, blog, email marketing, and affiliates with Podia’s Mover plan. (
The Mover plan costs $39/month paid monthly or $33/month paid annually.
)

The pitch: pricing and packaging your online course

Well done! By this point, your content is complete and the course is nearly ready to ship.

There are just two critical steps left: naming and pricing your course.

The name is the first thing that anyone who encounters your course will see.

If you get it right, it will pique their curiosity, draw them in, and make them eager to learn more.

If you get it wrong, they’ll move on and ignore your course.

  • Great course names are targeted. The name makes clear exactly who this course is for. “Knife Skills 101: Learn To Cut With Confidence” is a better name than “Knife Skills”, because it tells the prospective student what level of skill the course is geared toward.

  • Great course names are results-oriented. The name conveys the result that the student can expect by taking the course. “Knife Skills 101: Learn To Cut With Confidence” is also a better name than “Knife Skills” because it tells the prospect what outcome they’ll see at the end of the course.

  • Great course names are unambiguous. The name doesn’t use fluffy language or jargon that confuses the prospect and makes them think hard about what the course is really about. “Knife Skills 101: Learn To Cut With Confidence” leaves no question as to what the course is about.

Pricing is a deep, complex topic, but you don’t have to make it one.

We recommend a simple model of goal-based pricing. What is it that you want out of your course?

  • Do you want to reach the highest number of people? If you just want to reach as many people as possible (for example, if you’re using the course as a lead generation tool), then offer it for free. If there’s no barrier to enrolling, you’re likely to see more signups.

  • Do you want to make the highest total number of sales? Then price your course low enough to make it a “no-brainer” for as many people as possible, which is something under $30 depending on your niche (look at competing courses for some benchmarks).

  • Do you want to earn the most total revenue? This is where you get to charge the big bucks. For most creators, it’s a lot easier to earn $1,000 selling a $1,000 to one person than by selling a $20 course to 50 people. Go high with your pricing, and test to see what the market will pay for.

You’re not setting your pricing in stone, and you can — and should! — always try different pricing as you grow your online business.

Writing an online course sales page that converts

You’ll need a great sales page to show your product off to the world and make it easy for interested customers to buy. This is the page that your emails and social posts will link to, and it’s a great place to share all the details about your course.

Writing a great sales page is a lot like writing great marketing emails: if you’ve done the deep work to understand your audience and the language that they use, then the hardest part is already finished.

There are plenty of copywriting formulas out there, but the one we recommend is the simple and straightforward PAS Formula by legendary copywriter
Dan Kennedy
.

PAS stands for:

  • Problem

  • Agitate

  • Solution

To use the PAS formula, write your sales page in the following order:

Section 1: Problem – What’s the problem that your course solves for your customer?

State it at the very top. That’s your headline.

Remember: don’t worry about “wordsmithing” anything…just use the words that you’ve seen your audience using to describe their challenges!

Section 2: Agitate – What are the pains that having this problem causes for your prospect?

List them here, both as a reminder and a warning of what the cost of not solving the problem could be.

Section 3: Solution – The big reveal!

Share your solution to the reader’s problem, and why they should act on it now.

And there it is!

After you’ve got the foundation of your sales page down, you can add other elements like testimonials, FAQs, and promo videos, as well as any other information that will help your target audience make a decision. 

Here’s how you’ll set up a landing page in Podia step-by-step. 

  1. In the “Products” tab, click “Edit” next to the name of your course

  2. Click on the three dots int he top right corner and select “Edit sales page” 

  3. Podia makes a default sales page for every product you create that looks great out of the box, but you can also customize it however you want. 

  4. Click the plus sign anywhere on the page to add more sections, like images, text, CTAs, FAQs, testimonials, grids, links, and anything else you like.

Launching your course

You’ve researched, drafted, built, and packaged your course, and now it’s time to launch it to the world. 

When Podia creator Em Connors launched her first online course, she did a live launch window where people could only buy the course for a short period of time. Before the course was ready, she spent months building an email list and an audience on Instagram, and in the weeks leading up to the launch she told them about the course that was coming soon. 

The result? Em made 5 figures in just a few days!
You can read more about Em’s live launch strategy in this creator story
. 

While live launching can be fun, it’s also a lot of work for a burst of time. Another option is to set up an evergreen course, which is always available for purchase. With an evergreen or self-paced course, anyone who learns about your course can buy it any time, which can work well when you’re first starting out and growing your audience.   

No matter which approach you choose, keep these marketing ideas in mind to keep sales flowing long into the future: 

  • Email marketing: Growing an email list is something you can do right now for
    free with Podia
    . Start growing your list and building connections with subscribers so when you have something to sell, you’ve already got an audience built in. 

  • Promote your course on your social media channels and in your YouTube content

  • Link to your course from your blog posts so people who enjoy your content have the option to sign up and see more of your work.

  • Set up an affiliate program so your students can sell your course for you in exchange for commission.

  • Work with other small business owners in your niche. You can cross-promote each other’s products so everyone gets a larger audience.

Building an online course can feel like a big project, but you already have everything you need to get started! You can build your online course, sales pages, affiliate program, and email list in Podia,
so grab your account today to start building
. 

We can’t wait to see what you make!

SIGN UP NOW

Get your free Podia account

Join the 150,000+ creators who use Podia to create websites, sell digital products, and build online communities.

Start free →

Certified vs non-certified: do you have to be certified to be a life coach?

Software Stack Editor · June 28, 2024 ·

image

The field of life coaching is booming, and it’s not just a passing trend. Recent statistics from Grand View valued the market at $1.4 billion in 2022, meaning that the life coaching industry is not just surviving; it’s thriving, making it all the more attractive for newcomers. 

But here’s the million-dollar question for aspiring life coaches: Do you need to be certified in order to succeed in this field? That question has a few layers, so let’s explore it from a few different angles.

{{tableofcontents-component=”/blog-shortcodes/table-of-contents”}}

What exactly is a life coach?

If you’re reading this article, you likely already know what a life coach is! But just in an effort to make sure we’re all on the same page about the career we’re talking about, essentially a life coach is a professional who specializes in helping people achieve their personal and professional goals. By offering guidance, support, and accountability, life coaches help their clients create actionable plans for success and make meaningful changes. 

This partnership can focus on various aspects of life, including career growth, relationships, personal development, and overall life satisfaction, and the life coach and client will often work together over a series of sessions to ensure consistent progression in the client’s goals. 

So if being a life coach is a goal of yours, you should know that it not only gives you the opportunity to guide others through their personal and professional transformations; it’s a career that also comes with a ton of rewarding benefits. From the satisfaction of making a real difference in people’s lives to the potential for flexible work hours and financial gain, life coaching can definitely be a fulfilling and lucrative career path to pursue. 

But do you need to get certified as a life coach before jumping into this field?

Related: How to become a life coach

{{offeringcoaching-component=”/blog-shortcodes/popups2″}}

Understanding life coach certification

What is life coach certification?

Life coach certification is essentially a seal of approval from a professional association that vouches for an individual’s competence and adherence to industry-recognized standards. 

Basically, it tells the world you’ve got the chops to coach and you’re not just winging it! 

Generally, becoming a certified life coach involves completing specific coursework, accumulating a certain number of real-life coaching hours, undergoing direct mentorship from established coaches, and passing an assessment. The requirements are designed to ensure that coaches have a solid foundation in both the theoretical and practical aspects of coaching. Entities like the International Coach Federation (ICF) are key players in the certification arena, providing credentials that are recognized worldwide. 

Types of certifications available

From helping people climb the corporate ladder to guiding them through personal upheavals, there’s a life coach niche for just about everything… which means there are many certifications that also fit.  

Now, each area may require a different type of certification. For example, someone interested in wellness coaching will pursue a different certification than someone looking at executive coaching. So carefully select your certification based on how well it aligns with your intended career trajectory and the specific clientele you aim to serve. 

{{coachconfidence-component=”/blog-shortcodes/popups2″}}

Benefits of being a certified life coach

Getting certified as a life coach isn’t just a formal nod to your skills; it’s a path that can lead to some serious perks. Let’s take a look at how certification can boost your credibility, expand your professional network, and even increase your earning potential.

  • Credibility and professional recognition: In a field where trust and reputation are extremely important, having a recognized credential can set you apart from the competition. It assures clients and fellow professionals that you’re serious, you know your stuff, and you’re committed to upholding high standards of coaching practice. 
  • Access to professional networks: Being a certified coach often comes with membership in respected coaching organizations, which can be a significant resource. These networks can provide opportunities for collaboration, continuing education, and client referrals, all of which can enhance your professional development and business growth. 
  • Potential for higher income: When it comes to their mental and physical well-being, clients may be more likely to trust someone with documented expertise. Holding a certification may boost their confidence in your skills, and may increase the likelihood that they’ll choose you over uncertified competitors. This results in more sales, and may attract clients who are willing to pay top dollar for top-notch coaching.

Related: How much do life coaches make?

Challenges of being a non-certified life coach

It is absolutely possible to be a life coach without obtaining certification, but you may find that it comes with a few challenges. Here are a couple of hurdles non-certified life coaches may face. 

  • Credibility issues: As a non-certified life coach, you may find it more challenging to establish trust with potential clients and may find that you have to spend extra time proving yourself. You might also face skepticism from within the coaching community, which can affect your professional relationships and growth opportunities. 
  • Limited professional opportunities: Some reputable coaching platforms and networks require certification as a prerequisite for membership. As a non-certified coach, you might miss out on opportunities to work with certain clients or organizations that only hire certified pros.

{{expandbusinesscoaching-component=”/blog-shortcodes/popups3″}}

What your path could look like as a life coach

The truth is, you can have success in life coaching whether you are certified or not. It really depends on personal career goals, financial resources, and the specific audience you intend to serve.

So consider a few of these scenarios of both certified and non-certified life coaches. From Sarah’s jump in income post-certification to Tom’s success in building trust without formal credentials, these stories shed light on a few different paths.

Certified life coaches

Let’s imagine a scenario where a life coach named Sarah decides to pursue a certification through the ICF. Post-certification, Sarah notices a dramatic shift in how potential clients perceive her services. The certification not only boosts her credibility but also connects her with a valuable network, leading to a 30% increase in her income due to higher rates she can now command. Although the journey requires significant investment of both time and money for coursework and mentorship, it pays off as Sarah establishes a thriving practice in executive coaching, serving high-profile leaders.

Consider another hypothetical coach, James, who opts for a specialized certification in wellness coaching to merge life coaching with health advice. This decision arms him with specific tools that appeal to his target audience, enabling him to offer personalized coaching sessions. The process of finding the right certification takes considerable time and effort, but it allows James to develop wellness programs for companies and run workshops that solidify his client base and professional connections.

Non-certified life coaches

On the flip side, imagine Maria, who launches her coaching career without any formal certification, relying instead on her extensive background in HR and corporate training. Initially concerned about her credibility, Maria finds that her practical experience and results gradually win over clients. Despite facing challenges in gaining initial trust and breaking into formal networks, her focus on building strong client relationships and leveraging word-of-mouth becomes her most effective marketing strategy, leading to a sustainable business focused on career transitions.

And finally, picture a coach like Tom, who chooses not to pursue formal certification but instead builds his practice based on personal experiences and self-education. Tom’s approach emphasizes authentic connections over credentials. He faces hurdles competing for contracts in settings that favor certified professionals, yet his commitment to transparency and continual learning helps him cultivate a loyal clientele through online platforms and social media, where his engaging style and personal growth stories resonate with individuals interested in personal development and lifestyle changes.

So the bottom line from all of these examples is that, whether you choose to be certified or not, both paths can lead to success in life coaching, albeit with different challenges and strategies. Certified coaches often benefit from the immediate credibility and networking opportunities provided by formal programs. Non-certified coaches may need to work harder to establish trust and credibility, but can also achieve great success through personalized approaches and strong client relationships.

So should you get certified or not?

There are at least two important things to consider while making your life coach certification decision: your career aspirations and your budget. 

As far as your career aspirations, think about where you see your coaching career going. Do you dream of big corporate gigs, or a more personalized practice helping individuals? Your answer might dictate whether you need that certificate hanging on your wall. 

With regard to your budget, it goes without saying that certifications can be pricey, with fees for courses and exams, not to mention the time commitment required. So you’ll need to evaluate your financial situation and figure out if the potential payoff in client trust, network access, and higher fees is worth the upfront cost. 

Run through this decision-making checklist to further drill into whether certification is right for you:

  1. Identify your niche: Who do you want to coach and what problems are you solving?
  2. Check your wallet: Can you afford the certification hustle?
  3. Career goals: How does certification fit with your long-term plans?
  4. Opportunity scan: What’s the market like? Do your target clients care about certification?

Related: Life coach certification programs

Bottom line: your coaching journey, your rules

Deciding whether to get certified in life coaching is not one-size-fits-all and depends heavily on your individual circumstances and professional aspirations. 

Whether you decide to go for that certification or opt to go without it, the key is to stay true to what makes you a fantastic coach. Keep learning, keep growing, and let your passion for helping others guide you and your clients to incredible win-win scenarios. 

{{likefree-component=”/blog-shortcodes/call-to-action”}}

How to create a value-packed lead magnet in under 30 minutes

Software Stack Editor · June 28, 2024 ·

Have you ever pulled up to the coffee shop drive-through window and learned that the car in front of you paid for your order? Getting something for free, especially something as valuable as that early-morning cup of joe, can make your whole day feel brighter.

Your audience also likes getting things for free, and your impact can go far beyond a caffeine buzz. Giving a helpful free resource to your followers can lead to positive customer relationships, more sales, and feelings of trust and appreciation toward your business.

The best way to do this is with a lead magnet.

What is a lead magnet?

A lead magnet is a piece of content like a free ebook, video training, email course, printable, or checklist that you offer in exchange for your followers’ contact information. It acts as an incentive to attract target audience members, and the ultimate goal is to build an email list of potential customers who love your work.

Lead magnets should help your audience do something specific. The most effective lead magnets are actionable and show someone the answer to a problem they can solve in the next few minutes.

Essentially, they’re bite-sized wins that leave the viewer wondering what else you could teach them.

Lead magnets are…

  • Action-oriented: They help the reader do something specific and make progress toward a goal.

  • Concise: The viewer should be able to consume the content in a short period of time and walk away feeling accomplished.

  • Related to your niche: You want to attract your specific target audience, not everyone and the kitchen sink.

  • Things people want: You only have a few seconds to pique someone’s interest. Go for quick, juicy wins over big-picture solutions.

Why should I make a lead magnet?

Sitting down to create anything takes work, and you may be wondering if it’s really worth it to make a product that you’ll give away for free.

Even though lead magnets won’t put money in your pocket today, they can be incredibly lucrative for your business in the long run.

  1. First, a lead magnet can help you establish credibility with your followers. By showcasing your expertise and providing something of value for free, you can position yourself as an authority in your field. When followers need information related to your niche, you’ll be the one they turn to.

  2. Second, a lead magnet is a fast way to build your email list. With an email list, you have a direct and reliable way to communicate with your audience, promote your digital products, and nurture relationships over time. 

In this article, you’ll learn how to make a lead magnet that attracts the right people, provides value, and stays true to your brand.

In Podia’s step-by-step website guide, I set up a site for my road trip planning business, Your Best Road Trip. Now, I want to grow my email list by creating a helpful free lead magnet.

Throughout this post, I’ll give you a front-row seat to my creative process so you can see exactly what I’m doing at each step of the way. If you’d like to follow along, grab your free 30-day trial of Podia now.

Lead magnet guide: Editing your lead magnet's sales page step 2

You don’t have to spend weeks on your lead magnet to make a big impact. In fact, you may be able to set one up in as little as half an hour. Let’s get started.

What lead magnet should I make?

Let’s say you have an online business teaching yoga classes. You create a lead magnet that’s all about picking the right color palette for your home office, and it’s good – really good. In fact, it’s one of the best resources ever created about home office color palettes. 

The problem is that this lead magnet isn’t going to attract the right audience for your business. Sure, it might be an amazing resource, but you’ll end up with an email list filled with home decor DIYers instead of yoga enthusiasts. 

While putting together a random freebie can be fun, one of your lead magnet’s main jobs is to draw in your target audience. There’s no point in building a list of people who aren’t interested in what you offer, so here are four questions you can ask yourself to find a topic that resonates:

  1. What questions do you get asked the most often? Creating a resource that answers a frequently asked question is helpful for your audience and also saves you time. Instead of answering questions in your DMs, you can direct people to your free resource. 

  2. What questions are people asking in the wild? Take a look at the questions people are asking on other blogs or in YouTube comments. Find a creator in your niche and scroll down to the comment section on their videos or website. Pro tip: You can use the command+find feature and search for the question mark symbol (?) to find questions faster.

  3. What’s the main problem your audience is trying to solve? Can you provide the first step to solving this problem or one resource that would get them going in the right direction? 

  4. What products or services do you want to launch in the future? Are there any smaller products you can make that would be a natural introduction to your bigger offers? For example, if you hope to offer a 12-week fiction writing course, a free workbook about fiction world-building or character development would be a logical first step.

After you answer these questions, see if you can find a common problem with a straightforward solution. The solution should be something that the viewer could implement in a matter of minutes. 

Remember, lead magnets should give people quick wins, they don’t need to be overly extensive and elaborate.

BUILD TOGETHER

I wasn’t certain what topic to cover for my road trip lead magnet, so I used the questions above to get clarity.

What questions do you get asked most often? When I reflected on conversations and emails with friends and family about their upcoming road trips, I realized that people always ask me about car maintenance items and what they should pack. People seem very concerned with being prepared should they experience car trouble or get lost.

What questions are people asking in the wild? I checked out the comment section under YouTube videos about road-tripping and made note of some common questions.

Lead magnet guide: YouTube Audience Research

Here are some of the questions that came up most frequently:

  • How much time do I need to road trip from point A to point B
  • What exactly do I need to bring on my road trip?
  • Do I need to pack XYZ items?
  • How much will all this cost?
  • Are road trips safe?

Think of the main problem your audience is trying to solve: Since my website is about planning road trips for beginners, I expect that the biggest problems will be where to go, what to do, and logistics. For someone new to this type of travel, overwhelm is a big issue.

What products or services do you want to launch in the future? I want to launch a coaching service where I help people plan custom road trips, so providing a resource for people who also want to plan a road trip makes sense here.

Questions like how much time it takes to get from Point A to Point B or how much a route costs will vary based on each trip, but a packing list feels like something helpful to everyone and it could reduce overwhelm.

Plus, I know that a person interested in a road trip packing list is probably in the planning stages, so they’re a potential customer for my future products.

I’m going to make a road trip packing list based on my experiences, but to give it some extra intrigue and make it stand out from the millions of other packing lists out there, I’m going to focus on 10 unexpected things that people should bring. This makes the list less overwhelming and piques curiosity since viewers will wonder what they’re missing.

Designing a lead magnet that’s unmistakably yours

You have your lead magnet topic nailed down, and the next step is to write out a draft of what you’d like to say. 

The best lead magnets are short, actionable, relevant to your business, and filled with value. This is true whether you’re making a PDF, spreadsheet, video, cheat sheet, case study, mini online course, email sequence, or any other type of lead magnet. 

The goal of your lead magnet is not just to collect email addresses, but also to create a strong foundation for a long-lasting and mutually beneficial relationship with your audience. 

Here are some tips to remember as you outline: 

  • Keep it short: You want to provide a quick win for your audience, something they can easily consume and implement. No need to write your magnum opus at this stage. 

  • Remember your niche and products: Think of your lead magnet as the first step on a journey that connects with the other products or services you offer. 

  • Help your audience take action: When you solve one of your audience’s problems, you build trust and establish yourself as an authority. If you’ve helped subscribers achieve something that matters to them, they’re more likely to open your emails, trust your recommendations, and ultimately make purchases from you. 

With that in mind, open up a blank document and start brainstorming. Write a script for your free video training, list out ideas for your checklist, outline the lessons of your mini-course, or draft your ebook. 

Here are some tools to make the creation process quicker and smoother: 

  • Grammarly: Free proofreading software that can help you catch typos and improve your sentence structure. 

  • Hemingway: Another writing and editing tool that can improve readability and give you suggestions for other ways to phrase things.

  • Unsplash: Free-use stock photos you can use without attribution. (Don’t pull images off Google Images since they might not be royalty-free, which could cause copyright issues.) 

  • Descript: A video editing and transcription tool that you can use to add effects and overlays to your videos or transform your video and audio files into text. 

BUILD TOGETHER

For my road trip free lead magnet, I started by brainstorming all the packing list items I wanted to include in a Google Doc. Then I went through and wrote a few sentences about why that item is important and what it can be used for.

Lead magnet guide, example of written content for road trip packing lead magnet

The full document is less than two pages long, but if someone has never gone on a road trip, this simple packing list will help them feel more prepared and potentially prevent sticky situations.

Now that you know what to say, export your lead magnet into a format that your audience can access. There are a few ways you can do this, depending on what you’re making. 

  • Option 1: Saving your written lead magnet as a PDF: This is the simplest option. If you’ve typed your lead magnet content into Word, Pages, or Google Docs, save the document as a PDF and export it to your computer. 

  • Option 2: Uploading an unlisted YouTube video: If you’d like to use a video or webinar replay as your free lead magnet, you can upload it to YouTube and save the video as unlisted. Only people who have the exact URL can find the video, and you can send the URL to subscribers instantly when they sign up. 

  • Option 3: Creating resources with Canva: If you’d like to add more design elements to your lead magnet, you can do this with a popular graphic design tool called Canva. It’s free to use and there are tons of templates for all types of projects, like ebooks, printables, checklists, journals, brand kits, and more to help jumpstart your creativity.  

  • Option 4: Create a drip email sequence to deliver your course or challenge content slowly over a few days. You can do this with an email marketing platform like Podia Email.

Of course, there are tons of other ways you can set up your lead magnet, so you choose the option that makes the most sense for your product and press publish. 

For my road trip packing list, I used Canva to make the information more visually appealing. You can see my step-by-step process in the video below.

“Is my lead magnet any good?” 5 step checklist

How do you go from a good lead magnet to a great lead magnet? Follow this quick 5-step checklist to ensure you’re giving your ideal followers exactly what they’re looking for. 

  1. How could someone make a meaningful improvement to some aspect of their life within 10 minutes of downloading this lead magnet?

  2. Why would your audience rate the pain point that your lead magnet addresses as above a 7 out of 10 in importance?

  3. What is one major benefit, pain, or technique that your audience will remember and take away from your lead magnet?

  4. What about the title of your lead magnet will make your audience stop what they’re doing to sign up?

  5. Have you gone through the signup process for your lead magnet yourself, to make sure it looks right on different devices and the confirmation emails all work?

Now that your lead magnet has passed with flying colors, it’s time to share it. In the next chapter, you’ll learn how to add your lead magnet to Podia and create a landing page to capture sign-ups.

How to create a lead magnet in Podia

Podia includes lead magnet functionality on all plans, and you can easily make your lead magnet available to the public. 

To distribute your lead magnet for free, create a digital download product and set the delivery method to free email delivery. Simple and easy!

This method works well with files, such as ebooks, audio files, video files, or PDFs. 

In this video tutorial, I’ll walk you through how to set up your lead magnet as a free digital download with email delivery. If you prefer to read, keep scrolling for text and photo instructions. 

Step 1: Click on Products in the top bar of your navigation and select “New Product.” 

Lead magnet guide: Adding your lead magnet to Podia step 1

Step 2: When the window pops up, select “Digital download.”

Step 3: In the digital download editor, you can add files to your digital download product. You can upload as many files as you like as long as each individual file is under 5GB. If you upload multiple files, these will be automatically zipped by Podia’s system once they’re downloaded by your customers. 

Lead magnet guide: How to add your lead magnet to Podia step 3

Step 4: Once you’re done uploading the files, head over to the Pricing tab to set up the file delivery method.

Lead magnet guide: Editing your lead magnet's sales page step 1

Step 5: Under Pricing, select Edit, then choose Free Email Delivery. This will ensure customers need to enter their emails to sign up for your free product without needing to create an account.

Lead magnet guide: How to add your lead magnet to Podia step 5

Step 6: Once you have everything set up, make sure to Publish your product.

Step 7: Edit your lead magnet sales page to share more information about your lead magnet and encourage people to download it. Click on the three dots on the right-hand side of your product and choose “Edit site” from the drop-down menu. 

This will take you to your lead magnet’s landing page. All Podia products automatically come with a sales page so you can easily promote your offer, and Podia’s point-and-click website builder has several different customization options.  

This is the default page: 

Lead magnet guide: Editing your lead magnet's sales page step 4

If you just want a simple place to promote your product, this page works great out of the box. You can also add other details like text, images, testimonials, FAQs, CTAs, and grids by clicking the plus sign under each section. 

Finally, edit the page settings to add an SEO description and make sure your lead magnet URL is what you’d like it to be. Your best bet is something short and easy to remember. 

Hit publish and you’re good to go. 

Customers can now visit this page and download the lead magnet you created in exchange for their email address. After entering their email address, the file will be delivered via email, and the user will be added to the product as a customer.

The last step is getting more followers onto your email list. You’ve worked hard on your lead magnet, and there are many people out there who could benefit from your resource. In the final chapter of this guide, we’ll cover how to promote your list, gain subscribers, and make a bigger impact.

Now that you have your lead magnet and sales page set up in Podia, it’s time to share your link far and wide. Here are some ways you can publicize your lead magnet on your channels to get your work in front of more eyes.

#1 Leverage your website

Your website is prime real estate, so make sure you’re featuring your lead magnet on your most visited pages. In Podia, you can include a lead magnet sign-up form on any page by adding a product block. 

For my road trip website, I’m adding a link to my lead magnet sales page to the header menu and putting a call-to-action banner on the home page. 

Lead magnet guide, chapter 4, website

#2 Create blog or podcast content

Another way to feature your free resource is to write blog posts related to your lead magnet topic and include an opt-in form within the content. You can also create podcasts about your lead magnet topic and include a link to the freebie in your show notes. 

I have three articles about road trips on my website, and I added a lead magnet opt-in section to the bottom of each so website visitors can easily find it.

#3 Use social media 

Share snippets or teasers of your lead magnet on platforms like Instagram, Facebook, Twitter, Pinterest, or LinkedIn. Don’t forget to add the link to your opt-in page to your social bios so people can easily find it. 

Podia creator Emily Mills from Sketch Academy includes links and the word “Freebies” in her Instagram bio to point people in the right direction. 

Lead magnet guide, chapter 4, social media

(Need a custom link in bio page? You can create one for free with a 30-day trial of Podia.)

#4 Collaborate with influencers and other creators 

Another way to reach more people is to partner with other creators and small business owners in your niche who have a similar audience. You can cross-promote each other’s lead magnets, contribute guest blog posts, do social media takeovers, or arrange podcast appearances. 

In your author bio or within the content, mention your lead magnet and provide a link to your opt-in page to capture new subscribers.

#5 Engage with your audience

When audience members reach out to you through email, direct messages, or in the comments section on your social media platforms, respond to their questions and mention your lead magnet as a resource that can further help. You can also add a link to your lead magnet in your email signature. 

#6 Connect in communities and online forums

Are you a part of any entrepreneurial groups or online communities? This can be a great place to share your new lead magnet. Check the group rules to see if there’s an appropriate place to link your work, but often there’s a section where self-promotion is allowed. 

#7 Join “Get Noticed!”

If you’d like to learn more about growing your audience, check out Podia’s free Get Noticed! course. Get Noticed! is an in-depth 5-module course based on dozens of creator interviews, thousands of survey responses, and the techniques 19 successful creators used to get in front of the right people.

You’ll explore audience growth myths and truths, how to find irresistible angles in your content, examples of growth across different platforms, and tips for staying consistent.

Get free access to the “Get Noticed!” course Sign up now

Creating a lead magnet is an important step in building your online business. Lead magnets help you grow your audience, showcase your expertise, build connections with followers, and share your knowledge with those who need it. With this solid foundation, there’s no limit to where your creator journey will take you. 

Build your lead magnet with a 30-day free trial of Podia today. We can’t wait to see what you make. 

How to create, sell, and profit from an online course

Software Stack Editor · June 28, 2024 ·

No matter who you are, you have something to teach the world.

Maybe it’s a long-time passion of yours – something you’ve always loved to teach and answer questions about – or maybe it’s something you’ve only considered creating content for in your most far-flung dreams.

Either way, you know if you could just find a way to bottle up that spark and deliver it to the world, to customers, you’d be unstoppable.

Luckily, today it’s easier than ever to turn your knowledge into revenue-driving online courses that can change the lives of your customers.

No matter what subject matter or topic you want to teach, how much experience you have in creating videos and lessons, or whether you’ve ever put together a marketing campaign in your life, creating an online course can be accomplished in a few simple, easy steps.

Sound good? Then let’s get started.

Who should create an online course and what are the benefits? 

The rewards of creating an online course – making more money, earning passive income, reaching more people, making a bigger impact – can be tempting.

But getting there takes work. And the only way to stay motivated to do the work (and actually enjoy it) is to know that you’re doing something that you should be doing.

Here are two questions to help you decide if making an online course is the right move for you:

“Do I have something to teach?”

There’s a very good chance that for the people in your circle, you’re an expert on something. Maybe you’re great at managing money, or computer skills, or cooking, or finding cheap travel deals, or home decorating. Maybe you’re super-organized and can do magic with spreadsheets.

You might already know what gift or skill people come to you for. Or you might not (though chances are, the people around you do!), in which case, we’ll help you figure it out.

If there’s something that you can teach others that will help them in their life or work, creating an online course is a great way to get it out there.

“Do I want to start an online business?”

You’ve probably seen the photos on Instagram. An inspirational guru posting a snapshot of their “daily life” in the form of a cocktail on the beach on a Tuesday.

“Start an online business,” they tell you, “you’ll make money in your sleep. Just buy my coaching program and I’ll show you how.”

In reality, building an online business looks nothing like that Instagram photo. It can be hard work and a lot more time consuming behind the scenes. But it’s incredibly rewarding work, too. When a student who completes your course tells you that you changed their life, it will be one of the most gratifying things you ever hear. 

So ask yourself, do you really want to start an online business and put in the work required to get the results you want? 

“There are so many ways to make a living online – how do I know if courses are the right fit for me?” 

These days, you can build a business selling digital products, coaching, blogging, YouTubing, getting brand sponsorships, and about a million other ways. So how do you know if courses are the right call for you? Try making a small, simple course and see how it goes. You’ll… 

  • Overcome any mental barriers before sinking tons of time into a big project. Even building a small course and getting it in front of people will show you that these concerns can’t hold you back from success.

  • Get valuable student feedback without much time invested. The very best courses aren’t first versions; they’re courses that have been iterated on over time, incorporating student feedback along the way. The most important step in this process is simply to get started.

  • Learn a lot along the way! Everything that may seem challenging to you now, like creating content and writing a sales page, will get much, much easier after you do it for the first time.

How to come up with ideas for your online course

To come up with an idea for your online course, start by thinking about your ideal audience – or the people who you think would buy your course one day. 

If you already have a blog, email list, or social media following, look at your followers. If you don’t have an audience already, simply look to the people around you: your friends and co-workers. 

Try asking the people you have access to these 5 questions, either over email, on 1:1 calls, through a survey, in your social media comments, or any other way that you can do today. 

  • “Tell me about your experiences with [topic].”

  • “What’s your biggest challenge with [topic]?”

  • “How are you currently dealing with those challenges?”

  • “What would solving these challenges allow you to achieve?”

  • “What blogs do you read frequently? What communities are you a part of online?”

Keep a note of any common trends you hear. If multiple people are experiencing the same challenges and pain points, there might be an opportunity for you to share a solution. 

Another way to do this is to head to public channels and forums like YouTube or Reddit and search for questions around your course idea. Remember: Any problem worth solving in a course has probably already been written about. And if it’s a real problem for people, they’re probably seeking solutions online. So head to the comments section and see what you can find. 

Do you see any patterns or recurring ideas?

By now you should have a list of potential online course topics that you could tackle based on what you’re good at and what you’ve learned from your research, so let’s hone in on the best ones.

We’ll be judging all of the ideas based on two factors:

  • Passion: How excited are you to work on this? If you hate working on something, its’ profit potential doesn’t matter, because you’re likely to quit before you get there!

  • Profit potential: Is it a problem that people would pay to have solved for them? A good framework for thinking about this is “do people already spend money to solve this problem, in the form of books, apps, services, etc…?”.

Plot the ideas from your list on the Passion/Profit Matrix.

243142ccf66f1e179bb7c2b0a4ccdf90942b549c course-passion-profit-matrix-1

We’re looking for the ideas that land in the top right quadrant: the ones that you’re excited to work on and that you’ll be able to sell.

Once you have your idea chosen, it’s time to get to work on building your course.

How to plan and build your course content

The first time you make a course, it’s tempting to sit down and brain dump everything you can think of into a list, then use that as your course outline. But this can quickly lead to information overwhelm for you and your students, so we have another approach you can try. 

Start with the end result.

You don’t need to teach your students everything you know about a topic. You just need to teach them exactly what they need to know to achieve the result you promised.

At Amazon, they write a press release announcing a product launch before they even start working on the product. They don’t publish the release, of course. But the internal process of writing the press release makes them focus on what’s most important: the elements of the product that are exciting and useful for their customers.

Amazon starts with the end result and builds backward from there. And that’s how we’re going to approach your course, too.

What is the end result you want your students to achieve?

When you begin to build your outline, the answer to the question above goes at the top.

Then, your first module or course section will get your student excited about why they’re taking the course.

After that, break down the end result into the various steps that need to be taken to achieve it.

Remember that your goal is not to teach everything you know. It’s to teach everything your student needs to achieve a result.

Once you have the end result broken down into its component parts and dropped into an outline, you’re ready to make your course content.

Online courses typically have the following components. You can mix and match these media types depending on what makes sense for each lesson, so don’t overthink this step. 

Use the tools you already have (like a smartphone, your computer webcam, your headphones, and anything else that you’ve got on hand. You don’t need the most fancy equipment to share what you know, and getting too caught up in the logistics of “perfect” content will only slow things down. Plus, you can always go back later and update modules as your business grows. 

  • Video

    • Pro: Engaging, multi-sensory, builds the strongest relationship between the student and teacher.

    • Con: Can be more time-consuming to create.

  • Audio:

    • Pro: Students can take the content “on the go” and listen anywhere.

    • Con: Easier to get distracted while listening to, can be harder for non-native speakers to understand.

  • PDF:

    • Pro: PDF guides are easier to go back to and reference than audio/video, and PDF worksheets help walk students through doing the work.

    • Con: Typically lower engagement than audio/video.

  • Text:

    • Pro: This is the “easiest” to produce for creators that are comfortable with writing. Requires no additional tools or skills.

    • Con: Writing well can be difficult (but anyone can learn!)

  • Quizzes:

    • Pro: You can use quizzes as a way to see how well learners are grasping the course material.

    • Con: Not every topic lends itself well to quizzes, so it might not make sense for your program.

A note on accessibility: When publishing video and audio content, consider that you may have students who are hearing-impaired or who don’t natively speak your language. Make sure that everyone has a good learning experience by including transcripts of any video/audio files. 

As for the online course creation process, this video tutorial will show you exactly how to set up your course in Podia in about 10 minutes.

Still need an online course platform? You can create unlimited online courses and digital products, as well as your website, landing pages, blog, email marketing, and affiliates with Podia’s Mover plan. (The Mover plan costs $39/month paid monthly or $33/month paid annually.)

The pitch: pricing and packaging your online course

Well done! By this point, your content is complete, and the course is nearly ready to ship.

There are just two critical steps left: naming and pricing your course.

The name is the first thing that anyone who encounters your course will see.

If you get it right, it will pique their curiosity, draw them in, and make them eager to learn more.

If you get it wrong, they’ll move on and ignore your course.

  • Great course names are targeted. The name makes clear exactly who this course is for. “Knife Skills 101: Learn To Cut With Confidence” is a better name than “Knife Skills”, because it tells the prospective student what level of skill the course is geared toward.

  • Great course names are results-oriented. The name conveys the result that the student can expect by taking the course. “Knife Skills 101: Learn To Cut With Confidence” is also a better name than “Knife Skills” because it tells the prospect what outcome they’ll see at the end of the course.

  • Great course names are unambiguous. The name doesn’t use fluffy language or jargon that confuses the prospect and makes them think hard about what the course is really about. “Knife Skills 101: Learn To Cut With Confidence” leaves no question as to what the course is about.

Pricing is a deep, complex topic, but you don’t have to make it one.

We recommend a simple model of goal-based pricing. What is it that you want out of your course?

  • Do you want to reach the highest number of people? If you just want to reach as many people as possible (for example, if you’re using the course as a lead generation tool), then offer it for free. If there’s no barrier to enrolling, you’re likely to see more signups.

  • Do you want to make the highest total number of sales? Then price your course low enough to make it a “no-brainer” for as many people as possible, which is something under $30 depending on your niche (look at competing courses for some benchmarks).

  • Do you want to earn the most total revenue? This is where you get to charge the big bucks. For most creators, it’s a lot easier to earn $1,000 selling a $1,000 to one person than by selling a $20 course to 50 people. Go high with your pricing, and test to see what the market will pay for.

You’re not setting your pricing in stone, and you can — and should! — always try different pricing as you grow your online business.

Writing an online course sales page that converts

You’ll need a great sales page to show your product off to the world and make it easy for interested customers to buy. This is the page that your emails and social posts will link to, and it’s a great place to share all the details about your course.

Writing a great sales page is a lot like writing great marketing emails: if you’ve done the deep work to understand your audience and the language that they use, then the hardest part is already finished.

There are plenty of copywriting formulas out there, but the one we recommend is the simple and straightforward PAS Formula by legendary copywriter Dan Kennedy.

PAS stands for:

  • Problem

  • Agitate

  • Solution

To use the PAS formula, write your sales page in the following order:

Section 1: Problem – What’s the problem that your course solves for your customer?

State it at the very top. That’s your headline.

Remember: don’t worry about “wordsmithing” anything…just use the words that you’ve seen your audience using to describe their challenges!

Section 2: Agitate – What are the pains that having this problem causes for your prospect?

List them here, both as a reminder and a warning of what the cost of not solving the problem could be.

Section 3: Solution – The big reveal!

Share your solution to the reader’s problem, and why they should act on it now.

And there it is!

After you’ve got the foundation of your sales page down, you can add other elements like testimonials, FAQs, and promo videos, as well as any other information that will help your target audience make a decision. 

Here’s how you’ll set up a landing page in Podia step-by-step. 

  1. In the “Products” tab, click “Edit” next to the name of your course

  2. Click on the three dots int he top right corner and select “Edit sales page” 

  3. Podia makes a default sales page for every product you create that looks great out of the box, but you can also customize it however you want. 

  4. Click the plus sign anywhere on the page to add more sections, like images, text, CTAs, FAQs, testimonials, grids, links, and anything else you like.

Launching your course

You’ve researched, drafted, built, and packaged your course, and now it’s time to launch it to the world. 

When Podia creator Em Connors launched her first online course, she did a live launch window where people could only buy the course for a short period of time. Before the course was ready, she spent months building an email list and an audience on Instagram, and in the weeks leading up to the launch she told them about the course that was coming soon. 

The result? Em made 5 figures in just a few days! You can read more about Em’s live launch strategy in this creator story. 

While live launching can be fun, it’s also a lot of work for a burst of time. Another option is to set up an evergreen course, which is always available for purchase. With an evergreen or self-paced course, anyone who learns about your course can buy it any time, which can work well when you’re first starting out and growing your audience.   

No matter which approach you choose, keep these marketing ideas in mind to keep sales flowing long into the future: 

  • Email marketing: Growing an email list is something you can do right now for with Podia. Start growing your list and building connections with subscribers so when you have something to sell, you’ve already got an audience built in. 

  • Promote your course on your social media channels and in your YouTube content

  • Link to your course from your blog posts so people who enjoy your content have the option to sign up and see more of your work.

  • Set up an affiliate program so your students can sell your course for you in exchange for commission.

  • Work with other small business owners in your niche. You can cross-promote each other’s products so everyone gets a larger audience.

Building an online course can feel like a big project, but you already have everything you need to get started! You can build your online course, sales pages, affiliate program, and email list in Podia, so grab your 30-day free trial today to start building. 

We can’t wait to see what you make!

10 Warning Signs You Need a Customer Education Program ASAP

Software Stack Editor · June 27, 2024 ·

Most businesses offer some level of employee training, whether it’s formal and well-structured or on-the-job training that happens spontaneously.

But did you know that, in many cases, you need to train your customers as well? Just like employees, customers also need help mastering a product that has multiple features and use cases.

This “help” comes in the form of a customer training program – a set of initiatives like live or on-demand webinars, online learning courses, setup guides, and knowledge bases that support your customers’ journey.

The benefits of customer education for your business are undeniable. Customer education helps during the critical phase of onboarding and throughout the customer lifecycle, boosting loyalty and helping you build a business that withstands competition.

Similarly, not offering a customer education program can negatively impact core business metrics and your bottom line. But which metrics are tied to customer training? And what other parameters should you take into account?

If you’re unsure whether your business needs a customer education program or not (and let us tell you right now – chances are that it does), you’re in the right place. Here are 10 tell-tale signs you need to offer customer education now!

9000+ brands trust LearnWorlds to train their people, partners & customers.

Start a FREE Trial

Is it Time for a Customer Education Program? Here’s How to Tell

The truth is that all businesses can benefit from a customer education program. But, in some cases, the need is even more urgent. If most of the following statements stand true for your business, then it’s time to roll up your sleeves and start working on one!

1

Low Product / Feature Usage

Low feature adoption is one of the most obvious signs that you need to offer customer enablement right now. When customers underutilize features, they are either unaware of them and their benefits or have trouble using them.

Low feature usage concerns both old and new features that go undiscovered by existing customers – which is a reminder of how customers need support throughout their customer journey and not just during the early stages.

💡 To accurately measure product usage, don’t forget to use analytics tools to check website and in-app user behavior. You can also use product analytics tools to measure the frequency of usage, number of clicks, and time spent with specific features. For more detailed feedback, you can roll out surveys and set up user interviews or focus groups.

2

High Volume of Support Tickets

If your customer support team struggles with a large amount of incoming tickets, that’s a clear indication that your customers need help navigating your product. Develop a customer education strategy with a comprehensive knowledge base with support articles and some step-by-step tutorials will take a load off your agents’ plates and reduce customer support costs.

💡 Speed and quality of responses is an issue that needs to be addressed urgently by any business. The level of customer support has a huge impact on customer satisfaction – something which is evident from the fact that most customer reviews, especially for tech products, comment very strongly on the level of customer service provided.

3

Recurring Customer Support Requests

Perhaps your customer support team is not overwhelmed with tickets, but they still receive recurring questions on specific functionalities or use cases (“How can I…”). This is another case where you must develop training content to address the issue.

💡Your customer success team can also give you valuable insights into what customers repeatedly need help with. Make sure you have a proper documentation process in place to keep track of customer requests.

4

Low Trial-to-Customer Conversion Rates

Does your list of free-trial users who never convert to customers grow longer and longer? That’s a surefire sign that they need more support during onboarding. Maybe they have trouble navigating the product or using specific features that are useful to them but hard to figure out.

An updated knowledge base with setup manuals and guides, support articles, and live or recorded interactive demos, are very helpful for successful customer onboarding.

💡To find out what’s wrong (and reverse the situation), include an exit survey where the user will give their reason for not signing up. Use product analytics tools to see which features prospective customers have used and which went unnoticed or were abandoned, as this will indicate areas they need support with.

5

Early Drop-Offs

Similar to low conversion rates, early customer churn indicates that new customers did not have the customer experience they were expecting and possibly need more support and educational content during their onboarding. While you should cater to every customer’s need, remember that customers on higher plans expect a personalized onboarding process in addition to self-service resources.

Customers who have signed up for your most advanced features might still not have the time or tech know-how to navigate them independently. Schedule one-to-one meetings with their CSM (Customer Success Manager) to shorten the time to value, ensure product adoption, and maximize customer retention.

6

High Customer Churn

Businesses that do not offer a customer education program are more likely to struggle with customer loyalty and notice a shorter customer lifecycle. Churn can be attributed to several reasons, so find out with an exit survey or interview: if customers report issues related to product complexity or usability, you need to start working on offering more support right away.

💡 Customer training fosters customer engagement and can not only prevent churn but also facilitate upsells and cross-sells. This ensures not only customer retention but also increased satisfaction and trust, leading to future purchases.

7

Negative Reviews

Not having clear instructions on how to use a product can quickly lead to a customer calling your product “hard to navigate” or “not intuitive,” usually backed up by the opinions of all users who are unhappy with your product and have collectively decided it was a bad choice.

💡 Don’t wait until you see a negative review posted publicly online! Conduct NPS and CSAT surveys soon after a customer signs up. Check in with the customers via their CSM or at least via email. Monitor user behavior closely and reach out to customers indicating low engagement. If customers mention they have trouble using your product, contact them for assistance.

8

Complex Product

Does your team report having trouble getting customers to sign up or securing renewals because customers don’t understand the product or haven’t found it as useful as expected? Product complexity, especially in SaaS products with rich functionalities, can intimidate prospective customers or, if it’s not dealt with, be a reason for not renewing a subscription.

If you have a complex product, make sure you proactively address first onboarding needs by offering a comprehensive knowledge base with guides and step-by-step video tutorials. Also, provide ongoing support with a well-trained customer support team and regular interactive webinars.

9

Frequent Product Updates

If you release new features often, you need to update existing training material or create new ones as you go while also communicating the news via email, social media, and the product. This will help existing customers discover new features and get the most value out of your product!

10

Competitive Disadvantage

If your competitors offer a customer training program and you don’t, you’re definitely at a disadvantage. Essentially, you’re oblivious to your customers’ needs and pain points while competitors are attentive, which doesn’t make you look good.

Having not only scattered training materials but a fully-fledged learning program in place not only puts your brand in a positive light, it also increases brand awareness and perceived authority and can be used as additional leverage by your sales team.

5 Tips for a Successful Customer Education Program

In this section, we share 5 quick tips for a successful customer education program.

Mix on-Demand With Synchronous

Offer a mix of self-service resources in various formats (walkthrough product tutorials, on-demand webinars, eBooks, online courses/certification programs) and personalized customer support, even in person if that’s feasible.

For your asynchronous online courses, use microlearning modules to help customers understand the content better and faster. Include quizzes as “knowledge checkpoints” and case studies to demonstrate examples of your product’s best uses!

Segment Your Audience

Don’t create training courses following a “one-size-fits-all” approach. Segment your audience based on criteria like their plan, use case, skill level, or even location to personalize their experience and develop targeted material for each group. The more functionalities and the larger/diverse your customer base, the more courses and training material you will need to create.

Align With Business Goals

Your customer education team must be aware of your business goals and that they tie those to the training resources. Set specific metrics to measure the success of your program, like “reducing incoming tickets by 2% in twelve months” or “boosting CSAT score by 5% in twelve months.”

Use the SMART methodology to ensure your goals are Specific, Measurable, Attainable, Realistic, and Time-bound!

Use a Learning Management System (LMS)

Use a flexible, customizable learning platform like LearnWorlds to create a scalable customer education program for different audiences. Our LMS offers rich integrations with tools like Zendesk and Hubspot and enables you to build customizable learning paths in a branded learning environment.

Here are our top features for customer education:

  • Content authoring tools
  • Website Builder with templates
  • Custom User Roles and User groups for easier administration and access control
  • Clone & Sync for fast school creation and content repurposing
  • Multiple schools to manage multiple academies from one centralized location
  • AI tools for course outline, learning objective, assessment, and feedback generation
  • Copyrights protection
  • CRM & customer service integrations
  • Community for better customer engagement
  • API, Webhooks & SSO
  • Assessment, Survey & Certificate Builders
  • Native, white-label mobile app for better user experience

Measure & Reiterate

You know that when it comes to business, you can’t move ahead relying on your intuition but on concrete data. And here’s where you can get this data from:

  • LMS reports to evaluate the learning experience, like course completion rates etc.
  • Business metrics like Customer Satisfaction Scores, NPS, and CES (Customer Effort Score) – anything you’ve set a “business goal” – to measure the business impact.
  • Customer surveys and focus groups to evaluate both the training provided and how it relates to their perception of your business.

Customer Education Can Transform Your Business

Offering a customer education program is one of the best initiatives you could organize for your business, as it has a positive impact on your brand and your bottom line. With a feature-rich and intuitive LMS like LearnWorlds, you are a few steps away from building valuable training content for your customers.

Sign up for your 30-day free trial now!

9000+ brands trust LearnWorlds to train their people, partners & customers.

Start a FREE Trial

The post 10 Warning Signs You Need a Customer Education Program ASAP appeared first on LearnWorlds.

How to sell digital products for beginners

Software Stack Editor · June 27, 2024 ·

image

Creating your online course is just the starting point. The real game begins when you sell it effectively—turning your expertise and hard work into a steady revenue stream. If you’re ready to see your sales numbers climb, you’ve landed in the perfect spot. This guide is all about actionable strategies to elevate your sales from the ground up.

The e-learning market is on a steep upward climb, expected to hit a whopping $1 trillion by 2032, up from $200 billion in 2022, according to Global Market Insights Inc. This explosive growth encompasses the whole sphere of online education, including university programs, corporate training, and yes—online courses like yours. 

With such immense potential at stake, it’s time to dive deep into the tactics that can help you tap into this thriving market. Let’s break down the process of selling your digital products into clear, actionable steps.

{{tableofcontents-component=”/blog-shortcodes/table-of-contents”}}

What are digital products?

A digital product is any virtual or intangible item that you can purchase and sell online. Think things like online courses, software, eBooks, digital music, videos, and graphics—all available right at your fingertips through a simple download or online access. These items are particularly perfect for today’s on-the-go lifestyle since they don’t require shipping or physical storage.

The beauty of digital products lies in their scalability. Once you’ve created your product, you can sell it over and over again without the need to restock or incur traditional production costs, which means the profit margins can be impressively high. Plus, they’re instant—your customers can enjoy them right away, no matter where they are in the world, making digital products a perfect fit for our fast-paced, digital-first economy.

So after you’ve created your digital product, now it’s time to get it sold. Let’s look at some strategies.

Related: 23 profitable digital products to sell online

Deeply understand your audience

When it comes to marketing your digital product, particularly an online course, knowing your audience inside and out is your first big play. 

Start by developing a detailed buyer persona that includes not just demographics but also your potential customers’ interests, challenges, and online behavior. What’s their age range, where do they hang out online, what hurdles are they trying to jump with your course? Send out surveys, dig through social media insights, and analyze website traffic to get to know your audience and find out what your students are itching to get. 

This insight allows you to tailor your content to their needs and create marketing messages that hit home for them. It also helps you choose the channels that are most likely to reach them effectively. For instance, if your course is designed for busy professionals, LinkedIn might be a more appropriate platform for your marketing efforts than, say, TikTok.

Once you’ve got your audience mapped out, start segmenting them based on distinct characteristics and needs. For instance, if you’re offering a photography course, you’ll likely have beginners who are just starting out as well as seasoned photographers aiming to polish their skills. By customizing your course content and promotional messages for these different groups, you’ll likely see an increase in both engagement and sales, making every student feel like you’re speaking directly to them. It’s not just good teaching; it’s smart marketing that turns browsers into buyers.

Related: How to build your audience personas

{{getaudience-component=”/blog-shortcodes/popups”}}

Pricing your digital product: finding the sweet spot

Setting the right price for your digital product is definitely a balancing act, because it can truly make or break your sales. 

Think about the real worth of your course—how does it stack up against the competition out there? Dive into some market research to check out what your competitors are charging, and more importantly, how your course stands out in terms of depth and results. 

This isn’t just about finding a sweet spot for pricing; it’s about ensuring your price reflects the unique value you’re offering without scaring off potential customers. You might even consider using tiered pricing to cater to different levels of commitment and budget, providing various access levels or bonus content to sweeten the deal.

Don’t be afraid to shake things up with some promotional pricing, either—think discounts for early birds or special discounts for Black Friday. These strategies can boost early sales and get people excited about your offering. 

Remember, flexibility is your friend here. Keep an eye on how these prices perform and listen closely to customer feedback. If your initial price isn’t hitting the mark, be ready to tweak it. It’s all about testing and refining; adjust your pricing strategy as you learn what makes your audience want to hit that “buy” button. Keep your approach dynamic and responsive to ensure you’re always offering the best value at the best price.

Related: Tips for putting a price on what you know

Choosing the right sales platform (Teachable vs. Marketplaces)

Choosing the right platform to sell your online course is like picking the perfect stage for your rock band: you need the right fit to make sure the crowd hears every note. 

On one hand, you’ve got big marketplaces where loads of students browse through a sea of courses—think of these like giant music festivals where everyone’s vying for the audience’s attention. These platforms can offer lots of foot traffic… but your course might just be another act in the lineup, struggling to shine among the headliners.

Then there’s Teachable, a platform that’s more like having your own concert venue. Here, you get to control everything—from ticket prices (a.k.a. your course fees) to the posters on the wall (think branding and course design). Teachable lets you personalize your student’s learning experience, keep a bigger slice of the pie, and you get tools that help you understand your audience better, like analytics and marketing features that are tailored for educators. 

If you’re tired of getting lost in the crowd and ready to take center stage with your digital products, Teachable might just be your spotlight!

Related: Selling digital products on a platform vs marketplace

Building a compelling product page that converts

A stellar product page is your best salesperson. It’s the first thing potential customers see, and it holds a lot of sway in whether they decide your course is worth their time and money. 

So make sure that it leaves a solid impression! Highlight the key benefits of your course in a way that’s easy to digest. Use engaging visuals and a clear layout to guide visitors through the content, answering common questions they might have along the way. Don’t forget to pop in some standout calls to action (CTAs) that nudge them towards signing up. Sprinkle your page with relevant keywords to boost its visibility in search engine results, making it easier for your future students to find you.

Adding a dash of social proof like testimonials, endorsements, and case studies can also spice up the trust factor of your course. When potential students see that others have not only invested in your course but have also reaped substantial benefits, they’re more likely to do the same. Keep your testimonials relatable and genuine, showcasing the real impacts your course has had on past students. 

To keep your sales page performing at its best, regularly tweak and test different headlines, images, and CTAs. This ongoing optimization keeps your page fresh and effective, continually enhancing its ability to convert visitors into customers. Treat your product page as an extension of yourself: welcoming, informative, and inviting.

Related: How to create a powerful sales page that converts

{{salespage-component=”/blog-shortcodes/popups”}}

Digital product marketing strategies

As you might’ve guessed, marketing is the engine that drives your sales. Effective marketing communicates the value of your course and persuades the right audience to buy.

When it comes to marketing, content is king but context is queen. So think of engaging marketing content that you can create that not only introduces your course but also offers real value—think free webinars, sample lessons, or insightful blog posts related to your course topic. This approach helps build trust and establishes you as an authority in your field, making potential customers more likely to take the leap and purchase your course. 

Remember, each piece of content should include a clear call to action (CTA) that guides readers toward your sales page, subscription form, or any other conversion-oriented action.

And like we said in the product page step, don’t underestimate the power of testimonials and social proof. It bears repeating: nothing convinces potential buyers better than hearing from past students who have achieved success through your course. Share these stories prominently on your sales page, in your emails, and across your social media platforms. You might also consider offering a limited-time discount or bonus content to first-time subscribers, which can create a sense of urgency and encourage immediate action. 

But above all else, we recommend that you follow the old adage of “connect first, sell second.” Marketing is about building relationships, not just pushing products. If you offer value and build the relationships with the right audience, the sales will come. 

Related: Do this to market your course before launching: Expert advice

Launch strategies that work (without a huge audience)

Launching your digital product, especially when you don’t have a massive following, can feel a little like throwing a party where you’re not sure anyone will show up. 😅 But don’t worry; you can still pull off a successful launch… and the main way to do it is by leveraging the power of exclusivity and urgency. 

Start by creating a buzz with a pre-launch email sequence sent out to a carefully curated list—even if it’s small. Share sneak peeks, early bird specials, or access to exclusive content for those who sign up or express interest before the launch. This builds anticipation and makes your initial audience feel special, turning them into eager advocates ready to spread the word.

Next, consider partnering with influencers or other course creators who share your target audience but aren’t direct competitors. Now, this can be a game-changer, giving you access to a broader audience and lending credibility to your offering. Arrange for guest posts, co-hosted webinars, or social media shoutouts in exchange for a share in the revenue, or provide them free access to your course for an honest review. Pro tip: the key is to choose partners whose audiences align with your course’s niche, ensuring that the traffic they drive is likely to convert into sales.

Lastly, make good use of social proof and testimonials right from the start. Even if your audience is small, encourage the early adopters to provide feedback and share their experiences. Showcasing these testimonials during your launch can significantly boost credibility and convince fence-sitters to take the plunge. Also, run a limited-time offer or launch discount to create urgency. This tactic can push prospects who are still deciding, to act now rather than later. Keep the momentum going with regular updates and added bonuses for new sign-ups to keep the course appealing beyond the initial launch phase.

Related: About to launch your online course? Use our checklist

{{launchprofitable-component=”/blog-shortcodes/popups2″}}

The power of community & customer support

Building a thriving community around your online course can seriously amp up your sales game. Think of your community as your course’s fan club—where students gather not just to learn, but to chat, share insights, and support each other’s growth. 

This sense of belonging can turn happy students into vocal advocates for your course. Facilitating a place where students can ask questions, get extra resources, and interact directly with you not only enriches their learning experience but also boosts course completion rates. Happy students are more likely to recommend your course to others, creating a cycle of engagement and new sign-ups.

Customer support is another cornerstone of a successful online course. It’s not just about answering queries; it’s about being proactive and genuinely helpful, ensuring that all students feel supported throughout their learning journey. Quick and thoughtful responses to questions or technical issues can make a massive difference in student satisfaction.

Consider setting up a dedicated support channel, like an email helpdesk or a special section in your course community where students can get help. Regularly updating your FAQ section based on the feedback and common issues faced by students can also preemptively solve problems, reducing frustration and dropout rates.

So definitely don’t underestimate the power of going the extra mile with your support and community efforts. Regular check-ins, live Q&A sessions, and providing additional learning materials can further enrich the learning experience. Encouraging students to share their progress and successes builds a positive learning environment and motivates others. 

Ultimately, a strong community and robust customer support structure not only enhance the attractiveness and effectiveness of your course but also cement its reputation as a worthwhile investment, leading to better sales and more satisfied learners.

Related: How to build an online community

{{lookinglaunch-component=”/blog-shortcodes/popups2″}}

How Teachable can help you actually sell your digital products

Selling digital products isn’t just about having a great course. It’s about creating an ecosystem where your course can truly thrive—from pricing it right and choosing the right platform to engaging with your community and continuously optimizing your tactics.

‍

So, are you ready to roll up those sleeves and jump into the lively world of online communities? Head over to Teachable and watch your digital sales take flight! Remember, this digital selling game is all about being proactive. Keep adjusting, keep testing, and keep pushing those sales forward.

‍

How to build an audience that loves your work

Software Stack Editor · June 27, 2024 ·

This guide contains everything you need to know about getting your work noticed and building an audience of engaged fans.

Jump ahead

In this article

Thousands of creators use Podia to run their businesses, and when we talked to the most successful creators, we found that they have a few things in common.

People who grow an audience publish consistently. They usually choose one channel that they focus on before they try to build an audience everywhere. They usually don’t have a specific product to sell or a business strategy in mind when they start building. And, most of the time, the creators who succeed are the ones who make things they actively enjoy making.

This guide is for anyone who wants to build an audience of their own. It’s for you. You’ll learn how to discover what your audience is really looking for. You’ll learn how to make sure there are people who notice when you hit publish. And you’ll learn how to have people waiting and ready to buy once you’ve launched your next product.

It doesn’t matter if you already have a product to sell or if you’ve never pressed publish in your life. If you want your work to get noticed, this guide is for you. 

Prefer to watch?

This guide is also available as a free online course

This guide is a companion piece to Get Noticed!, a free course with worksheets and additional resources to help you grow your audience.
Join Get Noticed! for free →

4 audience-building myths you should ignore

First, let’s tackle some audience-building myths so that growing your audience isn’t harder than it has to be.

Myth #1: Your audience is everyone on the internet 

When building your audience, shouldn’t you start with everyone on the internet? It seems like that’s what you’re supposed to do, but then why do so many creators end up burning out before they ever really get going?

The chart below represents all of the people you could potentially reach. The people at the top are the easiest to reach, but the pool of potential audience members is the smallest. At the bottom, the pool is huge, but it’s a lot more difficult to get audience members. 

Let’s divide this chart into six segments, starting from the top:

  1. Immediate family and friends: These are people you can call up or text.

  2. Acquaintances: These are people you know, but not that well. Maybe you can email or direct message them.

  3. Warm connectors: This includes people who would recognize your name, but that you don’t know personally. They might respond to a cold email.

  4. Cold connectors: These are people whose names you recognize, but that you don’t know personally.

  5. Unknown connectors: This includes people in your niche you don’t know, and who don’t know you.

  6. Everyone else: This is anyone on the world wide web.

Where on this chart are strangers on the internet? You guessed it, at the bottom.

The strength of our connections can vary with different circles of people you know — which means our approach to interacting with them should also vary. And the weaker the connection, the more time you have to spend to build trust, which is why it can feel so frustrating to start with “everybody” as your audience.

You can grow an audience from any and all of these segments. You can start at the top and work your way down, or you can work on multiple segments at once, but the most important takeaway is that you don’t have to start with strangers on the internet.

Myth #2: Success means millions of followers

When people talk about building an audience, they usually point to some number of subscribers or followers. YouTube sends out its coveted play button awards based on how many subscribers a channel has. Many companies award sponsorship dollars to podcasts based on their number of downloads. 

If you really think about it though, what matters to you probably isn’t how many people you have in your audience, but how much those people care about the things you create. When people care about something, they’re more likely to drop what they’re doing to listen, watch, read, comment, share, or buy. These aren’t just followers, they’re fans.

Would you rather have 50,000 email subscribers who ignore most of your emails, or 500 highly engaged subscribers who drop everything when they see an email from you in their inbox, reply with questions, and buy your products?

Myth #3: Your content should be everywhere

It’s possible to build an audience without being everywhere all the time. In fact, here are a few reasons it might be easier and more effective.

  1. Focusing on one platform lets you be more consistent: Consistency, or showing up regularly for your audience, is really important when it comes to growing an audience. When you focus on one platform, you give yourself more time to show up consistently.

  2. Focusing on one platform lets you become an expert on that platform: Every platform has unique features and algorithms, so by focusing on one platform, you’ll have an easier time learning which strategies are most effective for getting your content in front of people.

  3. Focusing on one platform can keep you from burning out: Trying to be everywhere all the time, especially if you have limited time and energy, can become overwhelming. When you’re overwhelmed, it’s harder to stay motivated to show up, even if it’s something you’re passionate about. Focusing on one platform makes it easier to spend your time and energy sustainably.

  4. Focusing on one platform lets you build a deeper relationship with your audience: Focusing on one platform makes it easier to consistently engage with audience members and you’ll more quickly learn what type of content resonates and provides the most value for your audience.

And don’t get me wrong, if you’ve got the time and energy or some extra help and a solid plan for posting on multiple platforms, go for it. The takeaway here is that you don’t have to.

Myth #4: If you skip the latest trend you’ll be irrelevant 

It can feel really tempting to hop on the bandwagon and go after that shiny new platform. Maybe everyone’s telling you you should make short videos or launch a podcast or start a blog, and you find yourself asking “What if there’s an audience waiting for me that I’ll miss out on if I don’t jump on the latest trend?”

It’s that question that causes many creators to spend time trying to grow an audience on a platform or with a medium that’s not really a great fit. Check out this story from Podia creator
Valeria Hernández
:

“Everyone’s on TikTok right now. For awhile, I was like, ‘Oh, I should be on TikTok. I feel like I’m missing out.’ I got on it and it just was not my vibe. I enjoy consuming it, but creating, I just didn’t find a rhythm with it as much. So instead of doing TikTok I’ve been focusing more on emails and newsletters. I’m a very long-winded person. I love to talk. TikTok was just not my jam because I can’t say everything I need to say in 15 to 60 seconds.”

So remember, your audience doesn’t need to be everyone on the internet. Success doesn’t necessarily mean having the most followers. Your content doesn’t have to be everywhere all at once, and you aren’t doomed if you don’t love the latest social media trends. 

Up next, we’ll cover how to find your target audience and make content that they love.

Finding your target audience and conducting audience research

When you talk to successful creators and ask what they wish they’d done sooner, building a strong understanding of their target audience tops the list. 

At the beginning, making content feels like the most important step toward building an audience. But as soon as your work starts getting noticed, you’ll run into other questions. 

You don’t have to figure this out overnight, but starting with this makes it easier to understand who you’re creating content for, what content matters to them, and how to listen to your target audience so you know exactly what to say. This approach can ultimately turn your content into a business that brings in more people and more revenue. 

Start with an educated guess then go out into the wild

Where do you start your research? First, you put together your best guess. Right now, who do you think is the best fit for your content? This can be an educated guess based on observations you make about your audience.

Then you go out into the wild and look at what real people have to say so that you can test your ideas and get more information from exactly the people you want to reach. 

If you’ve already started to publish, the easiest way to start doing research is by looking at who gravitates to you. Podia creator
Valeria Hernández
noticed there was an audience she was naturally attracting.

“I noticed a trend that a lot of my clients were women of color and they were experiencing very similar issues. That’s when I realized that this could be a really cool subset of people that I serve. And me being Latina, I understand what they’re going through and I also can speak to specific things that they would be struggling with that maybe other people wouldn’t.”

Find examples of specific people dealing with the problems you solve

If you want to build an audience — and especially if you want to build a business — you’ll need to hear about your audience’s struggles in their own words.

Casey Richardson
learned a ton about her audience through five-minute one-on-one calls:

“I went to all of my social media platforms and I said, ‘Hey, I’m building a course to help Black women understand business management. If I can talk to you for five minutes to ask questions, let me know.’ I figured that anybody that set up a call with me, they were my target audience.

So I had those five-minute calls and asked them things like what keeps them up at night, what are their biggest fears, and where they want to be in one year. And I would just repeat back to them exactly what they said and they felt like I was reading their minds.”

80% of the women Casey spoke to on those initial calls eventually converted to customers. 

When you give people the space to share their struggles in their own words, it becomes possible to make content that leaves people saying “Oh my gosh, you’re reading my mind.”

It can feel intimidating to strike up conversations, especially if they’re with people you don’t know. While you’re working up to that, there is another way you can hear from real people.

Pay attention to what your target customers are already doing online

Your audience is leaving comments, having discussions, writing book reviews, and generally talking to each other online in ways that are easy for you to drop in on. Some of the easiest ways to pull exactly the words your audience uses to describe their problems are:

  • Look for other creators who serve similar audiences and see the types of comments people leave on their work.

  • Visit forums (like Reddit) and online communities to look for questions and people venting.

  • Look up popular books on your topic and read the reviews on Amazon. You’ll be surprised at how descriptive people are about how the books helped them and what other information they wish the book had included, which is a great source of ideas for new content.

How to say exactly what your audience wants to hear without being a mind-reader

Having a system for organizing what you’re hearing from your audience is so important. It tells you which content ideas are worth pursuing and helps you find ways to make your content really resonate.

When you talk to your audience, you’re going to uncover incredible stories, hard challenges, and patterns that they experience in their everyday life. To make sense of it all, keep an eye out for four types of information:

  1. A problem that lots of people in your audience experience: The question to ask here is “Do a lot of people mention this problem?” Seeing the problem talked about specifically or hearing it come up often in conversations can signal that this is a common problem.

  2. How they feel about that problem: As you’re talking with people, take note of any “feeling” words you hear and also pay attention to tone, volume, and body language. People may use the actual word for whatever emotion they’re feeling, or they may describe their feelings in other ways like “I was desperate” or “I feel like I’m drowning.”

  3. What they’ve tried to do to solve that problem in the past (including trying to ignore it): We can really sweeten the deal when we know what solutions folks have already tried and why they fell short. These are often found after desire statements like “I wish” or “I would have loved it if (fill in the blank).” When you identify what people have tried and how that solution fell short, you identify potential opportunities to provide better solutions.

  4. A list of problems that you — with your expertise and approach to content — can solve for people. The problems you are uniquely positioned to solve are great candidates for topics that lead to audience growth.

Categorizing your research like this is useful because it gives you a clear sense of the most valuable things to focus on. Now let’s look at how you can set your work apart. 

The one sentence test to make your content more interesting

You’ve got your target audience and an idea of their pain points and needs, but how do you make your content stand out from the millions of other videos, blog posts, pictures, and reels out there? 

This one-sentence test can be used on any piece of content you make. 

  • Can you sum up, in a sentence or maybe two, the most interesting thing about it? 

  • If you were to share that sentence with someone in your target audience, would they stop to read, watch, or listen to what you’ve created? 

When someone comes across your content, they’re making snap judgments and decisions about whether or not something is interesting enough to merit their time and attention. You have a tiny window to convince them that what you’re offering is worth consuming before they move on.

Earlier, you learned about audience research and how to look for the real words and phrases people use to describe their problems and struggles.

If you use that language as a part of the offer you’re making in your titles, subject lines, thumbnails, and descriptions, and if you’re concise enough to communicate your offer within the small window of time you’re afforded, you’ll have a much easier time earning your audience’s attention.

Let’s check out some real examples of this idea in action.

Em Connors
is an online course creator and marketing coach who shares tons of Canva tips through Instagram. We’re going to check out one of her Instagram reels and see if we can spot some of the things she did to make her offer interesting.

First, she uses elements that identify the target audience:

  • The Canva logo, so you know immediately that this has to do with Canva

  • The word “reel” is an Instagram-specific format

If I’m a person who uses Canva and is also trying to make content on Instagram, I know right away this is probably relevant to me.

She also addresses a pain point by saying “transform any graphic into a reel.” A pain point is a specific struggle or problem someone is experiencing. Here, Em is appealing to anyone with the pain point of wanting to make video graphics but not knowing how or not having the time to animate.

During the reel, Em says, “Here’s how to turn any social media graphic that you have already made in Canva into a reel in about two seconds.”

Just in the first few seconds, Em has already indicated some kind of value to the viewer. Value could have to do with time, money, or even energy.

So when she says “graphic that you have already made in Canva” you might think ‘Nice! I don’t have to spend the extra time or energy making something from scratch.’ And then she says “in about two seconds.” You’re telling me I can do this in less time than it’s taking for me to ask this question?

Let’s check out another example.

Jay Clouse
is a creator educator who runs The Lab, an online community for creators, conducts creator interviews on his Creative Elements podcast, and shares his insights and experience through his Creator Science newsletter.

We’re going to look at two things from Jay, an
email subject line
, and a companion YouTube video title.

This email subject line comes out of the gate strong with “$200K per month” communicating value to the reader. That’s followed by something surprising… “coloring book empire?”

What this subject line is really saying is “If this business can earn $200,000 per month, maybe yours can too.”

The video title does something similar, mentioning $200K per month and the surprising “Coloring Book Empire,” but first it identifies the subject as a YouTuber.

If you’re a YouTuber with a type of business you’re pretty sure will never earn $200K per year, let alone per month, this is instantly intriguing.

Jay knows that his audience is full of people who are trying to build a business and make an income from their creative work, and these examples do a fantastic job of appealing to those interests.

These are just two examples of how matching what you offer in your content to what you’ve learned from your audience research can make your content interesting enough to earn your audience’s time and attention. 

If you did this with every piece of content, you’d be head and shoulders above most of what’s out there. 

How to reach more people

After you’ve made amazing content, how do you make sure people see it? You may think of hitting publish as the last step in your content creation workflow, but you can get a lot more out of your work if you find other ways to distribute it. 

Distribution is an extra step you can take after publishing to get your work in front of more people, and it can help you rise above the sea of noise online. 

Check out these distribution ideas from successful creators.

#1 Reshare your content across multiple platforms

First, don’t be afraid to reshare your content across multiple platforms. I know it sounds simple, but
Veronica Green
from Cultivating Confidence notes that your followers might only see your work on one channel. It’s worth spending a few extra minutes to promote new content anywhere you have a presence. 

“I just created a YouTube video. I just put a new one up finally. I share stuff on social media about it. I take out clips, I take out quotes, I just post the pictures, I made carousels, and then I emailed my list about it, even though some of them may have seen it. I don’t know who has and who hasn’t and not everybody opens your emails.”

#2 Engage on online forums and communities

Some creators distribute their knowledge–and links–by commenting on forums like Reddit, Facebook groups, and other speciality online communities. 

Veronica used this strategy to give her blog posts an extra boost. When people in Facebook groups ask questions relevant to her work, she provides a valuable and supportive response. If she has a blog post that can help them, she also shares a link to her article. 

Robert Williams
from Folyo found some of his earliest customers by brainstorming product ideas with fellow creators in online communities. Many of the community members were also potential customers. He says, “The people who were giving me feedback on my idea and helping me improve it also ended up signing up and paying for it.”

#3 Collaborate with relevant brands in your industry

Other creators extend their reach through collaboration with similar brands in their niche. When you connect with a creator who has a relevant target audience, you get in front of more people who might be interested in your offers. 

Podia creator and Odunife founder
Tamkara Adun
grew her audience by guest posting and connecting with other creators in her space. While this strategy takes time, Tamkara ultimately built a community based on reciprocity where she would share work that inspired her, and other creators would repost her content in return. 

“I did a couple of guest posts on other really big accounts that were in my niche. When I did the guest posts for them, they exposed me to their audience, and some of their audience would come to my page and see that the content there was also engaging and they would follow me.”

If your target audience doesn’t use social media, you can still do outreach by meeting your ideal clients where they are. For Kaye Carroll from
Zea Mays Printmaking
, this meant reaching out through academic networks.

“Our video tutorials are useful for printmaking students who don’t have access to a press or studio themselves, so we’ve been getting in contact with printmaking professors and offering a special rate for them to subscribe to our videos and share them with their students. This allows us to grow our audience outside of our local sphere and also attract younger subscribers.”

#5 Learn about blog post and YouTube SEO

Finally, if you create long-form content like blog posts or YouTube videos, it may be worth spending some time learning about search engine optimization, or SEO. 

Becky Mollenkamp
optimizes her blog posts for search, and now, clicks from search engines are the number one source of traffic to her website. 

And classical piano instructor
Joseph D’Amico
found that writing SEO articles attracted an entirely new client base for his music business, which he loved.

SEO is an entire course in itself, but we do have some resources linked below to help you get started.

Bottom line, when you publish a blog post, upload a YouTube video, create a social media post, or send a newsletter, don’t stop there! 

Whether you share advice in online forums, collaborate with other brands in your industry, offer related workshops, speak at events, or dive into the world of SEO, it’s worth giving your content many opportunities to shine.

Consistency is hard. This makes it easier

When building an audience, posting great content is just the first step. To continue to reap the benefits of your hard work–and grow your following even bigger–you have to have
consistency
. 

Consistency multiplies the effects of your effort. 

So far in this guide, you’ve put in a lot of work. All the things you’ve done already are going to help with audience growth, but if you add consistency to the mix, you’ll take all your hard work to the next level. 

Here are some tips that make it a bit easier to stick with it.

  • Having a consistent posting schedule and cadence builds trust and makes it easier to become part of your audience’s routine

  • Consistency makes you better at doing the things you love, so your quality will naturally improve over time

  • Focus on creating content that feels fun and energizing

  • Simplify your to-do list so you can consistently do the things that matter most in your business

  • Batching content can help you stay on track, even when life gets busy

  • Not enough content to post? Try repurposing the work you’ve already done

  • Don’t be afraid to ask for help and bring in outside freelancers or assistants 

  • Reflect on why you’re doing this work in the first place

We recommend picking a cadence and schedule that feels doable for you, and commit to publishing consistently. 

At the end of the time period you set for yourself, reflect on what happened.  

If the answer is no, it could be time to iterate and change things up. If the answer is yes, stick with it! 

Up next, we’ll look at how to solidify your audience for the long haul through your email list. 

Solidifying your audience through email

What if you could always communicate with your audience regardless of which platform you’re on?
Building an email list
is a great way to own your audience and secure your access to them long into the future. 

Most creators grow their audience on social media because it’s where the people are. It’s also somewhat risky because social media platforms aren’t always predictable or reliable. Social media platforms change their terms of service, update their algorithms, evolve to favor certain mediums over others, go offline and, on rare occasions, disappear for good. If you grow your audience in one of these places, there’s no guarantee that you’ll have the same access to them tomorrow as you have today.

Owning your audience
means having the ability to reach the audience you’ve built no matter what happens to a given platform and being able to take that audience with you wherever you go. 

An email newsletter is the best way to own your audience.

Starting an email list isn’t just about avoiding some of the negative aspects of social media. Your
email newsletter
gives you the ability to connect with your audience in ways that social media falls short.

Your audience is more likely to see your email newsletter

First, content shared in an email newsletter reaches a larger percentage of your audience than sharing it on social media. Because email isn’t affected by algorithm changes and doesn’t rank content based on what’s good for the platform, you have the same chance of reaching your audience every time.

Second, people typically hold on to their email addresses for a long time, even as new platforms come and go. Once someone gives you access to their inbox, unless they unsubscribe, they can be with you for the long haul. 

Your audience is also more likely to engage with your emails–and purchase your products

Your newsletter subscribers aren’t only more likely to see your content. According to Emily Mills, they’re also more likely to engage with your content.

“Email is the main way that I communicate with people because that’s where my largest responsive audience is. I have more followers on Instagram, but just because you have a bunch of followers doesn’t mean that they actually engage with you. My email list is highly engaged, and so that’s my number one method of communicating with people.”

Newsletter subscribers can also be more likely than social media followers to purchase from you because email newsletters make it easy for your audience to get to know and trust you.

If you can build an engaged email list, your audience will see more of your content, feel more connected with you, trust you more, enthusiastically share you with others, and ultimately buy more of your products. The best news of all is that you can start building your email list today.

If you’re a Podia user, you already have access to a
free and easy email tool
. You can find the email feature in the email tab of your Podia dashboard. If you don’t have a Podia account yet,
you can sign up for free.

How to get the right people to join your email list

Now you know why an email newsletter is the best way to connect with and own your audience, what’s next? Do you simply drop a signup form on your website and hope for the best?

It’s not quite that simple. Unlike that epic neighborhood lemonade stand you started when you were eight, email newsletters aren’t an “if you build it, they will come” situation.

Here are some things you can do to attract subscribers.  

  • Think of your email list as a product. Put yourself in a potential subscriber’s shoes and think about what you can offer to make them feel like giving your space in their inbox and their attention is a no-brainer. 

  • Make it easy for your audience to sign up by linking to your newsletter where they engage with your content. People can’t join your newsletter if they don’t know it exists. Make sure you’re pointing people to your email newsletter signup form on your main website pages, in your
    social media bio link
    , and within your content. 

  • Let your audience know what they can expect. Explain to people who your newsletter is for, what happens when they sign up, what content they’ll get, and how often they’ll get it. 

  • Offer something in exchange for signing up. Your followers have approximately nine-hundred-thirty-eight-thousand-two-hundred-seventy-six newsletters they can sign up for on a given day. To make yours stand out, offer something of value in exchange for their email address. Some creators offer special deals on their products or early access to new content. Other creators use
    lead magnets
    like free checklists, digital downloads, ebooks, or mini-courses to grow their lists. 

  • Don’t forget about 1:1 connections. Finally, you can also grow your email list through 1:1 connections, both online and in person.

Whether you’re offering exclusive content or deals, creating a valuable free lead magnet, or simply reaching out to audience members one by one, the important thing is to start building your email list today. You’ll never regret having direct access to more people, so choose a tactic that makes sense for your business, and start getting the word out. 

I have followers on my email list, now what?

Once you have people on your email list, you want to continue growing your trust and relationship with them — which means they need a reason to keep opening the messages you send over time.

Let’s check out some other strategies for keeping your list engaged.

Keep your list engaged with a value-packed onboarding sequence

Becky Mollenkamp’s
email open rate is around 50% which is nearly double what’s considered to be a high open rate. One of the strategies she attributes her success to is using an onboarding or opening sequence to make sure her new subscribers are getting
a ton of value
right away.

Periodically remove uninterested followers from your list

Becky also points to her practice of regularly cleaning or culling her email list. This means if someone on her list hasn’t opened, clicked, or replied for a period of time, she removes them. Removing people from your list seems counterintuitive, but Becky explains why it makes a lot of sense.

 “I don’t have a giant list…I do a lot of scrubbing of cold subscribers and try to keep only the people who actually engage with my list, which is why my open rates are at almost 50%, which is high. And that’s because I make sure that I have people on my list that actually want to be there.”

Be human, and be helpful

Em Connors
points to authenticity and providing a lot of value as key strategies for driving higher engagement.

“I just try to be human, I don’t want to be a robot. I use extra words that make it sound like I’m talking to someone. When I pretend I’m texting my best friend, or I’m emailing my best friend, or talking to a friend, it just takes a weight off my shoulders that was making me think I had to be something other than myself.” 

Use news stories or trending topics to connect with subscribers

You don’t necessarily have to get personal to find those connection points. Khe Hy sometimes ties in popular culture or events to find common ground with his subscribers.

“I try to understand what other content my readers are consuming. Are they listening to this specific podcast or reading this new book? That gives me an entry point into another thing to write about. If all of my readers are following a specific TV show, is there a way to weave that into my storytelling, into my links, into my blog post?”

These are just a handful of ideas you can start using right now to keep your email list more engaged which hopefully leads to more opens, more clicks, and more sales. It’s okay to take your time with these and not rush right into making sales. 

Spend time connecting, not just selling

Becky Mollenkamp stresses that allowing your audience to get to know who you are is what ultimately turns subscribers into customers.

“Don’t forget, it’s ‘Know, like, trust, and then buy.’ A mistake I see people making is thinking, ‘I got them, I better hurry up and sell them something.’ I think my open rates are high because I take that time to make sure that they get to know who I am. I show up authentically and I speak conversationally so they feel like, ‘That’s an email I want to read’ and ‘I don’t think she’s going to hit me with a bunch of sales pitches every two minutes.’ And I think that helps.”

When you show up authentically–creating things you enjoy, being yourself, connecting your experiences and expertise to real problems–you make it easier for your audience to connect and engage with you. You don’t just attract followers, but you build an audience of fans.

I hope you’ve come away from this guide with ideas and inspiration for your creator business, and that you feel excited and confident about growing your audience.

This is the end of the guide, but not the end of your journey. If you haven’t already checked out our online course,
Get Noticed!
, you can head there to find worksheets and additional resources that will help you put this information into practice. 

And if you need a place to build your business and audience,
you can do it on Podia for free
. 

Upselling vs. cross-selling for creators

Software Stack Editor · June 27, 2024 ·

image

So you’ve made your digital product, and now you’re ready to start bringing in the sales. As you learn about ways to market your product, chances are good you’ve come across terms like “upsell” and “cross-sell.” And while they may sound similar, these two sales strategies can play very different roles when it comes to getting your digital products sold. 

This guide will break down each term, compare their uses, and offer actionable strategies to optimize your sales process. After all, a study by Forrester Research found that upselling and cross-selling can account for 10-30% of e-commerce revenues. So, with that in mind, let’s get started!

{{tableofcontents-component=”/blog-shortcodes/table-of-contents”}}

Upselling explained: offering higher-value options

First up, let’s talk about upselling. Imagine you’re at a fast-food restaurant and you order a burger. The cashier asks if you want to “make it a meal” by adding fries and a drink for a little extra. That’s upselling in a nutshell — encouraging customers to buy a more expensive version of a product, or add extras, to make a higher sale.

For digital products, upselling could look like offering an extended version of a course, additional content, or exclusive access to live sessions for an added fee. The key here is to make the upsell relevant and valuable. It’s not just about selling the most expensive option; it’s about making the customer’s experience better and adding to the value of their initial choice.

In the context of digital products, upselling could look like:

  • Offering extended versions of a course
  • Additional, exclusive content
  • Access to personalized coaching sessions

Related: Upsells: How to increase your revenue

Cross-selling explained: recommending complementary products

Cross-selling, on the other hand, is when you recommend products that complement the original purchase. Think of cross-selling like being at a book club where someone says, “If you loved this book, you might enjoy this one, too.” It’s all about enriching the customer’s initial purchase with products that complement it. 

For digital products, this could mean suggesting a course on photo-editing to complement a photography course, or a series on eBook publishing for those who’ve just learned fiction writing.

The trick with cross-selling is to ensure the additional products make sense in the context of the original purchase. They should feel like a natural extension, not just an attempt to push more sales. When executed properly, it can enhance the customer’s experience and increase your sales without significant additional marketing costs. 

For digital courses, effective cross-selling might include:

  • Suggesting a course on SEO to a learner enrolled in a content writing course
  • Recommending a time-management tool or eBook to students in a productivity course

Upselling vs. cross-selling: when to use each

Now that we’ve unpacked what each tactic is, you may be asking yourself when you should use upselling versus cross-selling. 

Well, choosing between upselling and cross-selling is like deciding whether to go deep or go broad with your customer’s interests. 

Use upselling when your learners show an appetite for more in-depth knowledge in the same area; it works well when the customer already sees the worth in your offerings and realizes that bundle deals get them even more of the value you offer.

Use cross-selling when you see an opportunity to enhance their experience by offering breadth across different yet related topics. It’s like when you buy a new smartphone and the salesperson suggests buying a protective case or headphones to go with it.

While both strategies aim to increase revenue, they serve different purposes, and which one you choose often depends on customer interaction and the specific products involved. 

Upselling pro tips:

  1. Make your upsell relevant. If someone purchases a beginner’s course on web development, offer them a follow-up intermediate course or a bundle that includes advanced topics.
  2. Offer clear benefits: Clearly show the benefits of the upsell, including what the additional features or products can do for them and why the higher-priced option is worth their investment. 
  3. Offer incentives: Discounts, exclusive content, or free trials can make the upsell more attractive. For instance, offering the first month free on a premium version if the customer signs up immediately can be a compelling incentive.
  4. Timing matters: Present the upsell at a time when the customer is most likely to consider it, which is typically after they have decided to buy the initial product but before the final checkout. 
  5. Leverage social proof: Use testimonials, reviews, and user statistics to validate the upsell. Showing that others have benefited from the premium product can further demonstrate the value.

Cross-selling pro tips:

  1. Leverage personalization: Personalize cross-sell recommendations based on the customer’s past behavior, preferences, and data; these suggestions are more likely to convert.
  2. Use a soft selling approach: Present your cross-sell as a helpful suggestion that could enhance the value of their purchase, not as a hard sell. This approach respects the customer’s decision-making process and keeps the shopping experience positive.
  3. Monitor and optimize: Continuously monitor the performance of your cross-selling efforts. Analyze what’s working and what isn’t, and adjust your strategies accordingly. This might involve changing the timing of offers, the type of products recommended, or the way offers are presented.
  4. Follow-up and feedback: Use follow-up to ask customers about their experience and potentially introduce other products that could complement their purchase. Feedback not only improves customer satisfaction but also provides insights into the effectiveness of your cross-selling tactics.

{{nextstep-component=”/blog-shortcodes/call-to-action”}}

Upselling & cross-selling examples for creators

Let’s look at some examples of upselling and cross-selling that you might use for your digital products:

  1. Say you’re selling an online course on digital marketing. An upsell could be an offer for an advanced masterclass on digital marketing analytics at a discount, if purchased with the original course. A cross-sell could be suggesting a course on social media marketing strategies, assuming it complements the digital marketing course.
  2. Say you’re selling an online course on creative writing. An upsell could be an offer for exclusive feedback sessions with an author. A cross-sell could be a course on self-publishing a book.
  3. Say you’re selling an online course on digital photography. An upsell could be an offer for a bundle that includes advanced editing techniques. A cross-sell could be a course on videography or a guide to starting a photography business.
  4. Say you’re selling an online course on fitness training. An upsell could be an offer for a more comprehensive course with additional workout plans and dietary guides. A cross-sell could be a wellness and mindfulness course.
  5. Say you’re selling an online course on public speaking. An upsell could be an offer for an advanced communication skills workshop. A cross-sell could be a course on body language. 
  6. Say you’re selling an online course that teaches Italian cooking techniques. An upsell could be an offer for a premium package that includes live sessions with professional chefs. A cross-sell could be an eBook with Italian dessert recipes.

These examples show that the key is understanding what adds value to customers’ purchases and takes their experience to the next level.

Related: How to upsell (almost) anything using Teachable

The art of the upsell: doing it ethically

The most important thing to remember, however, is that upselling should feel like a win-win, for both you and the student! 

The art lies in making sure that your upsells are genuinely useful, and aren’t just there for the sake of higher revenues or pushing higher-priced products. Offer upgrades or additional features that genuinely add value and improve the customer’s outcome from the purchase. Be transparent and let your customers know what they’re getting and how it benefits their learning journey.

When upselling gets annoying: UX is important

Ever been to a website so cluttered with ads that you couldn’t wait to leave? That’s a perfect example of what not to do with your upsells.

There’s a fine line between effective upselling and spammy tactics, and it definitely impacts your user’s experience (UX). When a customer selects a course, your upselling should feel like a helpful suggestion (not a pushy sales pitch) and integrate seamlessly into their experience.

Think subtle, intuitive prompts in the sidebar or in a pop up that can be dismissed if not interested, rather than those aggressive pop-ups that are impossible to maneuver around.

User experience should never be compromised by aggressive sales tactics. Make sure that your offers are presented as optional and that they provide value. 

Sometimes choosing not to upsell is the right choice

Believe it or not, there are times when it’s better to hold back on upselling or cross-selling. For instance, if a customer’s purchase history shows that they prefer lower-tier or introductory products, pushing high-end upsells might feel pushy and lead to dissatisfaction. 

Be sure to read the room (or the data), because sometimes, playing it cool is the best sales strategy. If a learner seems overwhelmed or is satisfied with their current purchase, respect their space. This builds trust and increases the likelihood they’ll return to purchase from you in the future.

Related: How to make your first digital product sale (video included)

Upsell & cross-sell successfully with Teachable

By understanding and implementing both upselling and cross-selling, you can not only increase your revenue but also your value to customers, improving customer satisfaction and retention. 

That’s a huge win-win, and will keep your customers coming back to you again and again. 

So use these strategies wisely, keep your users’ experience at the forefront, and if you’re ready to 10X sales for your digital products, get started with Teachable to make it happen!

{{joinfree-component=”/blog-shortcodes/call-to-action”}}

The Best White-Label Online Course Platform for Elearning Businesses

Software Stack Editor · June 25, 2024 ·

@media screen and (max-width: 480px) {
.small-font {
font-size: 13px;
}
}

Did you know that consistent brand presentation can actually increase revenue by up to 20%?

Statistics don’t lie. In today’s fast-paced, ultra-challenging business landscape, you need to do anything in your power to stand out from the competition. In this light, establishing and promoting your online school’s brand should be your number one priority.

Here at LearnWorlds, we firmly believe in facts. We use our expertise in edtech to provide course creators with a prominent white-label eLearning platform that allows them to build successful white-label online courses for their learners.

Your professional looking Academy in a few clicks

Start FREE Trial

Why Do You Need a White-Label Online School?

Branding is a powerful concept in marketing and e-commerce businesses. “A brand is a name, term, design, symbol, or any other feature that identifies one seller’s good or service as distinct from those of other sellers” (American Marketing Association)

Having a strong brand means that many people, visitors, or customers recognize your company’s unique characteristics and strongly associate them with certain values, ideas, or a product/service.

A powerful brand can help you sell more courses or price higher while at the same time differentiating from the competition.

So, why should you prefer a white-label course platform for your virtual classrooms, webinars, corporate training, and any other learning experience you want to provide?

Exclusivity – It feels like you have created something from scratch, offering a higher-valued proposition.

Trust – Your customers already trust you, and anything that comes under your brand name, design, and the company will be more reliable. This increases someone’s willingness to make repeat purchases from someone they trust. Just think about the difference this would make when deploying customer education programs!

Consistency – Your students have a seamless experience, staying at your own website instead of visiting an unfamiliar environment – the secure environment you have created for their learning. This goes along with design elements, using your company’s colors, logo, and fonts.

Experience – LearnWorlds offers a unique, social, and interactive experience, but the best part is that you can customize your customers’ learning journey. This means customizing the landing pages using our powerful no-code Website Builder and pre-built templates, the assessments and quizzes, the course player, developing your own branded mobile app, and many other parts of the process.

Value & Price – A strong brand is valuable to a company, brings new customers, and attracts investors (or buyers). But it can also allow you to price higher (high-ticket selling). Think of Apple vs Samsung. They might offer a similarly good phone, but Apple always charges more for their products, and their customers happily pay for them.

Employee Satisfaction – Many employees choose to work for companies based on their brand values, exclusivity, and unique perks. A branded corporate academy can instill a sense of pride and satisfaction as it will be perceived as a higher quality internal training for them.

Advertising – Brand consistency will also help you while advertising. Using your social media or paid ads, you are using your company name, logos, color, font, etc. Continuing your sales funnel with a consistent tone will increase the likelihood of enrollments and of learners purchasing your courses.

What Does White Label Mean?

As an entrepreneur, your first instinct might be to solve business challenges by yourself. Basically, that’s the point of entrepreneurship, isn’t it? Well, not always.

In many cases, building a custom solution from scratch in an attempt to meet the exact specifications of your business can be a recipe for failure. You could be reinventing the wheel and making mistakes others before you have already mastered.

Alternatively, you could dramatically slow your time to market when you are trying to troubleshoot and learn outside of your core expertise. Not to mention that it is also costly to develop tools and solutions that already exist in other formats.

Here is where a white-label solution comes to the rescue and helps you easily avoid such problems while helping you build your personal branding!

White Labeling Explained

White-labeling refers to the practice of producing a product or service and allowing other companies to rebrand it as their own.

The term “white label” describes a product or service that a company manufactures and sells to another business enabling it to customize it with its own brand. The reseller can personalize the product or service and distribute it with its own brand, logo, and identity, so customers are able to associate that product with that reseller.

Likewise, a white-label online course is created with an e-learning platform that is branded on behalf of another company, i.e., yours.

Therefore, you can drastically alter the look and feel of a standard platform and have it fully portray your own corporate identity, giving your trainees, customers, or employees a seamless learning experience with your course content.

Who Uses White Label Products?

White labeling is common across various industries and can apply to both physical products and digital services. So, we are not strictly speaking about SaaS solutions (Software as a service).

Startups and small businesses, retailers, e-commerce businesses, financial institutions, tech companies, hospitality businesses, healthcare providers, or other service providers (e.g., web designers, consultants, and freelancers) are examples of businesses utilizing white-label services.

Perhaps the most common use is by agencies, such as digital marketing agencies. These agencies often leverage white-label services to expand their service offerings without the need for extensive in-house resources.

Here are some white-labeling use case examples:

  • White-Label Content for Social Media Management: Agencies can use pre-created content or social media management tools under their own branding to manage clients’ presence and social media marketing campaigns without creating everything from scratch.
    Examples: Hootsuite or SocialPilot.
  • White-Label SEO Services: By partnering with a white-label SEO (Search Engine Optimization) provider, agencies can offer their clients SEO tools and services, including audits, keyword research, content creation, link building, and reporting.
    Examples: That!Company or Semify.
  • White-Label Services for Project Management: White-label project management software offers reporting tools that allow agencies to provide their clients with customized dashboards that present campaign performance metrics, SEO insights, social media analytics, and more.
    Examples: project management tools like Asana or Monday.com.
  • White-Label Software for Marketing Automation: This includes tools for white-label email marketing, CRM systems, and other automated marketing workflows that can be rebranded and presented as the agency’s own product or solution.
    Examples: Email marketing software like ActiveCampaign or marketing automation tools like SharpSpring.

💁🏻Explore the best email marketing platforms for online courses here.

This list of examples is not exhaustive, but it should give you an idea of white-labeling and how it works. The same principles apply to most white-label SaaS platforms you find in the e-learning industry.

What are the Benefits of White Labeling?

Simply put, not only can you quickly and easily brand a white-label SaaS product, such as an online learning school, but you also benefit from a diverse set of built-in features and integrations.

You don’t have to worry about spending time and money on research or development. All you need to do is take the software and add your own branding.

Here is what you can expect to get from a white-label solution:

  1. Lower development and maintenance costs: Avoid the high costs of creating and maintaining a platform from scratch.
  2. Quick deployment and launch: Set up and launch your branded e-learning business quickly.
  3. Fully branded experience: Reinforce your brand identity, customizing the platform with your logo, colors, and branding for a seamless user experience.
  4. Access to premium features: Utilize advanced features such as real-time analytics and reporting, gamification, website-building functionality, and mobile compatibility.
  5. High scalability: The platform can help your online school grow to accommodate increasing numbers of learners.
  6. Ongoing customer support: Receive continuous technical support and updates from the provider.
  7. Integration with other tools: Connect with CRM (like HubSpot), LMS, payment gateways, marketing tools like Google Analytics, and other applications.
  8. User-friendly design: Benefit from an intuitive interface and engaging features for learners.
  9. Robust data security: Enjoy strong data protection and compliance with regulations.

A white-label solution keeps your learners happier, as you directly provide them with a prepackaged solution they can instantly use to reach their learning goals.

Using a white-label elearning platform customized with your brand clearly saves you time and money. You would practically need to invest a huge amount of money, time, and human resources to build your own learning solution from scratch. Not to mention the time you would need to test and market the solution. An existing white-label learning management system is much more cost-effective.

Besides, what would you rather do? Focus on building a custom solution or focus on developing your core business?

Teachable vs Thinkific vs Kajabi vs LearnWorlds White Label

As you may know, not all e-learning platforms are created equally. Each platform serves a specific niche of course creators, entrepreneurs, or businesses.

All course platforms offer the capability to connect a custom domain name; it is almost an industry standard. White-label features begin by removing the mentions of the brand, for example, “Powered by…” or “Created with…” labels on the bottom of each page.

The main things you would be looking at in a white-label course platform sorted by importance would be:

  • A custom domain
  • Mentions of the brand
  • Login branding
  • Branded email notifications
  • Design & customization capabilities (this varies from platform to platform)
  • A native mobile app option

Teachable, Thinkific, Kajabi, and Learnworlds under the lens of white labeling completeness (comparable packages).

Teachable Thinkific Kajabi LearnWorlds
Custom Domain ✔ ✔ ✔ ✔
Login Page

(The platform’s name is not visible on the login page)
✔ ✔ ✔ ✔
Social Media Login

(The platform’s name is not visible in the social media logins)
❌ ❌ ✔

Customer Brand
Footer Branding

(The platform’s name can be removed from the footer of landing or course pages)
✔ ✔ ✔ ✔
Email Notifications

(from your domain e.g. support@youracademy.com instead of the platform)
✔ Partially ✔
API Availability ✔

(Limited number of calls)
✔ ✔

Limited (for certain integrations)
✔
Option for Branded mobile apps ❌ ✔

iOS & Android
✔

iOS & Android
✔

iOS & Android
Remove branding from UI

(in case you want to resell the platform)
❌ ❌ ❌ ✔
Teachable Thinkific Kajabi LearnWorlds
Custom Domain
✔ ✔ ✔ ✔
Login Page

(The platform’s name is not visible on the login page)
✔ ✔ ✔ ✔
Social Media Login

(The platform’s name is not visible in the social media logins)
❌ ❌ ✔

Customer Brand
Footer Branding

(The platform’s name can be removed from the footer of landing or course pages)
✔

Highly customizable, modern player
✔ ✔ ✔
Email Notifications

(from your domain e.g. support@youracademy.com instead of the platform)
✔ Partially ✔
API Availability
✔

(Limited number of calls)
✔ ✔

Limited (for certain integrations)
✔
Option for Branded mobile apps
❌ ✔

iOS & Android
✔

iOS & Android
✔

iOS & Android
Remove branding from UI

(in case you want to resell the platform)
❌ ❌ ❌ ✔

While most platforms offer the basic white-labeling, when you get into the details, it is easy to identify a true white-label course platform.

When you don’t consider branding or white-labeling, all platforms offer unique features for an online course business, which makes each platform better for different audiences.

However, Teachable offers the least in terms of a white-label product. While it offers a school login, it prominently displays a Teachable login option.

A screenshot showing Teachable's login option for a user when accessing an online academy.

And, during the login process, it redirects students to an unbranded login page bearing the platform’s name. This is a breach of the consistency principle we mentioned earlier.

A screenshot showing Teachable's URL and SSO parameter when a user is trying to log in to an online academy.

This way, any sense of white labeling is lost. You might have paid top dollar to get a branded school – and still, during the first user interaction, the provider brand is exposed.

Another thing we go above and beyond here at LearnWorlds is that we have built a set of unique Social Logins and Single Sign-On to make it easier for your users to log in.

Those logins need to pass from a Social Account, which, by default, is branded. Those are branded under the platform you are using, but we go a step beyond to white-label them.

For example, Thinkific offers white labeling in the sign-in forms until someone clicks on a social login through Facebook or LinkedIn.

A screenshot showing Thinkific's social login option via Facebook featuring the platform's logo and name.
A screenshot showing Thinkific's social login option via LinkedIn featuring the platform's logo and name.

This is not only a white-label concern but also a privacy concern for your customers’ data. While they know your branding, they have suddenly jumped on a page mentioning a different company.

A screenshot showing Thinkific's social login option via Google featuring the platform's logo and name.
A screenshot showing Thinkific's social login option via Apple featuring the platform's logo and name.

Similarly, emails sent by Teachable, Thinkific and Kajabi come from their own domain with a change in the sender’s name, making them not true white-labeled. If you can open an email and check the sender’s email to see @t.kajabimail.net, @m.teachable.com, and @notify.thinkific.com, this is not white-labeling.

A screenshot showing Thinkific's email address appearing on a user's email.
A screenshot showing Teachable's email address appearing on a user's email.
 A screenshot showing Kajabi's email address appearing on a user's email.

Your students may be confused as to who the sender is, or worse, the emails you worked so hard to craft word by word may not reach their intended recipients. You can’t afford to risk that.

That’s not how we do things here at LearnWorlds. We want to provide you with the best white-label solution your brand can use.

For us, white-label schools mean no logos or links to anyone other than the company or organization itself. A true white-label LMS enables you to remove all vendor references, regardless of where they are located.

Learnworlds is one of the top course platforms and the only one providing an entirely white-label experience, for both desktop and mobile. As SaaS software, it has all the key features you need and even more!

🎨LearnWorlds No-Code Website Builder

The powerful drag-and-drop LearnWorlds No-Code Website Builder enables you to design and customize your online school’s website just as easily and quickly without any technical skills.

Simply drag elements like headers, footers, images, text blocks, and widgets into place to create a professional-looking site that aligns with your own branding.

A GIF showing LearnWorlds' Theme Explorer inside its Website Builder.

Use our Theme Explorer to choose from pre-designed color schemes and fonts. Customize your school’s typography and page layouts, and get the combination that works best for you!

📱LearnWorlds Mobile App Builder

The LearnWorlds Mobile App Builder is a premium white-label mobile learning app solution that puts your brand in the spotlight!

With our Mobile App Builder, you can fully customize and release your online school’s mobile app and provide it to your learners directly on Apple iOS or Google Android under your brand. Yes, it’s fully customizable, and it’s entirely yours!

 A GIF showing LearnWorlds dashboard and mobile app customization.

You can choose your app’s name and icon and customize the colors, text, backgrounds, splash screens, and onboarding screens. This will allow you to provide your learners with a seamless mobile experience and boost their engagement on the go.

At LearnWorlds, we put you, the course creator, at the center of our focus. To offer the highest quality of service, we did a thorough analysis of our competition, examining several dozen courses delivered on the most prominent platforms to determine if they actually provide white-label courses.

It wasn’t hard to figure out that the courses weren’t really white-labeled after all.

Final Thoughts

Your brand is one of your company’s most valuable assets. Whether you have an established online business or are building one, you should protect and nurture it. If you’re looking for the best white-label software solution, then you should look for a platform that really gets the job done, and meets your specific needs.

Ready to build your own online course business with your rules and your branding?

Try LearnWorlds now with a 30-day free trial. No credit card is needed, and no strings attached. Plus, most of our features are available, so you can get the full LearnWorlds experience!

Your professional looking Academy in a few clicks

Start FREE Trial

Further reading

  • Knowledge Economy: How to Sell Knowledge Online
  • Starting an Online Course Business from Scratch
  • How to Create and Sell Profitable Online Courses: Step-by-Step Guide
  • Sell Digital Downloads: The Complete Guide
  • How To Create an eLearning Website with Templates & Examples
  • The 19 Best Learning Management Systems
*The information for this article was updated in June 2024. We encourage you to test our claims yourself and decide which is the right option for you*

The post The Best White-Label Online Course Platform for Elearning Businesses appeared first on LearnWorlds.

Email marketingConvertKit review: Best (and worst) features, according to 31 previous customersIn this ConvertKit review, you’ll hear from 31 former ConvertKit customers about ConvertKit’s pros and cons and why many made the switch to Podia Email.

Software Stack Editor · June 21, 2024 ·

In this ConvertKit review, you’ll hear from 31 former ConvertKit customers about ConvertKit’s pros and cons and why many made the switch to Podia Email.

Jump ahead

In this article

ConvertKit is a popular email marketing platform among creators. It’s known for its visual automation builder, templated sign-up forms and landing pages, and detailed audience analytics, but is it the right choice for you?

In this ConvertKit review, you’ll hear from 31 former ConvertKit users about the things they liked, the things they didn’t like, and why they made the switch to Podia Email.

Your email marketing tool is one of the most important pieces of your online business — It’s how you’ll grow your audience, connect with followers, and promote your digital products. But important doesn’t have to mean complicated and expensive.

Ideally, your
email marketing platform
will have enough features to do what you want without being overwhelming. Bonus points if it doesn’t cost an arm and a leg.

While we were building
Podia Email
, we asked Podia users to share their experiences with other email platforms — both positive and negative — including
ConvertKit
.

In this post, we share those findings and we cover:

  • What ConvertKit’s users like best about their email marketing tools

  • Where ConvertKit’s previous customers ran into challenges with their product

  • Why some of those users decided to switch to Podia for their email marketing

While we’d obviously love for you to choose Podia, we’ve tried to give an honest review rather than simply critiquing ConvertKit because we want you to find the right thing for your business, no matter what you choose.

TL;DR

  • Previous ConvertKit customers liked that there was a free plan, but feature limits made it difficult to use. 37% said ConvertKit’s high pricing was their #1 issue with the platform.
  • Some users liked being able to run complex automations, but others found ConvertKit to be too complicated and overwhelming to set up.
  • ConvertKit has nice templates for landing pages and email forms, but these templates are difficult to customize. Users who wanted more flexibility felt limited.
  • 54% of people said the main reason they switched from ConvertKit to Podia was because they wanted their entire business (email, website, products, etc.) in one place. Podia’s affordable pricing was the second most common reason people switched.

Easy automations that do what you want them to do, a full-featured free plan, and unlimited landing pages that you can customize however you want  - 
try Podia Email for free today
.

What are the best features of ConvertKit?

ConvertKit is an email platform where creators can grow their audience, connect with followers, automate their email marketing, and earn money from digital products.

You can start by making embeddable email opt-in forms and standalone landing pages to direct people to your list. When you’re ready to send a broadcast or newsletter, ConvertKit has a point-and-click email designer and a library of templates you can use as a starting point, or you can create a custom email from scratch.

You can also build automated campaigns using the visual automation builder and add tags and segments to your audience based on actions they take (like clicking a link in an email or purchasing a digital product).

ConvertKit is primarily an email tool, so you’ll need to connect other software to run different aspects of your business. Luckily, they integrate with plenty of
website platforms
,
course platforms
, CRMs,
landing page builders
, and other resources.

Of all these ConvertKit features, these are the things that our 31 survey respondents liked the most:

ConvertKit has a free plan

ConvertKit’s free plan lets you have up to 1,000 subscribers, and you can send unlimited broadcasts. You can make as many forms and landing pages as you like, but you won’t get access to automations or integrations at this tier.

That said, ConvertKit’s free plan is a good way to test out the basic features of the platform, like the email builder and landing page designer, before committing to a paid plan.

Create visual automations

ConvertKit is well known for its visual automation builder, which lets you build detailed pathways, workflows, and funnels for your subscribers. One previous user specifically mentioned that they liked having “multiple funnels, triggers, and tags” to work with, and you can use as many segments and tags as you like to organize your audience.

ConvertKit shines for creators who need to build detailed customer journeys with multiple entrance and exit points, or who need hyper-specific automations to promote products.

Design emails and pages with pre-made templates

Other ex-users said they liked how ConvertKit’s email editor and landing page builder had pre-designed templates so they could make emails, opt-in pages, and landing pages quickly.

While there are limitations on what you can customize (particularly on your pages and forms, which we’ll discuss below), the designs look good out of the box. All you have to do is add your text, images, and links, and you’ll be on your way.

ConvertKit also lets you make your own email templates that you can use again and again.

Track data and stats for each subscriber

Another area where ConvertKit gets top marks is audience analytics. One respondent pointed out that they liked having “more information on each person in my audience, like where they click, which email they open, etc.”

You’ll have access to subscriber stats and subscriber scoring (available on the Creator Pro plan) so you can see lots of information about your audience. For example, you can see which opt-in forms are most popular, which subscribers have gone cold, and which emails have the highest deliverability and open rates.

As we mentioned earlier, you can also use ConvertKit to create unlimited tags and segments for your audience so you always send the right message to the right people.

What did previous customers not like about ConvertKit?

On the flip side, the 31 former ConvertKit users we surveyed weren’t fans of the expensive price, complex automations builder, and limitations with landing page designs.

ConvertKit’s pricing is expensive

37% of past users said their biggest problem with ConvertKit was the high price tag.

There is a free plan, but it only has basic features for up to 1,000 subscribers. If you want more functionality, you’ll need to choose a paid Creator or Creator Pro plan.

On both of these plans, pricing goes up as your list size increases. Here are some examples of what you can expect to pay on different ConvertKit tiers:

So, what’s the difference between these plans?

With ConvertKit’s free plan (up to 1,000 subscribers), you get:

With Creator, you get everything in free, plus:

  • Live chat & email support

  • Free migration from another tool

  • Automations

  • Third-party integrations

  • One additional team member

And with Creator Pro, you get everything in the previous two plans, plus:

It’s nice to have a free plan, but it won’t work for a lot of users because ConvertKit gates important features like automations, integrations, and customer support to paid plans only.

You’ll have to pay at least $15/month (for the Creator plan with 300 subscribers) to start experimenting with automated campaigns or get help with your business.

Plus, the visual automation builder is one of ConvertKit’s main selling points, but it’s not available until you get on a Creator plan, which can drastically jump up in price as your list grows.

Building automations and funnels can get complicated

Speaking of the visual automation builder, many respondents found ConvertKit’s automations too overwhelming to set up and manage. Some reviewers liked having lots of options, but other reviewers mentioned things like, “UI (user interface) was clunky” and “segmentation was so complicated” as their top cons.

While it’s true that you can do a lot of complex campaigns and workflows with ConvertKit, most creators simply need a platform that can send emails and run some basic automations like welcome messages, sales funnels, and nurture sequences.

If it gets too complicated, email marketing can feel like a chore. Plus, no one likes logging into their email account and seeing a whole web of automations with no idea what anything does.

Creators typically don’t want their businesses to be more complicated, and there’s no reason to pay top dollar for features you don’t actually need. Unless you’re certain you need highly specific automations for your business, ConvertKit could be more complicated and pricier than necessary.

Landing pages and opt-in forms have design limitations

It’s true that ConvertKit has nice-looking landing page templates and email opt-in forms, but there are limits on what you can customize. As one past user noted, “I didn’t like the limitations on the opt-in forms I created, and the previews weren’t actual views.”

Currently, ConvertKit doesn’t have a way to build landing pages or forms from scratch — you have to edit the existing templates that you’re given.

For instance, if you choose a landing page template with two columns, you only have the option to add elements (like images, buttons, dividers, or bulleted lists) within those columns. There’s no way to add additional sections beyond the base design. The options can feel limiting if you have a layout in mind that doesn’t align with a template.

Also, ConverKit’s landing pages are designed for email capture, not selling products or directing people to other URLs. Nearly all landing page templates have a prominent email opt-in form by default, and you’ll have to use custom CSS if you want to remove the email sign-up box from your page.

This makes it difficult to use ConvertKit’s landing pages for anything outside of gathering emails, so you could end up needing to pay extra for a third-party landing page builder.

Why are people switching from ConvertKit to Podia?

When asked why they switched from ConvertKit to Podia, respondents highlighted the lower price point, simple email builder, and the ease of having everything in one place.

Podia is less expensive for nearly all users

ConvertKit pricing goes up as you grow your list and upgrade to higher tiers, but
Podia
includes all email features on all plans, including the free plan. This means that your price only changes as your list grows, and creators with smaller lists have all the same advanced features as those with larger ones.

Unless you have between 100 and 1,000 subscribers, all Podia Email plans are less expensive than their ConvertKit counterparts. Here are a few examples of how the pricing shakes out for ConvertKit and Podia based on list size:

In addition to a lower price, Podia Email plans also have extra features for running your online business. 

Podia Email can be purchased as an add-on to any Podia base plan, including the free plan. By default, all Podia Email plans include your
full website
,
unlimited customizable landing pages
,
unlimited email opt-in forms
,
your own community
, and the ability to
sell a digital download
and
coaching product
. 

You can also run unlimited
email automations
on Podia’s free plan – this feature is limited to paid plans with ConvertKit.

Podia’s email editor is easy to use

Point, click, and customize. That’s all you need to do to make your emails look amazing in Podia. You can pick a
professionally designed template
, blank slate, or use a previous email as a starting point so you don’t have to reinvent the wheel each time you send a message. 

Make a design you love? You can use it as a custom template in your broadcasts or email campaigns as many times as you like.

Within your emails, you can add text sections, columns, featured callouts, social media links, videos, CTAs, and files for your customers to download. 

Plus, Podia’s email templates come with advice for what to write in addition to
design elements
, so you’ll never have to worry about knowing what to say. 

Podia lets you run your business all in one place

Over half of the people surveyed (54%) said that the number one reason they switched from ConvertKit to Podia was that they wanted to run all aspects of their business in one place.

ConvertKit is a great option for email marketing, but the ecommerce features are limited and there’s no website or community tool. Many of the creators we heard from found Podia’s all-in-one approach to be more straightforward and cost-effective since they didn’t have to connect (and pay for) a ton of extra tools. 

With Podia, your products, customers, landing pages, opt-in forms, courses, community,
affiliates
, and website are all already connected to your email marketing. 

This means you can customize the way you email your followers based on whether or not they’ve bought a product, joined a waitlist, or expressed interest in a particular topic without lots of complicated tags and integrations. 

Let’s say you wanted to set up a waitlist for an online course you plan to sell. 

In ConvertKit, you’d need to set up an opt-in form or landing page specifically for your waitlist and tag any subscribers who join through that form. During the launch, you can send messages to the people with this tag to promote the product. 

But once the course is live, you probably don’t want to keep messaging people who have already purchased it, so you will need to integrate ConvertKit with your online course platform. You would then need to set up another tag for people who have made a purchase and use that tag to exclude them from any future promotional messages you send to waitlist members. 

In Podia, your course, email, and customers are already in the same place. All you need to do is set up the course and put it in waitlist mode. Podia automatically generates a landing page for the course and anyone who signs up will be added to that course’s waitlist. 

From there, you can send messages or campaigns to people on that waitlist using Podia’s easy
audience filters
. Once the course is live, Podia automatically tracks people who have purchased it. Once again, you can use audience filters to exclude people who already have the product from future emails.

You don’t have to do any fancy setup behind the scenes or remember what a dozen different tags mean, and you won’t have to worry about getting your wires crossed since Podia has all the information about your customers in one place. 

Here are some ways Podia’s all-in-one platform can make life easier:

  • Run automated welcome emails whenever someone joins your email list

  • Automatically send customized email sequences to customers after they purchase a particular product

  • Message only people who have (or haven’t) purchased a product

  • Follow up with people who have joined your waitlist. Podia’s waitlist feature is available on all plans, including the free plan

  • Set up lead magnets that funnel people into automated marketing automations 

  • Use link clicks to add tags to subscribers, then create automated email sequences about the topics they’re interested in 

Having everything in one place makes it easier to keep an eye on your
customer data
, too. With Podia, you can see all your metrics, like open rates, new subscribers, purchases, and income generated from each email, in one dashboard. 

If you want to consolidate your online business into one place and get rid of extra fees and integrations, Podia could be the right fit for you too. 

Is ConvertKit right for me?

ConvertKit is a great option for content creators and small business owners who need an email service provider with lots of complex automations. It comes at a steeper price point than platforms like Podia, but it might be worth it for you if you need a visual automation builder. ConvertKit is also a good choice if you only want landing pages for collecting emails (not selling products) since that’s what ConvertKit’s templates are set up for. 

Podia is a better option for online creators who want to simplify their business with everything in one place. You can create unlimited emails and campaigns, use beautiful email templates (or design your own), build a full website, set up landing pages from scratch for any purpose you need them for, and sell any kind of product you imagine. 

Since you won’t need lots of extra tools and plugins, your overall business expenses will likely be lower than they would be if you cobbled everything together yourself. 

For affordable, easy-to-use, and powerful marketing features that don’t feel overwhelming, give Podia a try.
It’s free to get started
. 

We can’t wait to see what you make.


Email marketing FAQs

What is ConvertKit?

ConvertKit is an email marketing platform that lets you grow your email list through sign-up forms and landing pages, create automated campaigns, send broadcasts, and sell digital downloads. There’s a limited free plan for up to 1,000 subscribers, and paid plans start at $15 per month.

What are some ConvertKit alternatives?

Unsurprisingly, our favorite ConvertKit alternative is
Podia Email
! You can also read about other email marketing tools similar to ConvertKit in these guides.

What are the benefits of ConvertKit?

ConvertKit lets you send unlimited broadcast messages and create unlimited campaigns. There are pre-designed email templates, an easy email builder, and a visual automation builder. You can also sell digital downloads using the ecommerce feature.

What are the disadvantages of ConvertKit?

ConvertKit works well for managing your email, but you’ll need to connect other tools to build your website and sell products beyond downloads. More tools means more tech you’ll need to manage and potentially more fees. Plus, ConvertKit’s pricing gets expensive as your list grows and as you need more features.

What is the best email marketing software?

We’re a little biased here, but we think 
Podia Email
 is the best email marketing service around. With Podia Email, you get a beautiful email builder, templates, and unlimited email sends on all plans. You can also make email marketing campaigns and see how much money you earn from each email. Podia Email is automatically connected to your website, landing pages, products, courses, customers, and everything else. 
Sign up for free
.

SIGN UP NOW

Get your free Podia account

Join the 150,000+ creators who use Podia to create websites, sell digital products, and build online communities.

Start free →

What is SCORM? A Complete Guide on SCORM Files and Packaging

Software Stack Editor · June 21, 2024 ·

This comprehensive guide will explore everything there is to know about SCORM files and packaging. You’ll learn what a SCORM file is, the benefits of creating SCORM content, compatibility with different elearning software/learning management systems (LMS), and how to transform a powerpoint presentation into a SCORM course.

Table of contents

  • 1What is a SCORM Package?
  • 2What are the Benefits of SCORM?
  • 3How Does SCORM Work?
  • 4SCORM Versions
  • 5How to Create a SCORM
  • 6Add SCORM to LearnWorlds LMS

What is a SCORM Package?

SCORM stands for Shareable Content Object Reference Model and is a collection of industry standards for elearning courses and LMS systems that support it.

SCORM stands for Shareable Content Object Reference Model.

Those technical specifications help build a file similar to a zip file with multiple files inside, written in a specific language that a scorm-compliant LMS understands.

In this way, if an elearning administration purchases a compliance course by a freelance instructional designer, the resulting course will probably come in the SCORM format. The elearning admin will then be able to upload the file to the LMS, which will work smoothly.

Having a set of standards allows for communication between systems, and the same SCORM file should work across most LMS without a problem. This way, a company can change LMS but keep their course material and easily migrate to another.

SCORM standards facilitate the communication between elearning authoring tools and learning management systems.

SCORM Compliance

When an LMS is SCORM Compliant, it can “read” and deliver the course content inside a SCORM package. There are different levels of SCORM compliance, as some LMS can only read and deliver the course but do not track attendance, scores or save the learner’s progress.

SCORM Certified

Not to be confused with compliance. A SCORM-certified course has passed and was certified by ADL, the organization behind the SCORM standard.

What are the Benefits of SCORM?

The SCORM format has many advantages, which is why it is one of the most adopted standards in elearning and has stood the test of time. But why use SCORM over other formats?

Here are the most important benefits of SCORM:

the image showing the 5 benefits of scorm: compatibility, progress tracking, customizable, portable, and persistency

LMS Compatibility (Interoperability)

Most LMS are partially or fully SCORM compliant. It makes it easier to create a course that can be used across various systems.

Progress Tracking

It allows for tracking the learner’s progress in a standardized way and feeds it back to the LMS for reporting.

Modular & Customizable

SCORM is highly customizable and can be designed to offer modular courses as well. You can build a complete interactive course or microlearning activities using only SCORM lessons.

Portable Courses

As a widely recognized and used standard, it allows for the courses to be portable in case of changing LMS.

Persistency (Progress Saving)

The way SCORM is built allows the learner to continue their learning journey from where they are left. Not all LMS support persistency, but if they do, it is a powerful advantage for the learning experience.

What is tracked in a SCORM?

Here are a few examples of what is tracked using SCORM persistency:

  • The final score of the course
  • Total time spent
  • Learners progress so they can resume at the point they left off
  • Overall status, such as pass, fail, complete or incomplete

LearnWorlds is a scorm-compliant learning management system able to track all of the above. You can get a 30-day trial and try it yourself:

Your professional looking Academy in a few clicks

Start FREE Trial

How Does SCORM Work?

All SCORM formats work based on two principles: Content Packaging and Data Exchange.

Content packaging is how content should be delivered. Inside the SCORM package is a file called “imsmanifest,” which dictates how to import and launch the content to the LMS. This is an XML file that describes the hierarchical structure of the contents.

How a SCORM package looks like when its is openned, highlighting the imsmanifest.xml file.

Run-Time communication, also called data exchange, dictates the communication between the content and LMS. This two-way communication channel passes information between the SCORM course and the LMS.

For example, the SCORM course might be personalized and request the learner’s name from the LMS, or the LMS requires the final score or a pass/fail status to report on the learner’s progress.

SCORM Versions

There are three versions of SCORM right now:

  • SCORM 1.1,
  • SCORM 1.2, and
  • SCORM 2004 (formerly known as 1.3)

SCORM 2004 is the latest version of the standard used today. It has new and improved capabilities, better reporting variables, and sequencing.

The downside of the 2004 version is that fewer LMS vendors support it due to its complexity.

SCORM 1.2 is the most commonly supported format by LMS providers because it is easier and simpler to work with.

Review your LMS compatibility guide and your course’s requirements before deciding which SCORM version suits you.

There are other elearning standards like xAPI (Tin Can), cmi5, and AICC for more advanced capabilities. Unfortunately, both are more demanding, and few LMS support these formats and usually come at an additional cost.

How to Create a SCORM

Creating elearning content in SCORM format is now easier than ever. In the past, you would have needed a programmer to write the code for a SCORM file.

Now, elearning authoring tools make it incredibly easy to offer SCORM templates to quickly create a course and include the functionality to export learning material into a zip file as a scorm-compliant course.

There are three popular types of authoring tools to create SCORM courses:

  • Standalone software
  • Cloud software
  • PowerPoint add-ons

Take a look and choose the best scorm software for your needs!

Standalone Software

You can download these authoring tools to your computer to build an online course. Here are some of the most popular authoring tools in this category:

  • Adobe Captivate
  • Articulate Storyline
  • Lectora Desktop
Editing a SCORM course using Articulate Storyline.
Creating a SCORM course on Articulate Storyline SCORM

Cloud Software

With the prominence of cloud computing, you no longer need to download demanding software. You can create a scorm online with cloud software.

If you are looking for a cloud solution, then here are some of the best authoring tools for you:

  • Articulate Rise
  • DominKnow
  • EasyGenerator
Creating a SCORM course using DominKnow.
Working on DominKnow to produce a SCORM lesson

PowerPoint Add-Ons

One of the easiest ways to make a course is by converting a PowerPoint file into a SCORM. You can achieve this with an add-on that can take your slides and add quizzes, interactive elements, and more. These tools can help you convert a ppt file into a SCORM file with ease:

  • iSpring Suite
  • Articulate 360 Studio
  • Adobe Captivate (by importing the slides)

Here is a video on how to import a PowerPoint presentation and edit it in Adobe Captivate:

Exporting a Course into a SCORM

An authoring tool can export its result as a SCORM file or one of the alternative standards like HTML5 or Tin Can.

When exporting a course, you need to know which version of SCORM is supported by your LMS and what version supports the learning activities you are creating.

For example, the first version of SCORM (1.1) would not support interoperability, the transfer of a course from one learning platform to another. But, SCORM 1.2 makes that possible, and SCORM 2004 has had many improvements over the years but may not be supported by all LMSs.

🔺 SCORM may not support simulations. In this case, you need to use an export with Tin Can API that supports more advanced modules.

Add SCORM to LearnWorlds LMS

LearnWorlds is a SCORM-compliant LMS with many course creators using it to host their SCORM courses.

To import a SCORM file to LearnWorlds, you need to create a SCORM learning activity and upload the file. Here is the step-by-step process of uploading a SCORM file to LearnWorlds:

  1. Create a course.
  2. In the Courses menu, visit the course’s Contents tab.
  3. Click on Add an activity under a course section.
  4. Choose the SCORM/HTML5 Package activity unit in the Multimedia menu.
  5. Give a title to your SCORM file and click “Save” or “Save and Edit” to make changes.
  6. Upload the file and click “Save.”
Uploading a SCORM on LearnWorlds as a learning activity.

The SCORM course is ready to be viewed in the course player by your learners.

Example of SCORM on LearnWorlds

Here is an example of how a SCORM file will play inside the LearnWorlds course player. On the left is the standard player navigation. On the right, a SCORM course is loaded.

Below is an example from Sendinblue Academy’s Certification for Marketing Automation, using multiple SCORM modules to deliver their online training.

Sendinblue using LearnWorlds to deliver their SCORM courses. This is an example of a SCORM course showing an animated teacher with buttons to control the experience.

The Future of Online Learning

Most elearning professionals use SCORM, as it is a widely used standard for online training and is supported by most LMSs. Since SCORM’s last update, there have been a lot of newer standards that support more advanced learning activities.

At the same time, the LMS vendors have evolved, and many offer their own authoring tools or support newer standards such as AICC or TinCan API.

There are many advantages to building a course inside your own LMS. If most of your course learning material is based on video (as many newer courses are), you might not need a SCORM and can easily upload the course and supporting material to the LMS.

The downside of using the LMS authoring capabilities would be the trouble migrating to another LMS in the future.

It is essential to review your course requirements, your clients’ requirements (internal or external), and the capabilities of the LMS before choosing how to create the course.

Are you looking for a modern, SCORM-compliant LMS? LearnWorlds can help you take the learning experience and learner management to the next level. Try LearnWorlds with the 30-day trial.

Your professional looking Academy in a few clicks

Start FREE Trial

Frequently Asked Questions (FAQs)

– Is SCORM still relevant?

Yes, SCORM is still a widely used standard for many professionals, authoring tools, and LMS in the elearning industry. Due to its widespread appeal, SCORM enables instructional designers to create courses that can operate in multiple learning systems and makes the work of elearning professionals much easier.

– What is a SCORM activity?

In SCORM 2004 (1.3), an activity is the collection of online training material packaged to an agreed standard for learning objects.

– What is SCO?

The Sharable Content Objects (SCOs) are the reusable building blocks of a SCORM file. Defining the training material as a set of SCOs enables them to be reused within and across courses.

– How to test the SCORM package?

To test if your SCORM package runs correctly, you need to upload it to the LMS and use it as a student to see how well it performs and if it offers the intended learning experience.

If you need to track time spent, quiz scores, and completion of the SCORM, you can use the reporting function of the LMS to check whether those items are captured.

To test various versions of SCORM on an LMS, you can use these sample SCORM packages.

To test a SCORM file and how it will perform in various LMSs, you can use the SCORM cloud service by Rustici Software.

– Which one is better? SCORM 1.2 vs. 2004

SCORM 2004 is the newer version and supports the most advanced features, but it is not as widely adopted as 1.2. If your LMS supports SCORM 2004, you are better off using that for your SCORM courses.

– How do I check the SCORM version?

The imsmanifest.xml file holds the version information in-between the metadata tags of . For example, a SCORM version 1.2 will show up on the imsmanifest file as: 1.2

The post What is SCORM? A Complete Guide on SCORM Files and Packaging appeared first on LearnWorlds.

How to become a content creator after a layoff

Software Stack Editor · June 21, 2024 ·

image

Losing your job can feel overwhelming and disheartening. But through all the uncertainty and pressure, it’s time to move on and find other sources of income.  You may already be considering various career paths, and becoming a content creator could be a promising option.

Content creation has been rising in popularity in the last few years due to the rise of social media platforms and an increasing demand for digital content. A decade ago, few could have imagined that creating simple videos — like speaking to a camera for one-minute clips — could turn into a career. 

Yet, today, people like Khaby Lame have turned content creation into lucrative careers without even talking into said camera.

The content creation industry is substantial, with an estimated value of approximately $104.2 billion. This places it on a similar economic scale to established professions such as nursing and marketing.

In this article, we’ll explore content creation as a potential career path for those trying to find their footing after a layoff.

{{tableofcontents-component=”/blog-shortcodes/table-of-contents”}}

Why should you try becoming a content creator after a layoff?

While not a get-rich-quick scheme, content creation has the potential to grow over time as you build an audience. You can earn money in different ways, such as sponsorships, merchandise, fan support platforms, etc. 

Starting a content creation business after a layoff can be appealing for a few key reasons. First, content creation allows you to make money from skills you already have, like writing, design, video editing, etc. It’s also relatively cheap to get started—all you really need is a computer and an internet connection.

Second, it gives you control and flexibility that you didn’t have before. As a content creator, you’re the boss – you decide what to create, when to work, and what direction to take. This flexibility is great if you have other responsibilities like caregiving.

Third, you get to share your passions, knowledge, and creativity with an audience. There’s a high demand for unique online content across all kinds of topics and niches.

So, after a setback like losing your job, turning to content creation and later, influencing, lets you regain control, pursue your interests, and have flexible income potential. But it does require hard work and constant adaptation.

{{needcreator-component=”/blog-shortcodes/call-to-action”}}

Skill you need as a content creator

You may be surprised to find that many of your existing skills from your previous job can seamlessly translate into the world of content creation. 

Here are some valuable transferable skills that can help you succeed as a solopreneur:

  • Writing and communication skills
  • Creative skills (Video editing, graphic design, photography, audio production)
  • Technical skills (Coding, web development, app creation)
  • Analytical and research skills
  • Project management skills
  • Marketing and promotion skills
  • Collaboration and teamwork
  • Adaptability and continuous learning

The challenges of being a content creator

One of the most significant hurdles is building an audience from scratch, which can be a slow and frustrating process. You’ll need to consistently produce high-quality content, engage with your audience, and navigate the unpredictable algorithms of social media platforms.

One of the biggest challenges is standing out in an oversaturated market. With millions of content creators vying for attention, it can be difficult to build a loyal audience and establish yourself as an authority in your niche. This means you’ll need to consistently produce high-quality, engaging content that offers value to your viewers or readers.

Another obstacle is the unpredictable and often inconsistent income stream. Unlike a traditional job with a steady paycheck, your earnings as a content creator can fluctuate greatly, especially in the early stages. It may take months or even years to build a sustainable income, and you’ll need to have a solid financial plan in place to weather the ebbs and flows.

Additionally, you’ll need to stay up-to-date with trends, algorithms, and platforms in the content creation world. What works today may not work tomorrow, and you’ll need to be adaptable and willing to continuously learn and evolve your strategies.

Also, as your popularity grows, complete independence may become unfeasible. You might find it necessary to hire a manager to safeguard your business interests and even engage cybersecurity professionals to use penetration testing tools on your site to guard against hackers. Remember that investing in a good team is crucial for sustained success.

While these challenges may seem daunting, especially for someone who is looking for a career change after layoff, it’s important to remember that with hard work, perseverance, and a willingness to adapt, building a successful content business is possible.

{{coursecreatorslist-component=”/blog-shortcodes/popups3″}}

How to find your niche as a content creator

Finding the right niche is crucial but not easy. It sets the direction of your content, helps you connect with the right audience, and distinguishes you in a crowded market. 

To find that sweet spot, start by evaluating your interests, hobbies, and expertise. Ask yourself these questions:

  • What are you truly passionate about? 
  • What topics do you find yourself endlessly researching or discussing with others?
  • What topics give you joy to explore?

These passions can serve as a solid foundation for your content creation journey. 

However, it’s equally important to identify the skills you possess that could be valuable in creating content. Do you have a knack for writing, design, video editing, or public speaking? Matching your creative talents with your interests can help you produce high-quality content that resonates with your audience.

Once you’ve identified your passions and skills, now figure out what kind of personality you want to present to your audience. Generally, there are 2 types of creators: entertainers and educators. Entertainers aim to amuse and delight, while educators aim to teach the audience. For instance, Khaby Lame is an entertainer, while Erika Kullberg is an educator. 

Once you have these figured out, now try and study successful content creators in your niche and identify opportunities to differentiate yourself. It’s also essential to understand your target audience’s interests, pain points, and content consumption habits.

Remember, finding your niche is an iterative process, and it may take some experimentation to find the perfect fit. The key is to remain authentic and true to your passions while providing value to your audience. 

{{downloadcreatoreconomy-component=”/blog-shortcodes/popups4″}}

Low-cost tools and platforms for content creators

There are many low-cost ways to establish your presence as a content creator without breaking the bank.

First, research and find free and affordable online tools and platforms for content creation. For content creation, tools like Canva for graphic design, Audacity for audio editing, and OpenShot for video editing offer robust features at little to no cost.

Leveraging these tools and platforms allows you to create high-quality content without a significant financial investment. This way, you can focus on honing your skills and building your brand more efficiently and cost-effectively. 

Also, pay attention to popular content creation tools in the market. Despite the energy demand, AI is revolutionizing the content industry, and finding the right tools can be a game changer for you. In fact, data shows that these tools can help you cut the time and cost needed to make videos by up to 80%.

As you grow and expand your content business, you can explore more advanced tools and platforms that align with your evolving needs and budget.

{{freetoday-component=”/blog-shortcodes/call-to-action”}}

How to grow your audience

Building an audience as a content creator is a gradual process that requires patience and strategic effort. Here’s a step-by-step guide with practical tips to help you grow your following:

  • Defining your target audience. Identifying your target audience is the foundation of building a successful audience. Take the time to research and understand their interests, pain points, and content consumption habits. 
  • Engaging your audience. Engagement is key to building a loyal, dedicated audience. Respond to comments and messages promptly, fostering a two-way dialogue. Ask for feedback on your content and incorporate their suggestions. 
  • Provide value. Consistently providing value through your content is the key to retaining and growing your audience. Create content that solves problems, entertains, or educates your target audience. 
  • Be patient and consistent. Building a loyal, engaged audience takes time, dedication, and consistent effort. Understand that overnight success is rare, and be prepared for a marathon, not a sprint. Consistently create high-quality content, engage with your community, and analyze your metrics to adjust your strategies as needed. 

Monetization strategies for turning content into income

When transitioning into one of the different types of creator businesses, understanding how to monetize your work is crucial. Here are some practical and effective monetization strategies that content creators commonly use:

Advertising revenue

One of the most direct ways to earn money from your content is through advertising. Platforms like YouTube, blogs, and podcasts can integrate ads. 

For example, YouTube pays creators a portion of the ad revenue generated from their videos through their Partner Program, but you need to meet specific eligibility criteria to qualify. Blogs can use Google AdSense to display ads, where earnings are based on clicks and impressions.

Affiliate marketing

Affiliate marketing is a performance-based strategy where content creators promote products or services using unique affiliate links and earn a commission from sales or actions taken through these links. 

This model benefits both brands, which gain access to the creators’ audiences, and affiliates, who can earn passive income without handling products directly.

Key payment models:

  • Pay-Per-Sale (PPS). This is the most common model where affiliates earn a commission for each sale made via their links.
  • Pay-Per-Click (PPC). Affiliates earn each time someone clicks on their affiliate link, regardless of whether it leads to a sale.
  • Pay-Per-Lead (PPL). Commissions are earned for generating leads, like sign-ups or consultations, which usually require a higher engagement level than clicks.
  • Pay-Per-Action (PPA). Similar to PPL, but targets users further along in the purchase process, like those ready to buy.

Sponsored content

This strategy involves creating content, such as articles, videos, or social media posts, that subtly promote a brand or product. It’s typically more engaging and less intrusive than traditional advertising, allowing for a seamless integration into your regular content stream​.

To effectively utilize sponsored content, start by setting clear goals. Whether you aim to increase brand awareness or establish thought leadership, defining these goals will guide the creation of relevant and impactful content. 

Collaborate with brands or influencers that share a similar ethos or whose audience overlaps with yours. This synergy ensures the content feels authentic and enhances the likelihood of positive reception​ (Shopify)​.

Joining communities & finding mentors for your journey

Building a strong support network is crucial for the success of any of these popular types of creator businesses, especially when starting out after a layoff. Here are practical strategies to find mentors and communities that can guide and uplift you on your journey:

  • Find a mentor. A mentor who has already achieved success in content creation can provide invaluable guidance and advice. 
  • Join online communities. The internet is home to numerous vibrant communities of content creators sharing resources, tips, and support. Join niche-specific forums, Facebook groups, or subreddits related to your area of content creation to meet like-minded people. 
  • Attend in-person events. While online communities are valuable, attending in-person events can provide networking opportunities and hands-on learning experiences.
  • Building a local network. Seek out content creators in your local area and build a supportive network. Attend local events, join co-working spaces, or reach out to creators you admire for coffee or collaboration opportunities. 

{{communitycounts-component=”/blog-shortcodes/popups2″}}

Things to ask yourself before becoming a content creator

Deciding whether to pursue a career in content creation after a layoff is a deeply personal decision. It’s crucial to engage in honest self-reflection and ask yourself some tough questions to determine if this path aligns with your goals, skills, and lifestyle. 

Here are some essential questions to consider:

  1. Are you truly passionate about your chosen niche or topic?
  2. Do you possess the necessary skills (writing, video editing, graphic design, etc.)?
  3. Are you prepared for inconsistent and unpredictable income?
  4. Can you effectively manage your time and juggle multiple tasks?
  5. Are you comfortable with self-promotion and marketing yourself?
  6. Do you thrive on continuous learning and adapting to industry changes?
  7. Does this career path align with your lifestyle and financial situation?
  8. Are you prepared for the potential challenges and setbacks?
  9. Do you have a backup plan or alternative income source?
  10. Are you willing to invest the time and effort required to build a successful career?

While losing your job can be overwhelming, it’s also an opportunity to explore new and fulfilling career paths. Becoming a content creator allows you to leverage your skills, gain control over your work, and share your passions with the world. The journey requires hard work, adaptability, and a willingness to learn, but the rewards can be immense.

Ready to start your journey as a content creator? Join Teachable with a free plan today and begin owning your income and impact. Whether you’re a budding influencer or an established content creator, Teachable provides the tools you need to turn your passion into a thriving business.

{{likefree-component=”/blog-shortcodes/call-to-action”}}

How to Sell Guided Meditations Online – 5 Steps to Launch a Meditation Membership

Software Stack Editor · June 20, 2024 ·

Haiden Hibbert

Haiden Hibbert

I’m a Content Manager at MemberSpace helping entrepreneurs and creators sell digital products.

Turning your website into a membership site is the easiest way to start selling guided meditations and music. Whether you’re a certified instructor or just have a passion for meditation, you can monetize your mindfulness content and grow your online community in just a few steps. In this post, we’ll walk through a proven, five-step process that successful meditation professionals use to sell their content. 

Sell guided meditations online!

The easiest way to accept membership payments or one-time charges for digital products like online courses, communities, content libraries, and more — all from your own website!


Start selling now

Get started for free! 5 minutes to set up.

Table of Contents

Step 1: Convert your website into a membership site

To start selling your guided meditations or music, you’ll need to start by turning your website into a membership site with a tool like MemberSpace. This will allow you to lock any page on your website and accept payments from customers. 

After installing MemberSpace (this only takes a few minutes!), customers will be able to sign up to access your meditations via a simple, customizable form. 

sell guided meditations and music form
Customize your signup form to gather information like name, email, address, or whatever information you’d like to collect from members.

Step 2: Upload your meditations to your site

Once you’ve converted your website to a membership site, it’s time to add your guided meditations and music to pages on your website. You can upload audio files, videos, or whatever format you’d like. 

If you plan on offering other resources to your members, like a private Facebook community, workshops and events, exclusive discounts, private coaching sessions, or newsletter, you can add all of that content to your site, as well. 

Everything on these members-only pages will be password protected so only paying members can access them. 

Soul Boost Meditation Membership

Soul Boost Meditation offers a membership that includes live guided meditations, a private Facebook group, workshops and events, and more.

Step 3: Lock your web pages for paying customers

To restrict access to your content, you’ll need to add the URLs for the pages that contain your guided meditation recordings and music. You can add each page one by one, or protect them en masse if you have several pages filed under the same category. For example, if you have you’ve added your recordings like this: yoursite.com/meditations/meditation-1/ and yoursite.com/meditations/meditation-1, simply add an asterisk to protect all pages under yoursite.com/meditations/*. 

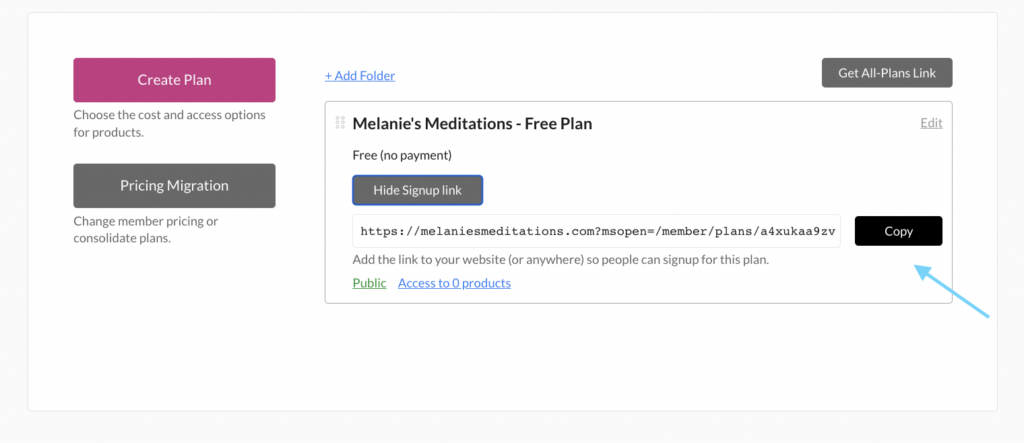
✨ Security Tip: For added security,  upload your meditation recordings to MemberSpace to protect the download link. This helps to ensure the recordings can only be accessed by customers who’ve purchased them directly. You can also add our extra security code to your protected page.

Step 4: Set up your pricing

After you’ve locked your website pages, you can set a price for your meditation recordings. Whether you want to set up subscription tiers or bundle your meditations for a one-time fee, the built-in Stripe integration handles payment processing and makes it easy to charge customers however you’d like. 

Here’s an example of how you might set up different membership tiers:

  • Free tier for a limited selection of meditations 
  • Premium tier for access to your full library of meditations and videos
  • A VIP tier for access to the full library of guided meditations, an online meditation course, and monthly livestreams

With MemberSpace, you can sell guided meditations and music for a one-time payent, or set up a subscription and charge members a recurring fee to access your content.

Step 5: Add your signup link to your site

When you’re ready to launch your guided meditations, you’ll grab the signup link from your MemberSpace account and add it to call-to-action buttons throughout your website, as well as email campaigns, social media posts, or wherever else you’d like to promote your recordings! 

Guided meditation signup link
When members click your signup link, a form will open requiring them to create an account and pay before they get access to your guided meditations.

Meditation Website Examples

For some visual inspiration, check out these meditation membership sites that sell guided mediations, music, online courses, workshops, and more. 

Previous
Next

Final Thoughts

Turning  your passion into a profitable meditation business is simple, whether you want to sell a live meditation classes, on-demand videos, or a content library of audio meditations. With a tool like MemberSpace, you can add a membership paywall to your website in just a few steps and start monetizing your guided meditation videos, audio, and music. You can launch business today by signing up for a free trial!

Need help with your meditation business?

Connect with our friendly team, weekdays 10am – 6pm ET.

Let’s chat!

The post How to Sell Guided Meditations Online – 5 Steps to Launch a Meditation Membership appeared first on .

Cannes Lions Festival for creators (2024)

Software Stack Editor · June 20, 2024 ·

image

In the sun-drenched realm of Cannes, an event like no other is unfolding.

The Cannes Lions International Festival of Creativity is an annual gathering of the world’s top creative minds, leading companies, and advertisers.

This year it’s where the new rules of the creator economy are being written, and every creator should be paying attention.

Here’s what we’re seeing from the festival so far…

{{tableofcontents-component=”/blog-shortcodes/table-of-contents”}}

Creators get in on the action

For the first time, Cannes Lions is rolling out the red carpet for creators. Yes, you read that right. 

Creators, who once operated on the fringes of the advertising world, are now being welcomed into the grand halls of Cannes with all the pomp usually reserved for Hollywood’s elite.

Top creators like MrBeast, Colin & Samir, and Madeline Argy are not just attending; they are headlining. They will be rubbing shoulders with tech giants like Elon Musk and stars like Chrissy Teigen and John Legend.

This year’s festival will feature creator-focused panels, networking events, and even a dedicated “headquarters” for creators to meet advertisers. This change shows how creators are redefining the boundaries of advertising and marketing.

{{needcreator-component=”/blog-shortcodes/call-to-action”}}

What it’s like for creators at Cannes

Picture this: you’re sitting on an outdoor terrace overlooking one of the most breathtaking views in Cannes, complete with perfect lighting and makeup stations courtesy of Elf Cosmetics. This isn’t just a fantasy—it’s the new reality at Cannes, where creators can shoot content that screams luxury and exclusivity. Thea Skelton, vice president of events at Cannes Lions, says, “The backdrop is probably one of the best views in Cannes.”

And if the view isn’t enough to make you envious, consider the special “creator ticket” priced at a tempting €1,374 ($1,476)—about a third of the cost of a standard pass. It’s as if Cannes is saying, ‘Hop in, creators! The water is warm.’

Why the Cannes matters for creators

There is a major shift in how advertisers view and use the influence of creators. 

As Ammar Kandil, co-founder of Yes Theory, puts it, “Creators are the ones who have people’s attention through the work that we do. Ultimately, advertising is based on being able to monetize that attention.”

For creators, this festival is a golden opportunity to mingle with top advertising executives. It’s a chance to forge new partnerships and make deals that could elevate their brands to new heights. 

Samir Chaudry of Colin & Samir highlights the rare opportunity to sit down face-to-face with marketers. “Those are people making decisions to spend with us, and learning the problems they are trying to solve teaches us a lot about our own business.”

Join Teachable with a free plan today and start owning your income and impact as a creator. Whether you’re a budding influencer or an established content creator, we bring the tools you need to turn your passion into a thriving business. Don’t wait—start completely free today.

{{likefree-component=”/blog-shortcodes/call-to-action”}}

Customer Training Best Practices: 7 Practical Tips for Optimal Results

Software Stack Editor · June 18, 2024 ·

.ez-toc-list.ez-toc-list-level-1 li:last-child {
display: none;
}

Customer training benefits not only your customers but also your business..Empowering customers to fully utilize your product significantly boosts their loyalty to your brand, positively impacting your business.

If you want to know the secrets to a successful customer education program, read on. In this post, we’ll explore the importance of customer training and share 7 best practices for achieving optimal results!

9000+ brands trust LearnWorlds to train their people, partners & customers.

Start a FREE Trial

Why is Customer Training Important?

It’s no coincidence that customer education is gaining more and more attention. Deploying a customer training program helps your business grow in multiple ways:

Prevent early customer churn

Customers who do not find value in your product soon after purchasing it or signing up for a trial are likely to give up on it. Offering customer onboarding that focuses on helping customers get started and realize the value of your product will help you prevent early customer churn.

How:

  • Accelerating time to value: Offering customer onboarding will help customers learn and use your product quickly.
  • Improving feature/product adoption: Customers who have access to training material and setup guides will discover more product features and capabilities.

Boost customer loyalty

Every business owner understands that converting new customers into repeat clients is the best news for their business. Loyal customers spend more, buy more often, and spread the word about your company.

Customer education can help you not only prevent churn but also boost loyalty and long-term customer retention rates.

How:

  • Enhancing the customer experience: The customer experience expands from the first time a prospective client hears about your business through their time as a customer. Providing support for them enhances this experience throughout.
  • Increasing customer satisfaction and customer loyalty: Customers are happy when they feel their money is spent wisely and when they receive the level of service they expect (or better!).
  • Maintaining communication with customers: A customer training program offers you several opportunities to communicate with your customers via email, customer support reps, customer success managers, social media, and more. Therefore, you achieve higher customer engagement and build a strong relationship with them.

Strengthen your brand

A customer education program boosts your brand’s presence in the market and keeps it top of mind with your customers. It also reinforces your brand identity by consistently presenting your brand elements throughout the learning experience.

How:

  • Showcasing your brand: Using your branding in the learning environment and every point of communication, your brand imprints in your customers’ minds. Also, your brand is mentioned more often on social media and through advertising.
  • Increasing the perceived value of your product: Deploying customer training is a big deal, especially if you decide to offer multiple training resources – and customers can realize that. The more you offer in terms of customer education, the more valuable your product becomes.
  • Building brand advocates: Brand loyalty is contagious! As we said, happy customers will spread the word about you. By offering them an incentive, they can leave reviews on review sites and social media, helping more people discover your brand and expanding your customer base.

Build a financially robust company

Effective customer training can positively impact your bottom line and help you build a financially robust business. By ensuring customers can fully utilize your product and are happy with your service, you increase satisfaction and foster loyalty.

How:

  • Increasing customer lifecycle: Customer training keeps customers happy with your product and prevents churn at any point during the customer lifecycle.
  • Increasing customer lifetime value (CLV): Repeat customers spend more because they trust your brand. They’ll prefer to buy more of your products than experiment with another brand.
  • Reducing customer support costs: Offering a proper customer onboarding process and training material for new and older customers will eventually reduce customer support costs since customers will have the resources they need to navigate your product and troubleshoot simple issues.

7 Practical Tips to Follow When Building a Customer Training Program

Now that we’ve seen the benefits of customer training, let’s see how you can implement it right to get the most out of it:

1. Plan before you act

The road to success starts with careful planning. Here are a few items to check off your list as you prepare for your custom training program.

✅ Segment your training audience: Start with identifying the different kinds of customers you want to train. This differentiation will come from the type of product and business model. Maybe you have a set of clients per use case, or maybe you have the same product spread across geographies, or different levels of accessibility.
✅ Align with business goals: Customer training should be tied to specific business goals you want to achieve. Focus on measurable, achievable goals using the SMART methodology. These goals can help you set the learning objectives of the course and can also be used later on to measure the effectiveness of the program.
✅ Build customer personas: If you haven’t done so already, now is the time to build customer profiles – their pain points and goals, their knowledge level, how much time they have available and how they will access training, etc.
✅ Decide what type of training you want to offer and who will create it: Very often, the Customer Enablement Manager will oversee the process. There are also different customer onboarding strategies to follow, some including more involvement from human resources and others less. Choose the one that best matches your needs and your available resources.

2. Select a flexible customer training platform

A flexible customer training platform can not only meet customer needs but also yours, facilitating admin tasks as your program grows. What does a flexible training solution look like?

✅ It’s as comprehensive as possible, offering an all-in-one solution that covers your training, admin, branding, and communication needs, so that you use the least amount of tools.
✅ It integrates with tools you already have, like your CRM or customer service software.
✅ It’s customizable so that you can shape it into a product that works for you. Branding capabilities are an additional important consideration.
✅ It’s scalable so that you can deploy training at a large scale in different languages, for different audiences if needed.
✅ It offers rich features, like multiple delivery methods, support for different training content, a report system, and more.

All in all, you should opt for a platform that grows with you. There’s no need to invest in a huge, expensive LMS that takes ages to set up. You should be able to rely on an LMS that allows you to start fast and grows along with your needs

One such solution is a Learning Management System like LearnWorlds, offering the above and additional features like:

  • Content authoring tools
  • Website Builder
  • Custom User Roles and User groups for easier administration and access control
  • Clone & Sync for fast school creation and content repurposing
  • Multiple schools so you can have a centralized environment where you can manage multiple academies at once
  • AI tools for course outline, learning objective, assessment, and feedback generation
  • Copyrights protection
  • CRM and customer service integrations
  • Community for better customer engagement
  • API, Webhooks & SSO to connect with the existing tech stack and ensure quick set up and efficiency
  • Native, white-label mobile app

9000+ brands trust LearnWorlds to train their people, partners & customers.

Start a FREE Trial

3. Offer accessible training resources

It’s important that customers can easily access your training resources and that you’re not limiting them to in-person or real-time support only. This, in fact, is neither feasible nor financially viable. Some ways you can ensure customers receive round-the-clock support are:

  • Use an LMS for easy distribution and higher scalability: An LMS provides one centralized location where you can maintain an easy-to-update knowledge base with any type of content you need, offer live or on-demand webinars and training sessions, or launch a training course.
  • Launch a mobile app: Learners take it as a given that the course and other material will display well on their mobile devices. Taking it a step further, you can launch your own mobile app to enhance the experience with learning reminders and in-app notifications.
  • Offer different resources: Don’t stick to one type of resource or even one location. While an LMS can host most of your material, you can also offer support via chatbots, your customer support/success team, social media chat, and a knowledge base on your website.

Remember that your training should be easily accessible by your customers but at the same time protected from non-authorized sharing. Therefore, choose an LMS with advanced security features.

4. Focus on engagement & effectiveness

Engagement and effectiveness often go hand in hand when it comes to learning. A learner who is distracted or bored is unlikely to retain knowledge. Likewise, a learner who is immersed in the learning experience is more likely to learn better and faster.

  • Create microlearning content: Small modules that last only a few minutes are not only more engaging but also more effective in imparting knowledge. Quizzes, infographics, and micro-videos are excellent resources for microlearning courses.
  • Offer different content formats: Do so to accommodate different learning styles and learning needs. Interactive video tutorials are very popular for demonstrating simple tasks step by step, while text-heavy manuals and user guides are more suitable if you need to go deep into technical details.
  • Create simulations: Simulations help with product knowledge for more complex products or those that require careful handling. Although they’re more common in employee training initiatives, you can create simple simulation assessments as part of an online course.
  • Offer a certificate: Adding a certificate at the end of the course is an excellent way to add value to your course and also to motivate learners to go through all the essential material that will help them take full advantage of your product. Tie the certificate to an exam to add credibility.
  • Host live sessions and webinars: The ultimate interactive experience, live online sessions will allow customers to interact directly with you and get a better sense of your brand while addressing any questions they have.
  • Add quizzes: Quizzes are a great way to reinforce learning through repetition. Combine quizzes with gamification elements, like badges, to make them even more fun and rewarding.

5. Promote your training program properly

Do customers know about all the available resources you’ve built for them? Here are some ways to make sure they do:

  • Use email communications, or let your customer support team and customer success managers tell customers that there are on-demand resources available for them.
  • Your sales team can also communicate and use your customer training program as an additional selling point.
  • Add a section on a prominent spot on your website.
  • Link to the resources in the product itself.

6. Brand everything

We discussed how effective customer training can help boost your brand. So, to achieve this, make sure your brand is (discreetly) in the spotlight by using a white-label platform that you can brand and by adding anything that signifies your brand on every touch point.

7. Monitor & improve

Monitoring the impact of your customer training strategy is crucial to determine if it has achieved the desired business results and to gauge customer satisfaction.

This will help you make necessary adjustments and continually improve the training experience.

How:

  • Create feedback surveys to gain valuable insights into how learners perceived the training experience firsthand.
  • Check business metrics and KPIs to see if your specific needs and goals have been met (but be patient!).
  • Monitor LMS reports to know in real-time how learners behave and interact with the training modules.

A Successful Business Starts With Customer Training

Closing a sale is not the end of the customer journey or the hallmark of success for your business. On the contrary, the challenge to retain the customer just begins!

A well-designed customer training program is instrumental in helping customers realize the full value of your product, fostering loyalty, and encouraging repeat business. By investing in customer training, you can enhance user experience and drive long-term success for your business.

Invest in a customer education platform like LearnWorlds to make sure you can streamline this ambitious endeavor and have access to all the tools you need for a successful training program! Try LearnWorlds now with a 30-day free trial.

9000+ brands trust LearnWorlds to train their people, partners & customers.

Start a FREE Trial

Further reading

  • What is an LMS (Learning Management System)?
  • The 19 Best Learning Management Systems
  • SCORM 101: The Definitive Guide to Choose a SCORM Compliant LMS
  • 18 Best Online Course Platforms Comparison Guide
  • 10 Best WordPress LMS Plugins Comparison
  • The Benefits of Mobile Learning: Unveiling Its Power and How It Works
  • The Essential Guide on How to Create Cohort-Based Courses

The post Customer Training Best Practices: 7 Practical Tips for Optimal Results appeared first on LearnWorlds.

  • « Go to Previous Page
  • Page 1
  • Interim pages omitted …
  • Page 25
  • Page 26
  • Page 27
  • Page 28
  • Page 29
  • Interim pages omitted …
  • Page 35
  • Go to Next Page »

Get your Software Stack together. softwarestack.tech

Software Stack

© 2024–2025 - Software Stack is a trading name of SouthwestCIO Limited ac ompany registered in England & Wales 11319049

  • Knowledgebase
  • Home
  • About Us
  • Contact Us